Table of Contents
Advertisement
Quick Links
FM/AM
Compact Disc Player
Owner's Record
The model and serial numbers are located on the
bottom of the unit.
Record the serial number in the space provided below.
Refer to these numbers whenever you call upon your
Sony dealer regarding this product.
Model No. CDX-G3205UV
Serial No.
To cancel the demonstration (DEMO) display, see
page 13.
For the connection/installation, see page 26.
Pour annuler l'affichage de démonstration (DEMO),
reportez-vous à la page 13.
Pour le raccordement/l'installation, reportez-vous à
la page 27.
CDX-G3205UV
4-595-967-11(1)
Operating Instructions
Mode d'emploi
GB
FR
Advertisement
Table of Contents

Related Manuals for Sony CDX-G3205UV


Summary of Contents for Sony CDX-G3205UV
- Page 1 The model and serial numbers are located on the bottom of the unit. Record the serial number in the space provided below. Refer to these numbers whenever you call upon your Sony dealer regarding this product. Model No. CDX-G3205UV Serial No. To cancel the demonstration (DEMO) display, see page 13.
-
Page 2: Warning
For safety, be sure to install this unit in the Warning dashboard of the car as the rear side of the unit becomes hot during use. FOR THE CUSTOMERS IN THE USA. For details, see “Connection/Installation” NOT APPLICABLE IN CANADA, (page 26). - Page 3 Disclaimer regarding services offered by third parties Services offered by third parties may be changed, suspended, or terminated without prior notice. Sony does not bear any responsibility in these sorts of situations.
-
Page 4: Table Of Contents
Connection/Installation Table of Contents Cautions ......26 Warning ......2 Parts List for Installation . -
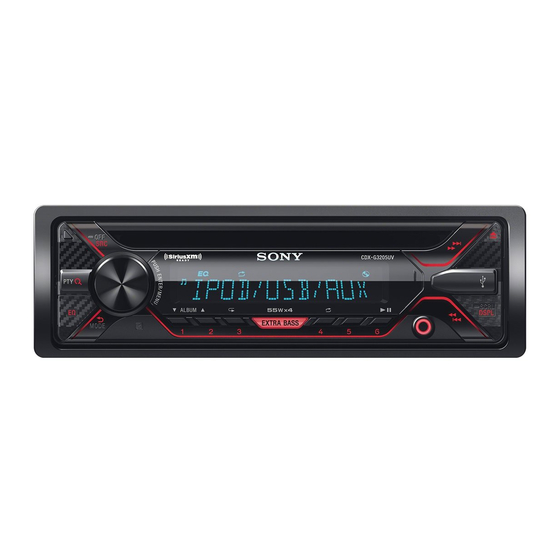
Page 5: Guide To Parts And Controls
Guide to Parts and Controls Main unit Front panel release button PTY (program type) Select PTY in RDS. SRC (source) Turn on the power. (browse) (page 10, 12, 13) Change the source. Enter the browse mode during playback. (Not available when a USB device in Android™... - Page 6 Number buttons (1 to 6) RM-X211 Remote commander Receive stored radio stations. Press and hold to store stations. ALBUM / Skip an album for audio device. Press and hold to skip albums continuously. (Not available when a USB device in Android mode or iPod is connected.) Press ...
-
Page 7: Getting Started
Resetting the Unit Getting Started Before operating the unit for the first time, or after replacing the car battery or Detaching the Front Panel changing connections, you must reset the unit. You can detach the front panel of this unit to Press DSPL and (back)/MODE for prevent theft. -
Page 8: Connecting A Usb Device
Connecting a USB Device Listening to the Radio Turn down the volume on the unit. Connect the USB device to the unit. Listening to the Radio To connect an iPod/iPhone, use the USB To listen to the radio, press SRC to select connection cable for iPod (not supplied). -
Page 9: Using Radio Data System (Rds)
Using Radio Data System Listening to the SiriusXM (RDS) Radio Selecting program types (PTY) Activating your SiriusXM Subscription Press PTY during FM reception. Only SiriusXM brings you more of what you Rotate the control dial until the love to listen to, all in one place. Get over desired program type appears, then 140 channels, including commercial-free press it. - Page 10 Notes To change the passcode • The activation process usually takes 10 to 15 Press MENU and rotate the control dial. minutes, but may take up to an hour. Select [GENERAL] [SXM PARENTAL] • Your radio will need to be turned on and receiving the SiriusXM signal to receive the activation [CODE EDIT].
-
Page 11: Playback
• Playback of the following files is not supported. MP3/WMA/FLAC: – copyright-protected files Playback – DRM (Digital Rights Management) files – Multi-channel audio files MP3/WMA: Playing a Disc – lossless compression files Before making a connection, select the USB Insert the disc (label side up). mode (Android mode or MSC/MTP mode) depending on the USB device (page 14). -
Page 12: Listening To Pandora
Searching a track by name (Quick- BrowZer™) Listening to Pandora® Not available when a USB device in Android mode or iPod is connected. Pandora® is available to stream music through your iPhone. You can control During CD or USB playback, press Pandora®... -
Page 13: Settings
Using the station list Settings The station list allows you to easily select a desired station. Canceling the DEMO Mode During playback, press (browse). Press SEEK + to select the sorting You can cancel the demonstration display order [BY DATE] or [A TO Z]. which appears when the source is off and the clock is displayed. -
Page 14: General Setup (General)
EDIT CUSTOM General Setup (GENERAL) Registers the functions (SOURCE, ATT, VOL +/–, SEEK +/–) to the steering wheel remote control: DEMO (demonstration) Rotate the control dial to select the Activates the demonstration: [ON], [OFF]. function you want to assign to the steering wheel remote control, then CLOCK-ADJ (clock adjust) (page 7) press it. -
Page 15: Sound Setup (Sound)
SXM RESET BALANCE Initializes the SiriusXM Connect Vehicle Adjusts the sound balance: [RIGHT-15] – Tuner settings (preset channels/parental [CENTER] – [LEFT-15]. lock): [YES], [NO]. FADER (Available only when SiriusXM is Adjusts the relative level: [FRONT-15] – selected.) [CENTER] – [REAR-15]. FIRMWARE S.WOOFER (subwoofer) (Available only while the source is off and... -
Page 16: Display Setup (Display)
DSPL-C (display color) Display Setup (DISPLAY) Sets a preset color or customized color for the display. DIMMER COLOR Changes the display brightness: [ON], Selects from 15 presets colors, 1 [OFF], [CLK]. customized color. To set this function to be active only CUSTOM-C (custom color) during a fixed period, select [CLK], then Registers a customized color for the... -
Page 17: Additional Information
• This unit is designed to play discs that conform to the Compact Disc (CD) standard. DualDiscs and some of the music Additional Information discs encoded with copyright protection technologies do not conform to the Updating the Firmware Compact Disc (CD) standard, therefore, these discs may not be playable by this To update the firmware, visit the support site unit. -
Page 18: Maintenance
If you have any questions or problems the connectors with a cotton swab. Do not concerning your unit that are not covered in apply too much force. Otherwise, the this manual, consult your nearest Sony connectors may be damaged. dealer. Notes •... -
Page 19: Specifications
USB Player section Specifications Interface: USB (Full-speed) Maximum current: 1 A FOR THE CUSTOMERS IN THE USA. NOT The maximum number of recognizable APPLICABLE IN CANADA, INCLUDING IN tracks: THE PROVINCE OF QUEBEC. – folders (albums): 256 – files (tracks) per folder: 256 POUR LES CLIENTS AUX ÉTATS-UNIS. - Page 20 Package contents: Android is a trademark of Google Inc. Main unit (1) libFLAC Remote commander (1): RM-X211 Parts for installation and connections Copyright (C) 2000-2009 Josh Coalson (1 set) Copyright (C) 2011-2013 Xiph.Org Foundation Optional accessories/equipment: Redistribution and use in source and binary SiriusXM Connect Vehicle Tuner: SXV100, forms, with or without modification, are SXV200, SXV300...
-
Page 21: Troubleshooting
During playback or reception, the Troubleshooting demonstration mode starts. If no operation is performed for 5 minutes The following checklist will help you remedy with [DEMO-ON] set, the demonstration problems you may encounter with your unit. mode starts. Before going through the checklist below, –... - Page 22 Audio file cannot be played. USB device formatted with file systems PTY displays [- - - - - - - -]. other than FAT16 or FAT32 are The current station is not an RDS station. unsupported.* RDS data has not been received. * This unit supports FAT16 and FAT32, but some USB ...
-
Page 23: Messages
USB NO DEV: A USB device is not connected Messages or recognized. Make sure the USB device or USB cable is The following messages may appear or flash securely connected. during operation. USB NO MUSIC: There is no playable file. CD ERROR: The disc cannot be played. - Page 24 For SiriusXM operation: NOT ALLOWED: The selected operation is not allowed. CH LOCKED “Thumbs” feedback is not allowed. The channel that you have requested is – Wait until the commercial ends. locked by the radio parental control – Some functions, such as Shared Station, feature.
- Page 25 If these solutions do not help improve the – Verify that your vehicle is outdoors with situation, consult your nearest Sony dealer. a clear view of the sky. If you take the unit to be repaired because of – Verify that the SiriusXM magnetic mount...
-
Page 26: Connection/Installation
Parts List for Installation Connection/Installation Cautions • Run all ground (earth) leads to a common ground (earth) point. × 2 • Do not get the leads trapped under a screw, or caught in moving parts (e.g., seat ... -
Page 27: Connection
Connection Subwoofer* Power amplifier* Satellite radio tuner (SiriusXM)* White White/black striped Front speaker* Gray Gray/black striped Green Green/black striped Rear speaker* Purple Purple/black striped Black Yellow For details, see “Making connections” (page 28). Blue/white striped from a wired remote control (not supplied)* from a car antenna (aerial) *1 Not supplied... - Page 28 Memory hold connection Making connections When the yellow power supply lead is To a common ground (earth) point connected, power will always be supplied to the memory circuit even when the ignition First connect the black ground (earth) switch is turned off. lead, then connect the yellow and red power supply leads.
-
Page 29: Installation
Mounting the unit in the Installation dashboard • Before installing, make sure the catches on Removing the protection collar both sides of the bracket are bent and the bracket inwards 2 mm ( in). • For Japanese cars, see “Mounting the unit Before installing the unit, remove the in a Japanese car”... - Page 30 Detaching and attaching the front You may not be able to install this unit in panel some makes of Japanese cars. In such a case, consult your Sony dealer. For details, see “Detaching the Front Panel” (page 7). TOYOTA ...
- Page 31 Web suivant : http://esupport.sony.com/ If you have any questions/problems regarding this product, try the following: Read Troubleshooting in these Operating Instructions. Please contact (U.S.A. only); 1-800-222-7669 Call http://www.SONY.com ©2016 Sony Corporation Printed in Thailand http://www.sony.net/...
Need help?
Do you have a question about the CDX-G3205UV and is the answer not in the manual?
Questions and answers