Table of Contents
Advertisement
Quick Links
Model:
For your convenience, we recommend to attach the serial number label HERE.
As part of Parmco Appliances commitment to improving and updating product ranges,
we reserve the right to alter, change and update technical specifications and appearance
attributes of all Parmco Appliances products. E&OE.
Installation
and Operating
Instructions
HOB6S-4E-4
HOB6W-4E-4
727626122014
Advertisement
Table of Contents

Subscribe to Our Youtube Channel
Summary of Contents for Parmco HOB6S-4E-4
- Page 1 HOB6W-4E-4 For your convenience, we recommend to attach the serial number label HERE. As part of Parmco Appliances commitment to improving and updating product ranges, we reserve the right to alter, change and update technical specifications and appearance attributes of all Parmco Appliances products. E&OE.
- Page 2 Parmco Appliances before any installation is carried out. We hope you enjoy your new appliance. If you would like to nd out more about this product or any other products in Parmco’s extensive range, visit us on the web at www.parmco.co.nz. Regards,...
-
Page 3: Table Of Contents
Congratulations on the purchase of your new appliance. Now that you have your new cooktop, please take the time to do a couple of very simple tasks. Read the user instructions contained in the first section of this booklet. Your new appliance has been designed and manufactured to the highest standards and incorporates a host of innovative styling and technical features. -
Page 4: Safety Instructions
Safety Instructions Your safety is important. Please read these instructions carefully before installing or using this appliance. Inflammable materials or products should not be placed on this appliance at any time. Installation of the appliance and its connection to the electrical mains must only be carried out by a QUALIFIED PERSONNEL. -
Page 5: Description Of The Appliance
If malfunctions occur do not attempt to repair the appliance yourself. First refer to the troubleshooting section of this manual. If you do not find the necessary information, contact a service agent or the Parmco's Service Department. Servicing work on this appliance must be carried out by a qualified technician only. -
Page 6: Use
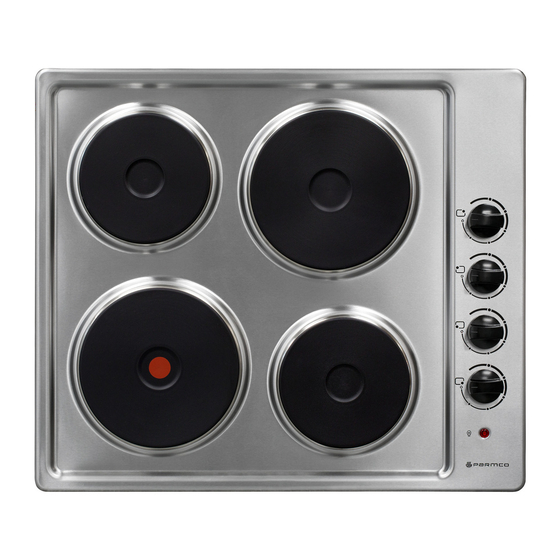
Operation of the electric plates The electric plates can be standard or rapid type. The rapid type plates are distinguished by a red mark at the centre. According to your needs, the heat of the plates can be adjusted by turning the knobs either clockwise or anti-clockwise. ... -
Page 7: Utensils
vice on th he use of c cooking to To save en ergy and to o extend the e life of the electric coo oktop, we a dvise using pans with flat b ottom and w with a diam meter not le sser than th he diameter... -
Page 8: Troubleshooting
Check if there is an power outage. does not turn If you've checked everything and the problem persists, call a qualified electrician or Parmco's Service Department. Use cookware with flat, smooth base. Use of improper cookware. -
Page 9: Installation
Installation Electrical connection Appliances with three-pole cable are set up for operation with single phase alternating current at the voltage and frequency indicated on the rating plate (220-240V/50Hz). The connection to the electricity supply must be made by a qualified person and following the regulations in force. -
Page 10: Ensuring Adequate Ventilation
TECHNICAL INFORMATION FOR INSTALLATION PERSONNEL This appliance must only be installed only an authorised personnel and in accordance with the regulations in force. The wall and bench surfaces must be capable of sustaining temperatures of 75°C. All laminates, fixing adhesive and surfacing materials should be certified suitable for this temperature. -
Page 11: Fastening The Fixing Brackets
Fastening the fixing brackets The unit should be first placed on a stable, smooth surface then: Turn the cooktop upside down and place it on a soft surface. Fasten the brackets to the appropriate holes. DO NOT tighten the screws at this stage. Apply the sealing strips around the edge of the cooktop. -
Page 12: Technical Specifications
Do not use a silicon sealant to seal the appliance against the aperture. This will make it difficult to remove the hob requires servicing. Technical specifications Cooking Hob HOB6S-4E-4, HOB6W-4E-4 Supply Voltage 220 – 240V/ 50-60Hz Installed Electric Power... - Page 13 Please retain this Warranty card together with receipt or other proof of purchase date when seeking service during the warranty period • Normal or scheduled maintenance including blocked filters or ducting. • Consumable items such as light bulbs. • Any damage to ceramic glass hobs caused by spills when cooking. • Any breakage or damage of glass items. Please contact Parmco at 09 573 5678 if your • Any damage caused by non recommended product used for cleaning, appliance needs servicing under warranty. Please maintaining, lubricating or similar. have your model number and proof of purchase ready. • Any aspect relating to the installation of the product, or damage caused Warranty repairs must be authorized by Parmco. during installation including blocked access for repair. • Any third party (including reseller) or consequential loss or damage (direct or indirect) however arising. Subject to updates without prior notice, please visit www.parmco.co.nz for E & O.E. 727626112014 the latest version.
Need help?
Do you have a question about the HOB6S-4E-4 and is the answer not in the manual?
Questions and answers