Table of Contents
Advertisement
Quick Links
Advertisement
Table of Contents

Subscribe to Our Youtube Channel
Summary of Contents for Trojan SPIN 150
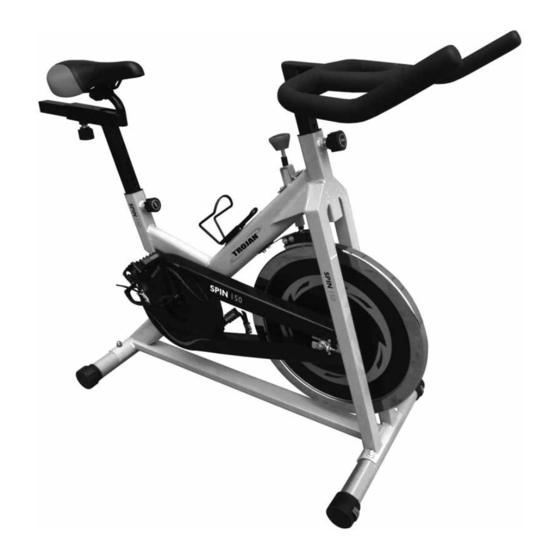
- Page 1 SPIN 150 SPINNING BIKE SPINNER CARE, INSTRUCTION AND ASSEMBLY MANUAL 10226...
-
Page 2: Table Of Contents
INDEX PAGE SAFETY INSTRUCTIONS PRE ASSEMBLY CHECK LIST HARDWARE LIST ASSEMBLY STEPS FITNESS TIPS AND TECHNIQUES CONDITIONING GUIDELINES WARM-UP AND COOL-DOWN FREQUENTLY ASKED QUESTIONS PARTS LIST EXPLODED DRAWING TROJAN 1 YEAR LIMITED WARRANTY TROJAN REPAIRS PROCEDURE 10226... -
Page 3: Safety Instructions
1. SAFETY INSTRUCTIONS It is the sole responsibility of the purchaser of TROJAN products to read the owner’s manual, warning labels and instruct all individuals, on proper usage of the equipment. Understanding each and every warning to the fullest is important. If any of these instructions or warnings are unclear please contact Trojan Customer Services on 0861 876 526 (0861 Trojan), within the Republic of South Africa. - Page 4 • This TROJAN SPIN 150 SPINNER may not be used by persons weighing more than 100 kg. SAVE THIS INSTRUCTION MANUAL FOR FUTURE USE AND REFERENCE If any of these instructions or warnings are unclear please contact Trojan Customer Services on 0861 876 526 (0861 Trojan), within the Republic of South Africa or visit www.trojanhealth.co.za.
-
Page 5: Pre Assembly Check List
look better and enjoy life to its fullest. Yes, it’s a proven fact that a regular exercise program can improve your physical and mental health. Too often, our busy lifestyles limit our time and opportunity to exercise. The TROJAN SPIN 150 SPINNER provides a convenient and simple method to begin your assault on getting your body in shape and achieving a healthier lifestyle. Before reading further, please review the drawing below and familiarize yourself with the parts that are labeled. -
Page 6: Hardware List
3. HARDWARE LIST DESCRIPTION Q’TY NOTE: The parts mentioned above are all the parts you need to assemble this Cap Nut M8 equipment. Before you start to assemble, Washer φ16 x φ8.5 x 1.5 please check the hardware packing to make sure all parts are included. Combination Spanner Front Stabiliser Round Head Bolt M8 x 60 Rear Stabiliser Pedal ( R ) - Page 7 4. ASSEMBLY STEPS ( CONT.) STEP 3. PEDAL ASSEMBLY • T hread the Right Pedal (7) that has “R” on the spindle, onto the Right Side Arm of the bike using the Combination Wrench (3). NOTE: The R Pedal is right-hand threaded which needs to be turned clockwise to tighten. • T hread the Left Pedal (8) that has “L” on the spindle onto the Left Side Arm of the bike using the Combination Wrench (3). NOTE: The L pedal is left-hand threaded which needs to be turned counter clockwise to tighten.
-
Page 8: Fitness Tips And Techniques
The Heart and Stroke Foundation South Africa encourages all South Africans to make heart-healthy choices that include daily physical activity, exercise and a balanced diet. Use Trojan, SA’s No. 1 selling Home Fitness brand to gives you the ability to boost your fitness level and lower your risk of cardiovascular disease. -
Page 9: Conditioning Guidelines
6. CONDITIONING GUIDELINES How you begin your exercise program depends on your physical condition. If you have been inactive for several years, or are severely overweight, you must start slowly and increase your time on the equipment; a few minutes per workout. Initially, you may be able to exercise only for a few minutes in your target zone, however, your aerobic fitness will improve over the next six to eight weeks. Don’t be discouraged if it takes longer. It’s important to work at your own pace. Ultimately, you’ll be able to exercise continuously for 30 minutes. The better your aerobic fitness, the harder you will have to work to stay in your target zone. Please remember these essentials : • Have your doctor review your training and diet programs to advise you of a workout routine you should adopt. • Begin your training program slowly with realistic goals that have been set by you and your doctor. • Monitor your pulse frequently. Establish your target heart rate based on your age and condition. • Set up your equipment on a flat, even surface at least 3 feet from walls and furniture. EXERCISE INTENSITY To maximize the benefits of exercising, it is important to exercise with the proper intensity. -
Page 10: Warm-Up And Cool-Down
7. WARM-UP AND COOL-DOWN WORKOUT GUIDELINES Each workout should include the following three parts: • A warm-up, consisting of 5 to 10 minutes of stretching and light exercise. A proper warm-up increases your body temperature, heart rate, and circulation in preparation for exercise. • Training zone exercise, consisting of 20 to 30 minutes of exercising with your heart rate in your training zone. (Note: During the first few weeks of your exercise program, do not keep your heart rate in your training zone for longer than 20 minutes.) • A cool-down, with 5 to 10 minutes of stretching. This will increase the flexibility of your muscles and will help to pre vent post-exercise problems. EXERCISE FREQUENCY To maintain or improve your condition, plan three workouts each week, with at least one day of rest between workouts. After a few months of regular exercise, you may complete up to five workouts each week, if desired. -
Page 11: Frequently Asked Questions
8. FREQUENTLY ASKED QUESTIONS - SPIN 150 1. How do I maintain the cosmetics of my spinner? • Polish the entire spinner, including all painted and chrome areas. Make sure to purchase a good quality polish for your bike. • Polish the flywheel of your spinner very carefully. This will ensure the brakes have a good surface to operate on. 2. How do I lubricate the moving parts of the spinner? •... -
Page 12: Parts List
9. PARTS LIST Part No. Description Part No. Description Main Frame Nylon Nut M8 Front Stabiliser Lower Hand Pulse Wire Rear Stabiliser Crank Arm (L/R) Front Post Chain Cover (L/R) Seat Post Self Tapping Screw ST 5 x 15 Handlebar French Nut Seat Crank Cover... -
Page 13: Exploded Drawing
10. EXPLODED DRAWING - 13 10226... -
Page 14: Trojan 1 Year Limited Warranty
The consumer does not need to return the product to the store. The consumer shall phone the Trojan hotline on 0861 876526 (0861 Trojan) and the manufacturer’s authorized agent will at its discretion either repair the item at the consumer’s residence or collect and repair the item at their premises. -
Page 15: Trojan Repairs Procedure
12. TROJAN REPAIRS PROCEDURE 1. Procedure for repairs Should you experience any faults or breakdowns on your Trojan equipment, please adhere to the following procedure to have the fault rectified speedily and professionally. • Do not return the product to the store* • Call 0861 Trojan (0861 876526) to log the faulty product (under warranty or out of warranty) • The operator will try identify the fault, and will book a service team call out. • The service team will call you to agree a date and time to collect the faulty product. • Items repaired in our service centre will be returned to your home on an agreed date and time. * Note: Should you live in an outlying area, it may be necessary to return the product to the store nearest to you. Our service operator will advise you of your repair procedure.
Need help?
Do you have a question about the SPIN 150 and is the answer not in the manual?
Questions and answers