Table of Contents
Advertisement
Advertisement
Table of Contents

Related Manuals for Touch T526S

Summary of Contents for Touch T526S
- Page 1 OWNER’S MANUAL CARAFE READY T526S...
- Page 2 3. Install the brewer in proper location as instructed in this manual. 4. Do not use accessory parts not recommended by Touch Coffee & Beverages, LLC. Using unauthorized accessory parts may result in fire, electrical shock or injury to persons.
- Page 3 SAVE THESE INSTRUCTIONS Warning to users and parents 1. Brewer injects EXTREMELY HOT WATER! DO NOT let children use the brewer without adult supervision. 2. After brewing cocoa or soluble, IMMEDIATELY RUN an 8 oz. brew cycle without the Pod in the brewer to rinse the brewer. This will avoid clogging up the two Needles in the Red Cup Holder.
-
Page 4: Table Of Contents
TABLE OF CONTENTS Using Touch’s T526S Brewing System PART 1. SET-UP Helpful Hints ................................Unpacking Instructions ............................. Product Features ..............................PART 2. BREWING A CUP Setting Up Your Brewer ............................Ready to Brew Your First Cup ..........................Stopping the Brew Process ............................ -
Page 5: Part 1. Set-Up
12 -18 oz cup of coffee; and use our Refill Jumbo Cup to brew strong 26 oz of coffee into the Carafe. 4. T526S model offers seven cup sizes (6 oz, 8 oz, 10 oz, 12oz, 14 oz, 16 oz, 18 oz), and one (CARAFE for 26 oz) family size for use with the Reill Jumbo Cup and Carafe. -
Page 6: Product Features
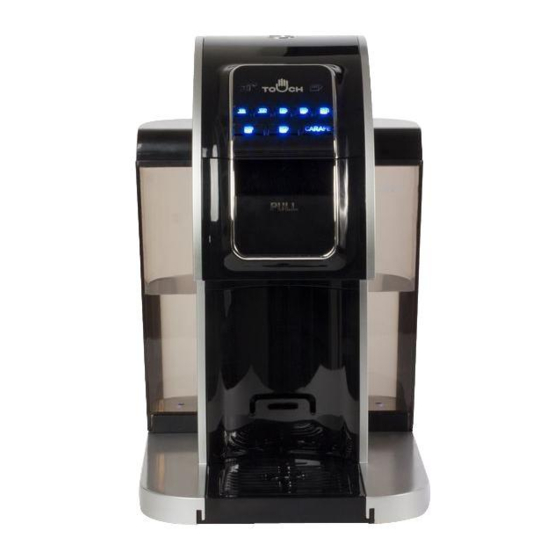
PART 1. SET-UP Product Features T526S Brewer parts Controls and Indicators Cover Power Button Cover Handle Low Water Indicator Red Cup Holder Brewing Indicating Light Deep Well 6 oz Button Housing 8 oz Button Power Cord 10 oz Button Drip Tray Slots... -
Page 7: Part 2. Brewing A Cup
PART 2. BREWING A CUP Setting Up Your Brewer IMPORTANT: DO NOT use the brewer until it has been set-up for its first use. NOTE: If the brewer has been exposed to temperatures below freezing, allow the brewer at least two hours to reach room temperature before using it. A frozen or extremely cold brewer may not operate properly. - Page 8 PART 2. BREWING A CUP Setting Up Your Brewer (Continued) CAUTION: DO NOT pull the Latch to open the Cover during the brewing period. (Fig. 4) CAUTION: Extremely Hot Water! (Fig. 5) 8. With the cover closed, press the 10 oz Button to start the brewing cycle. (Fig. 5) The brewing indicating light on the upper right corner will stay ON while the brewer is warming up.
-
Page 9: Ready To Brew Your First Cup
XBold cups; use 14-18 cup size for our XLarge cups; and use Carafe button with our Refill Jumbo Cup and Carafe. Touch Coffee & Beverages is NOT affiliated with Keurig, Inc. Keurig® and K-Cup® are register trademarks of Keurig, Inc. - Page 10 PART 2. BREWING A CUP Ready to Brew Your First Cup (Continued) NOTE: If you do not push a cup size button to start brewing within 60 seconds, the brewer will be disabled to prevent accidental activation. Re-activate the Brewer by pulling on the Latch and Closing the Cover again. 5.
-
Page 11: Stopping The Brew Process
PART 2. BREWING A CUP Stopping the Brew Process If you need to stop the brewing process for any reason, then press on the Power Button to turn OFF the brewer. NOTE: If the brewer is turned ON after terminating the previous brewing process, the next brewing cycle may NOT brew a full cup. We recommend performing a brewing cycle without the POD, and then restart the brewing cycle with a POD in the Red Cup Holder. -
Page 12: Adding Water
PART 2. BREWING A CUP Adding Water The upper left blue Low Water Light will blink when the water level in the Water Tank is low or if the Water Tank has been removed. (Fig. 13) The brewer will not allow you to brew while the blue Low Water light is blinking. The brewer will shut off automatically if the Water Tank is not refilled within about 2 minutes. The Water Tank can be filled in two ways. -
Page 13: Part 3. Brewing A Carafe
PART 3. BREWING A CARAFE Brew Your Family Size Coffee 1. Twist the Lid off from the Refill Jumbo Cup. 2. Pack a desire amount of your own grind coffee into the Refill Jumbo Cup. NOTE: To fill a Travel Mug, pack just above the Minimum Fill Line, and use the 16 or 18 oz button. To fill a Carafe, pack up to the Maximum Fill Line, and use the Carafe button. -
Page 14: Part 4. Maintenance
PART 4. MAINTENANCE Cleaning External Parts We recommend regularly cleaning the brewer’s external components. CAUTION: Only use a moist cloth and if necessary a mild detergent (never use abrasive or aggressive detergents). Do not wash machine parts in the dishwasher. (Fig. 19) 1. -
Page 15: Cleaning The Red Cup Holder
PART 4. MAINTENANCE Cleaning the top Needle (Continued) CAUTION: Top Needle is very sharp. To avoid risk of injury, do not directly touch this Needle with your finger. (Fig. 21) Cleaning the Red Cup Holder 1. Open the Cover, and remove the Red Cup Holder from the brewer by pulling on it. (Fig. 22) 2. -
Page 16: Cleaning The Water Tank & Water Tank Lid
PART 4. MAINTENANCE Cleaning the Water Tank & Water Tank Lid CAUTION: DO NOT use a dishwasher to clean the Water Tank and its Lid. 1. Remove the Water Tank from brewer by tilting and lifting away from the Water Tank away from the brewer. (Fig. 26) 2. -
Page 17: De-Scaling Your Brewer
PART 4. MAINTENANCE De-scaling Your Brewer Depending on the quality of your water supply, calcium and scale may build up inside the brewer. Scale is non-toxic but build up of scale can hinder brewer performance. We recommend de-scaling the brewer every 3-6 months depending on the brewer usage. Follow these instructions for de-scaling: ITEMS NEEDED: large ceramic mug (do not use a paper cup), fresh water, 58 oz. - Page 18 PART 4. MAINTENANCE De-scaling Your Brewer STEP 2: FRESH WATER RINSE 1. Fill the Water Tank with fresh water but not beyond the MAX Fill Line. (Fig. 32) 2. Place a large mug on the Drip Tray and press the 14 oz button without a Pod. (Fig. 33) Throw away the heated water into the sink. (Fig. 34) 3.
-
Page 19: Part 5. Troubleshooting
PART 5. TROUBLESHOOTING Brewer does not have power. • Plug the brewer into an independent outlet. • Check to be sure that it is plugged in securely. • Plug into a different outlet. • Reset your home’s circuit breaker, if necessary. •... - Page 20 PART 5. TROUBLESHOOTING • On a rare occasion, the brewer may shut OFF while brewing. This may happen if the water in the water tank is too hot. This is done to protect the heating mechanism in the brewer. If this happens, let the brewer cool down and replace the water in the water tank with room temperature water. If the brewer continues to shut OFF while brewing after replacing the water, please contact the customer service.
-
Page 21: Part 6. Warranty
It is recommended that you fill out and return the warranty card enclosed with the brewer so that the purchase information will be stored in our system. Touch will, at its option, repair or replace a defective brewer without charge upon its receipt of proof of the date of purchase. If a replacement brewer is necessary to service this warranty, the replacement brewer may be new or reconditioned. - Page 22 Touch Customer Service to obtain a Return Merchandise Authorization (RMA) number. Touch brewers returned without an RMA number will be returned to the sender without servicing. Touch is committed to your satisfaction. If you have questions, just give us a call to have them answered quickly without leaving the comfort of your home. Touch Coffee & Beverages, LLC 15312 E.
- Page 23 I would like to receive product news and information and special offer as described in your Privacy Policy at www. touchbeverages.com / privacy-policy. First Name Mail the Warranty and Registration Card to: Last Name Touch Coffee & Beverages, LLC 15312 E. Valley Blvd. City of Industry, CA. 91746 U.S.A...
- Page 24 For Household Use Only To learn more about Touch, visit www.touchbeverages.com or Call Toll-Free: 844-20TOUCH (844-208-6824) © 2014 Touch, Incorporated All rights reserved...
Need help?
Do you have a question about the T526S and is the answer not in the manual?
Questions and answers
My motor is working but no water
The Touch T526S may not dispense water if the Water Tank is empty or not properly filled. If the blue Low Water light is blinking, the brewer will not allow brewing. Additionally, if the Water Tank is removed during brewing, it may cause an issue. Ensure the Water Tank is filled up to the MAX Fill Line and properly placed on the brewer. If the issue persists, check if the brewer is plugged into a properly grounded outlet.
This answer is automatically generated