Table of Contents
Advertisement
Quick Links
Advertisement
Table of Contents

Related Manuals for RuggedBook 350 Series

Summary of Contents for RuggedBook 350 Series
- Page 1 User’s Guide 350 Series Semi-Rugged Tablet PC...
- Page 3 Preface © Copyright 2012. All Rights Reserved. The information in this document is subject to change without prior notice in order to improve reliability, design and function and does not represent a commitment on the part of the manufacturer. In no event will the manufacturer be liable for direct, indirect, special, incidental, or consequential damages arising out of the use or inability to use the product or documentation, even if advised of the possibility of such damages.
-
Page 4: Conventions Of This Manual
Before you Start ONVENTIONS OF ANUAL This manual is intended to help you get the most from your new 350 Series Semi-Rugged Tablet Personal Computer. If you are an experienced user of computers and / or Microsoft’s Windows operating systems, you might find it useful to read the Getting Started Guide that is included in your package. - Page 5 13. If any of the following situations arise, have the equipment checked by a service personnel: The Power cord or plug is damaged. Liquid has penetrated into the equipment. The equipment has been exposed to moisture. The equipment has not worked well or you cannot get it working according to the user's guide.
- Page 6 20. Laser Warning: Laser Class I Product Caution - Invisible laser radiation when open avoid exposure to beam. 21. Danger of explosion if battery is incorrectly replaced. Replace only with the same or equivalent type recommended by the manufacturer. Dispose of used batteries according to the manufacturer's instructions or in accordance with local law.
-
Page 7: Things You Must Remember Before Working On Your Computer
HINGS OU MUST EMEMBER EFORE ORKING ON COMPUTER ET YOUR COMPUTER ACCLIMATE ITSELF Your computer can easily stand temperature extremes but it doesn’t like rapid changes in temperature, like going from the cold outdoors to a warm office. Rapid changes in temperature can cause water droplets to condense inside your case, threatening to damage the electronic parts inside. - Page 8 Introduction ELCOME Congratulations on purchasing your new 350 Series Semi-Rugged Tablet PC. Your computer features some of the latest advances in mobile computing technology. Tablet PC OWERING UP THE On the top of the 350, locate the power button and press it for a few...
-
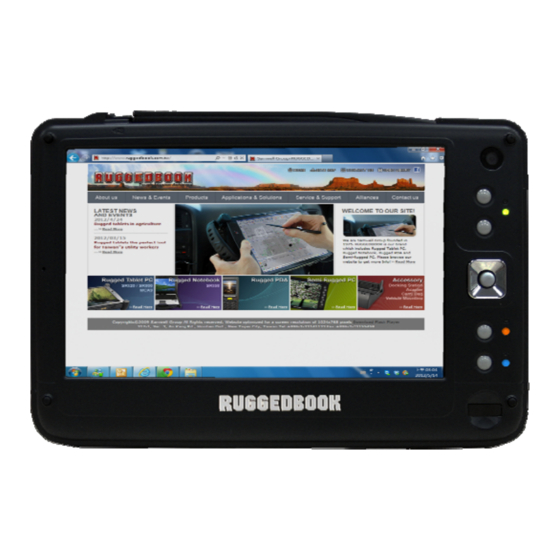
Page 9: Front Side Features
RONT EATURES Camera (option 1) Function Key 1 POWER LED Indicator Function Key 2 Five-way Track Point Battery Charge LED Indicator Function Key 3 WIFI LED Indicator Function Key 4 10. Fingerprint 11. Internal MIC... -
Page 10: Right Side Features
IGHT EATURES Power Button SD card slot PCMCIA Slot USB Port... -
Page 11: Left Side Features
EATURES LAN port Earphone Jack USB port VGA port (D-Sub 15 pins) DC-In Power Jack Mini USB port (option) - Page 12 EATURES 1. Kick Stand 2. Speakers 3. Battery 4. Mini USB port 5. GPS-antenna (option) 6. Camera (option 2) Attention the Camera function works on either option 1 or option 2 location.
-
Page 13: Bottom Side Features
OTTOM EATURES Docking Cradle Connector Port TRACK POINT This panel consists of the Track Point When you press the Track Point down , you will Enter the subject. -
Page 14: Status Display
TATUS ISPLAY The icons that appear below each of the individual system LED displays indicate the present status of the computer. Icon Keys LED Status Remarks Blue Press this button once to power Power on or enter the suspend/resume mode (blinking LED). Press this button for more than 4 seconds to power off the system. -
Page 15: Connecting The Ac Adapter
Getting Started ONNECTING TO AN XTERNAL OWER OURCE AC A ONNECTING THE DAPTER A universal AC adapter is provided to supply your computer with power and also to charge the computer’s battery pack. The adapter’s AC input can range anywhere from 100V to 240V, covering the standard voltages available in almost every country. -
Page 16: Turning On Your Computer
Whenever possible, keep the AC adapter plugged into the computer and an electrical outlet to recharge the battery. Never turn off or reset your computer while the hard disk is in use; doing so can result in loss or destruction of your data. Always wait at least 15 seconds after turning off your computer before turning it back on;... - Page 17 Charging the Battery Pack The installed battery pack charges automatically anytime the computer is connected to the AC adapter and an external power source. It is a good idea to occasionally discharge the battery pack fully to preserve its operating performance.
- Page 18 Using the Computer RACK OINT The Track Point is a round, electronic control pad located to the right of the LCD panel. You can use it in combination with the buttons on the left to simulate the functionality of a standard mouse. Track Point Precautions The Stick Pointer is a pressure sensitive device.
-
Page 19: Function Keys
UNCTION Tablet PC Settings in Control Panel enables users to map the different buttons to different actions, and you can program the keyboard shortcuts on your 350. It includes a Buttons tab, which shows the various button mappings for each screen orientation and contains images that show where specific buttons are located on 350 from a distance and in detail. -
Page 20: Power-Saving Modes
OWER AVING ODES This section contains information on the computer’s power system, including the AC Adapter, the battery pack, recharging the battery, and tips for conserving battery power. The power system is comprised of two parts, the AC Adapter and the battery pack. - Page 21 Your battery now has 1 ~ 2 minutes of battery charge remaining. You must save your data or connect AC power immediately; otherwise, you may lose your data. When there is only one minute of battery charge remaining, the computer will suspend to the HDD and power off. You should connect AC power and resume your work.
-
Page 22: Adjusting The Brightness
ADJUSTING THE RIGHTNESS To adjust the brightness of the LCD screen, use the brightness adjustment option in Power icon on the Taskbar as following, a.) Click Power icon → Adjust screen brightness b.)Slide the Screen brightness bar to adjust the brightness... -
Page 23: Using The Stylus
SING THE TYLUS You can use the stylus to generate, to select items, and to navigate through programs on the 350. Hold the stylus as if you were writing with a standard pen. The stylus interacts with the computer whenever its tip touches the screen. Programs that support... -
Page 24: Writing Pad
& W SING THE OUCH EYBOARD RITING (OS is the Microsoft Windows 7 Professional) Press the “Keyboard” icon next to the Windows Taskbar to display the on-screen keyboard and writing pads. These input tools allow you to type characters without a real keyboard. RITING This pad allows you to enter text on a word-by-word basis. - Page 25 Click “Docking” to display the option menu that you can use to adjust where the on-screen keyboard will appear on the screen. Float Undock the on-screen keyboard. Dock at top of screen Let the on-screen keyboard to appear at the top of the screen. Dock at bottom of screen Let the on-screen keyboard to appear at the bottom of the screen.
-
Page 26: Pen Calibration
OUCHSCREEN TILITY ALIBRATION If the pointing cursor doesn’t seem to follow your stylus taps properly, you can recalibrate it by selecting either the “4 Points Calibration” button or the more advanced “9 Points Linearization” button from HIDeGalaxTouch on Desktop. - Page 27 4 Points Calibration This basic routine will ask you to tap and hold the stylus on a symbol on the screen until it becoming blue within 15-second countdown. This will repeat four times at which point your screen should be properly calibrated.
-
Page 28: Using Windows Help
SING INDOWS ETTING ELP IN INDOWS To access the Windows 7 Help and Support Center, click Start Help and Support. The following Help window should open. - Page 29 INDOWS ESKTOP Your Desktop may display different or additional shortcuts icons, depending upon the software that is installed on your computer. Recycle Bin Start Button Taskbar System Tray Recycle Bin Used for storing deleted files in case you want to recover them at a later time.
- Page 30 turns off the computer. Shut down switches to another user from the current user. Switch user enables the current user to log off and allows a new user to log on. Log off locks the desktop and gets into Logon screen. Lock reboots the computer.
- Page 31 Taskbar When you open a program, its icon is displayed on the taskbar to allow you to conveniently move between programs by clicking the relevant application buttons. To add or remove toolbars from the taskbar: right click an empty spot on the taskbar, select Toolbars choose the toolbar you want to add or remove.
-
Page 32: Control Panel
ONTROL ANEL This panel houses many of the applets that allow changes to be made in the way Windows 7 looks and functions. Click Start → Control Panel dialog box. There are two interfaces – Classic View or Category View. Classic view displays all the panels at once in large or small icons, much the same way previous versions of Windows do. - Page 33 VGA Utilities VGA U TILITIES After you have restarted Windows, open the “Control Panel” and click on the “Intel(R) GMA Driver” icon. This application will allow you to adjust the settings of your display, get important information about your video drivers, and adjust colors, accelerations properties, rotation, and more.
- Page 34 System Recovery System recovery steps: Connect following external devices to 350 tablet PC: a. USB Keyboard b. USB Mouse (option) c. USB DVD-ROM or DVD R/W Press power button then press F2 boot into BIOS Setup Menu, then set USB DVD-ROM device to priority one boot device under Boot device setting item.
- Page 35 After you choose “Y” at step 4, you can see the menu like below, then you can choose: “1”: Old Hard disk and Run Recovery system (Recover OS with current partition setting, partition 1 (C:) will be recovered, and data on D: will not be changed) “2”: New Hard disk and Run Recovery system (Clean and re-partition your hard disk and recover OS to the first partition)
- Page 36 After option 1, system recovery will run with the message like this: After option 2, system recovery will run with the message like this: Notice: You will be prompted a message to ask you type the size of C: in MBytes. Please make sure it is at least 15000.
-
Page 37: Troubleshooting
Troubleshooting This chapter describes common problems that you may encounter while using your computer and how to solve them. HECKING ABLES AND ONNECTIONS When trying to troubleshoot a problem that appears to be hardware related, always start by performing a careful visual inspection of the exterior of the computer. -
Page 38: General Problems
If the computer is too close to a wall, a cable connection may become loose or the cables may be crimped. NOTE: Do not substitute cables for different devices (other than the manufacturer recommended cables) even if they look exactly alike. The wiring inside the cable may be different. - Page 39 CURSOR IS NOT IN POSITION WHILE USING THE STYLUS Change the settings in the Touch-kit utility. Select the 4 Points Calibration to recalibrate the touch screen. THE CURSOR IS STILL NOT IN POSITION WITH THE STYLUS If after performing the standard 4 Points Calibration routine the pointer still won’t properly align with stylus, return to the Touch-kit and perform a linearization calibration (see Chapter 4 for more details).
Need help?
Do you have a question about the 350 Series and is the answer not in the manual?
Questions and answers