Table of Contents
Advertisement
Quick Links
ST-IP-D2.4-PRO QUICKSTART GUIDE
Please refer to the complete User
manual for more information
4 Access to the IP Camera via IE
1. Be sure to power the camera with the correct power supply
2. Make sure the device IP address is in the same LAN with the
router, the default IP address of the camera is 192.168.1.168
3.Go to CD->IPCSearch.exe and copy it to your computer
4.Open IPC Search, click "Search", you will find the device IP,
and you also can modify the IP infor-
mation, see the picture on the left:
5.Factory default IP setting:
IP Address : 192.168.1.168
Subnet Mask : 255.255.255.0
Gateway : 192.168.1.1
User name : admin
Password : admin
6.After modifying IP, click "Search"
again, you will find the new IP of your
device. Double-click the new IP and you can access the camera
via IE or enter the IP Address in the address bar of IE, then click
"Enter". You will see the download_OCX controls interface:
7.Please click here
to download the OCX controls, as
is shown in the following picture:
Click run, the system will automati-
cally download the OCX, click "yes"
in the following picture:
1 Important Safety Information
Please be sure to read the following important safety infor-
mation before installing and using the product.
CAUTION:
RISK OF ELECTRIC SHOCK.
DO NOT OPEN
CAUTION:
TO REDUCE THE RISK OF ELECTRIC SHOCK, DO NOT
REMOVE COVER OR BACK. NO USER SERVICEABLE
PARTS INSIDE. REFER TO QUALIFIED SERVICE PERSO-
CAUTION:
TO PREVENT ELECTRIC SHOCKS AND RISK OF FIRE
HAZARDS, DO NOT USE OTHER THAN SPECIFIED POWER
SOURCE.
Notes:
●The power supply must match the camera's requirement.
●A voltage surge protector is recomennded to protect the
camera from dangerous over-voltage enviorment such as
a lightning storm. (ST-VSP-4)
●In order to capture high quality pictures, the power sup-
ply's cable and video output cable should not be too long.
Then it will install the OCX,
when complete, the window
below will pop up:
Click "OK" and refresh the page.
You will enter the login interface,
as is shown in the left picture:
Enter your username and pass-
word. You can start to access
and control your IP Camera.
5 Access to the IP Camera via Multi_window
Go to CD->find Multi_window.exe. Copy Multi_window.exe to
your computer and install it, then run it. See below:
1.Config:Group.See below:
Here you can add your IP Camer-
as and set the Capture Path. If you
forget the IP Address, you
can click "Search" to search
your IP Cameras. You can
select "List all ipcam" or
"List only unselect", then
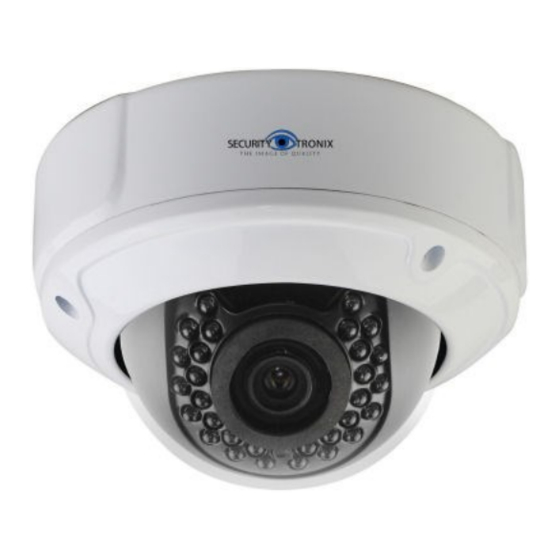
2 Brief Introduction of the products
Specifications
Model
ST-IP-D2.4-PRO
1/3" SONY 2.4 Megapixel High-resolution
Image Sensor
CMOS
Resolution
1080p@25fps,720P@25fps,D1@25fps
Minimum
0.1Lux (Color) 0Lux (B&W)
Illumination
S/N Ratio
>50db
Focus Mode
Manual
Day/Night
IR cut filter with auto switch
Weather Rating
IP66
Network
1 RJ45 Ethernet interface, 10/100M
Delay
Within The LAN 0.3S
Frame Rate
25 FPS ( Adjustable)
Video
H.264 /JPEG
Compression
Protocols: TCP/UDP/RTSP/FTP/PPPOE/
Protocol
DHCP/DDNS/NTP/UPnP/SMTP
Onvif
Support Onvif 2.0
User
Multi-user Classification Management
Permission
Power
DC 12V/ DC 48V (PoE)
Consumption
3.0W
Lens
2.8-12mm Manual Zoom Lens
IR Status
IR LED: ¢5X72PCS IR range: 60M
Dimension (mm)
150mm(W) x114mm(H)
Weight (g)
1850G
Temperature
-4°~122°F
Humidity
0%-90%RH,Without Condensation
double click the IP info to add the camera.
You also can enter the IP Info manually in the "IPcam Infor-
mation area"
Then you can view the images and set the parameters of IP
Camera, such as Alarm, Video, Net, Camuser, Date, etc.
Please refer to Multi_window Customer Manual for detail.
2.View the images
After adding the devices, you can see the devices in "List" of
the main interface, you can double click the device to control it
to play or stop. See below picture:
You also can control
the devices in "Camera",
see the picture on the right:
6 Access to the IP Camera via Android mobile
Search and download the surveillance software "MEyepro" to
your mobile from electronic markets or the Mobile Assistant,
then install it. Then you can see the icon of the software
,click it to run.
1.The following picture shows the main
interface:
2.Live view
See the picture on the
right.
Features:
Weatherproof IR Camera IP66
Advanced H.264 High profile compression
Internet Explorer browser enabled
Support several servers, IP address, DDNS, FTP, SMTP
Support single, dual, and triple stream
Support iPhone, iPad, Android remote monitor
Support ONVIF2.0
Reliability and compatibility
Low streams and high resolution image
3 Connection
DC12V
RJ45
switch/router/FOT
IPC
PC1
ST-IP-D2.4-PRO
Network Structure
Click the button "PTZ" , and you will see the PTZ function but-
tons, see below picture:
Button function:
Button
Name
Button
Name
Play
Switch channels
Snapshot
PTZ Control
Local Record
Zoom
Configure
Focal
PTZ
Iris
About
3.Device list
:Add device, Input Device name,
IP address or domain name, port,
username, password, Max Channel,
then click "OK" to finish and save.
:Edit device. Modify Device name,
IP address or domain name, port,
username, password, Max Channel,
then click "OK" to finish.
PC2
Advertisement
Table of Contents

Related Manuals for Security Tronix ST-IP-D2.4-PRO

Summary of Contents for Security Tronix ST-IP-D2.4-PRO
- Page 1 Resolution 1080p@25fps,720P@25fps,D1@25fps Support ONVIF2.0 DO NOT OPEN Reliability and compatibility Minimum 0.1Lux (Color) 0Lux (B&W) ST-IP-D2.4-PRO QUICKSTART GUIDE Low streams and high resolution image Illumination CAUTION: S/N Ratio >50db 3 Connection TO REDUCE THE RISK OF ELECTRIC SHOCK, DO NOT...
- Page 2 7 Access to the IP Camera via iPhone 8 Access to the IP Camera via iPad :Delete device. If you want to delete the device, please Search and install the surveillance software “ASee+” on line to Search and download the surveillance software “ASee+” to click this button, then select the device name to delete it.
Need help?
Do you have a question about the ST-IP-D2.4-PRO and is the answer not in the manual?
Questions and answers