Advertisement
Quick Links
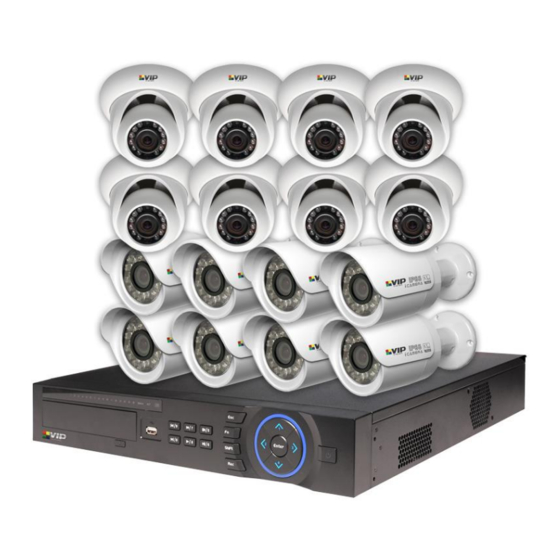
Professional IP Surveillance Pack
Network Video Recorder with 16 Security Cameras
NVR
- Advanced H.264 Video Compression Technology
- Multiplex Operation
- Long Recording Duration
- Intelligent Video Motion Detection Recording
- Remote Network Surveillance & Backup Functions
- Easy to operate with USB Mouse or IR Remote.
- System Auto recovery after power loss (blackout)
www.vip-vision.com
MODEL: NVR16PRO(PACK)4
„QUICK INSTALLATION GUIDE‟
N517
16 x IP Day/Night Cameras
- High Quality 1.3MP CMOS Image sensor
- IR Night view range of 20 metres
- 720p Resolution
In-Built POE Network Switch
- Centralise your cameras away from your NVR
- Power and video over the same cable
- View over the internet via Smartphone or PC
V3.5 260614
Advertisement

Summary of Contents for VIP NVR16PROPACK4
- Page 1 MODEL: NVR16PRO(PACK)4 Professional IP Surveillance Pack Network Video Recorder with 16 Security Cameras „QUICK INSTALLATION GUIDE‟ N517 16 x IP Day/Night Cameras - Advanced H.264 Video Compression Technology - High Quality 1.3MP CMOS Image sensor - Multiplex Operation - IR Night view range of 20 metres...
- Page 2 HDD NOTE: This NVR is designed to only work with 24hr rated Enterprise, NAS and Video Surveillance Hard Drives. The use of any other model Hard Drive (including energy efficient drives) may cause your system to fail and void Warranty. NVR Packs come with an approved Hard Drive already installed. We strongly recommend using the following Seagate Hard Drives: Name: Model:...
- Page 3 ● To operate the NVR Additional NVR16PROPACK4 Contents ( Only included when purchased as with the NVR16PROPACK4) 8 x Day/Night Weatherproof Bullet Cameras with Infrared LEDs - 20m Range ● IR LEDs for Viewing in Total Darkness up to 20m (B&W Mode) ●...
- Page 4 Installation Before installing this unit, please read through the following points: Do not place cords from the AC adapter where they can be pinched or stepped on. Leave at least 50mm of space between the NVR and other objects to allow air circulation. ...
- Page 5 Connection Guide Mount the 16 Cameras as required and connect them to the in-built POE Network Switch using the supplied Network Cables. Connect the 240V Power cable to the NVR. Plug the power cable into a Power-point. Switch NVR on from back of device. IF necessary hold Power button for 3 seconds to turn on. The power LED at the front of the NVR should now be illuminated and the unit will make a loud beep sound to indicate it is powered.
- Page 6 Front Panel Buttons marked with numbers can be used to enter numeric data “NUMERALS” when in numeric text entry mode (See “SHIFT”) “PLAYBACK” Playback controls used when viewing recorded footage. “CAMERA LIGHTS” Displays recording cameras. (Unit limited to four maximum) “STATUS LIGHTS”...
- Page 7 Main Screen Once booted, you will be presented with the screen below (camera may only be black if not yet set up). Each camera view will have one or more symbols from below: Currently Recording Video Loss Motion Detected Camera Lock System Menu ...
-
Page 8: Set The Time And Date
Set the Time and Date When using your NVR for the first time, you will have to set the SYSTEM TIME. Right clicking anywhere on the screen will bring up the password menu. Use the mouse to enter the NVR admin password with the on-screen keypad. ... - Page 9 To Connect Cameras NOTE: The NVR is designed to automatically configure the IP cameras which are camera connected to the dedicated POE Ports on the back of the device. However you can still manually add the cameras when they are connected via the local LAN. ...
- Page 10 To Set Up Recording Rates Record Times: The NVR16PROPACK4 system is capable of storing up to 1 week of recorded footage based on 2Tb of storage and the 16 included 1.3MP Cameras set to 720P @ 10fps and CBR @ 1536kb/s Right click to open the menu and select MAIN MENU, then select SETTINGS followed by ENCODE.
- Page 11 To Set Camera Colour Settings 1. Right click to open the menu and select MAIN MENU, then select REMOTE DEVICE Click IPC CONFIG to open the IP Cameras settings. 3. Here you can adjust the IP Cameras Colour, Gain, BLC, WDR and Day/Night. Please ensure that Day/Night is always set to Auto.
- Page 12 Motion Detection Should you wish to use Motion detect recording, it can be set per camera, per time period and to detect in certain portions of the screen. Right click to open the menu and select “MAIN MENU”. Select “SETTING”...
- Page 13 How to Playback Video Footage on your NVR 1. Right click anywhere on the screen to bring up the menu and log on. Use the mouse to enter the NVRs admin password “888888” with the on-screen keypad. 2. Once logged in you can left click to open the menu and select SEARCH. 3.
- Page 14 How to Backup Video Footage on your NVR 1. Right click anywhere on the screen to bring up the menu and log on. Use the mouse to enter the NVRs admin password “888888” with the on-screen keypad. 2. Once logged in, you can now left click to open the menu, select MAIN MENU then BACKUP. 3.
- Page 15 Using a PC to find available IP Addresses Before setting up your NVR you will first need to find it an IP address, along with all your IP Cameras. This process is to help you find what IP Addresses are currently in use on your computer network, and in turn which ones are still available.
- Page 16 Set Up the NVRs Networking Right click to open the menu and select MAIN MENU, then select SETTINGS followed by NETWORK. The device comes pre-configured to DHCP (which means it will automatically receive an IP Address). If you wish to manually give it an IP Address, un-tick DHCP and then enter the IP Address, Subnet mask, and Gateway.
- Page 17 How to use an external POE Switch NVR (optional) Installation with external POE Switch Rear Panel Camera 8 Camera 4 Camera 3 Camera 7 Camera 2 Camera 6 Camera 1 Camera 5 External POE Switch Camera 9 Camera 10 Camera 11 Modem Camera 12 “240V”...
- Page 18 Using the NVR to manually set the IP Address of an IP Camera (optional) 1. Right click to open the menu and select MAIN MENU, then select REMOTE DEVICE 2. Click IP SEARCH to begin scanning for all the attached IP Cameras. 3.
- Page 19 5. The IP Camera should now be listed with its new IP Address. You can then tick the new camera you wish to connect and click „Add‟ to have it connect to the NVR. 6. The IP Camera will now be shown in the bottom list meaning it has been successfully added to the NVR.
- Page 20 Simple Configuration of your NVR for Remote Access, using QR codes To be able to set your NVR up for Remote Access, you will first require: An ADSL internet connection of 512/512 minimum (ADSL2 or NBN recommended). A network cable between your NVR and your Modem. ...
- Page 21 DMSS Mobile App by QR Code App available for Android, iOS, Blackberry, Symbian, Windows Mobile and Windows 7 mobile From your compatible Smartphone, access the App Marketplace and download the free App. This may also be listed as: iDMSS lite for Apple iOS iDMSS plus for Apple iOS gDMSS lite for Android gDMSS plus for Android...
- Page 22 Advanced Configuration of your NVR for Remote Access by IP Address (optional) Important: Before Setting up remote access for your NVR, you will need a good understanding of computer networks. If you do not, please seek the assistance of a qualified I.T. professional. To be able to set your NVR up for Remote Access, you will first require: ...
- Page 23 Set up DDNS on your NVRPRO (optional) DDNS is a service that will track your numeric IP address and allow you to attach an alphanumeric address. So for example, instead of using “123.123.123.123” (the Google address) you would use “google.com”. Why use DDNS? Remembering a numeric IP address can be complicated, where an alphanumeric address is easy to remember.
- Page 24 DMSS Mobile App by IP Address (optional) App available for Android, iOS, Blackberry, Symbian, Windows Mobile and Windows 7 mobile From your compatible Smartphone, access the App Marketplace and download the free App. This may also be listed as: iDMSS lite for Apple iOS gDMSS lite for Android DMSS lite for others Configuration:...
- Page 25 How to enable ActiveX Controls in Internet Explorer (optional) Important: Before Setting up remote access for your DVR, you will need a good understanding of computer networks. If you do not, please seek the assistance of a qualified I.T. professional. We can only recommend using ActiveX Internet Explorer 5.5 or above, and strongly recommend the use of IE9 as unfortunately IE10 is not compatible.
-
Page 26: Troubleshooting
Troubleshooting Please refer to the FAQ table below for easy troubleshooting. The table below describes some typical problems and their solutions. Please consult these guides before contacting your NVR dealer. PROBLEM SOLUTION - Check power cord connection. No power - Confirm that there is power from the outlet. - Ensure that the power is connected to the NVR - Ensure that motion detection is enabled for that Motion Detection not working... -
Page 27: Limited Warranty
This warranty replaces any previous warranties and is the only warranty made by the Seller on this product. No increase or alteration, written or verbal, of the obligations of this Limited Warranty is authorized. Please refer to the website (www.vip-vision.com) for a full list of trading terms. - Page 28 We appreciate your confidence in our product, and you can be certain that we will do everything possible to ensure that you are happy with your decision and that you have years of satisfaction from your NVR16PROPACK4. We take extreme care in the research, design and development of our products to ensure they meet your needs.
Need help?
Do you have a question about the NVR16PROPACK4 and is the answer not in the manual?
Questions and answers