True PS100 Owner's Manual
Hide thumbs
Also See for PS100:
- Owner's manual (54 pages) ,
- Specifications (2 pages) ,
- Owner's manual (24 pages)

Related Manuals for True PS100


Summary of Contents for True PS100
- Page 1 * Assembly Guide & Warranty Card Included PS100 RECUMBENT BIKE OWNER’S MANUAL Revision 011514...
- Page 2 PS100 RECUMBENT BIKE OWNERS MANUAL IMPORTANT: All Products shown are prototype. Actual product delivered may vary. Product specifications, features & software are subject to change without notice. For the most up to date owner’s manual please visit www.truefitness.com. For documents in additional languages please visit www.truefitness.com/document-library/29/international-manuals IMPORTANTE: Todos los productos mostrados son prototipos.
- Page 3 The proud manufacturing tradition of quality and the culture of innovation at TRUE have given rise to a full line of truly extraordinary treadmills, indoor cycles and elliptical cross-trainers. As a result, people all over the world are benefiting from the TRUE experience.
-
Page 4: Table Of Contents
PS100 RECUMBENT BIKE OWNERS MANUAL TABLE OF CONTENTS : Chapter 1: Safety Instructions Chapter 5: Care & Maintenance Safety Instructions Care & Maintenance Space Requirements Cleaning the Equipment Grounding Instructions Other Scheduled Preventive Maintenance Power Requirements Long Term Storage Warning Decals... -
Page 5: Chapter 1: Safety Instructions
45, smokes, has high cholesterol, is obese or has not exercised regularly in the past year. Additionally, TRUE recommends consulting a fitness professional on the correct use of this product. - Page 6 Do not use this product outdoors, near water, while wet, or in areas if high humidity including extreme temperature changes • Never operate a TRUE product with the air openings blocked. Keep air openings free of lint, hair or any obstructing material. •...
-
Page 7: Space Requirements
Cleaning and user maintenance shall not be made by children without supervision. SPACE REQUIREMENTS: • TRUE’s recommendation is to leave a 39” safety zone at rear of bike. The sides of the bike should be at least 20” away from the wall or obstructions. (See Fig 1) GROUNDING INSTRUCTIONS: This product must be grounded, if it should malfunction or breakdown, grounding provides a path of least resistance for electric current to reduce the risk of electric shock. - Page 8 CHAPTER 1: SAFETY INSTRUCTIONS GROUNDING INSTRUCTIONS (continued): DANGER Improper connection of the equipment-grounding conductor can result in a risk of electric shock. • Check with a qualified electrician or serviceman if you area in doubt as to whether the product is properly grounded. Do •...
-
Page 9: Power Requirements
CHAPTER 1: SAFETY INSTRUCTIONS Truefitness.com / 800.426.6570 / 636.272.7100... -
Page 10: Warning Decals
CHAPTER 1: SAFETY INSTRUCTIONS WARNING DECALS: WARNING: Replace warning labels that may be worn, damaged or missing. To replace any worn or missing warning decals contact TRUE FITNESS by one of the following: www.truefitness.com or contact customer service at 800-883-8783. COMPLIANCES: This equipment complies with all applicable codes and regulations. -
Page 11: Chapter 2 Assembly Instructions
All exercise equipment is potentially hazardous. If attention is not paid to the conditions of equipment usage, death, or serious injury could occur. • Save these instructions. *Should you need technical assistance in assembly of your TRUE Fitness product, contact TRUE Fitness Technical Support at 1-800-883-8783. PRE-ASSEMBLY CHECK LIST: Provided Tools:... - Page 12 CHAPTER 2: ASSEMBLY INSTRUCTIONS PRE-ASSEMBLY CHECK LIST (continued): Provided Hardware: Part Number: Description: Qty: Where Used: Flat Washer M8x16x1.2mm Console Mast & Balance Bar Screw M8x15mm Sock Hd Console Mast & Balance Bar Flat Washer M8x1.2mm Stabilizer Screw M8x20mm Sock Hd w/Nylock Stabilizer Lock Washer M8 Console Mast &...
-
Page 13: Assembly Steps
CHAPTER 2: ASSEMBLY INSTRUCTIONS ASSEMBLY STEPS: CAUTION: • Use caution when assembling bike. It is recommended that at least two people unpack and assemble bike. • Remove all bike components from packaging. STEP 1 Attach Front Stabilizer Bar: a) Using 2 screws and 2 flat washers attach the front stabilizer bar to the bike frame. - Page 14 CHAPTER 2: ASSEMBLY INSTRUCTIONS ASSEMBLY STEPS (continued): STEP 4 Reading Rack Installation: a) Attach the reading rack to the front of the console mast using 2 screws. Hardware Required: #169 - Screw M6x16mm STEP 4 Console Installation: a) Connect the cables from the console mast to Attach 7 Pin Attach 6 Pin the console as shown.
- Page 15 CHAPTER 2: ASSEMBLY INSTRUCTIONS ASSEMBLY STEPS (continued): STEP 5 Attach Seat Latch Bar & Seat Handlebar: a) Use two screws to attach the seat latch bar to the seat carriage. Hardware Required: #28 - Screw M5x20mm b) Connect the heart rate wires coming from the handlebar to the corresponding wires coming from the bike frame.
- Page 16 CHAPTER 2: ASSEMBLY INSTRUCTIONS ASSEMBLY STEPS (continued): STEP 6 Seat Assembly: b) Mount the seat back cushion to the seat back frame using 4 screws and 4 lock washers. c) The seat back cover will snap into place once the cushion has been mounted. Hardware Required: #170 –...
-
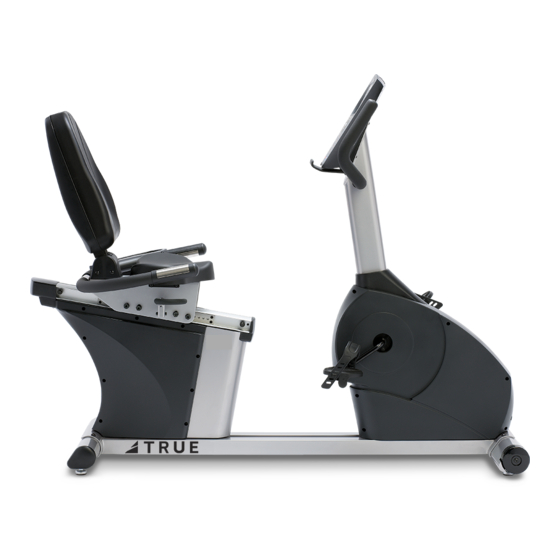
Page 17: Chapter 3: Product Overview
CHAPTER 3: PRODUCT OVERVIEW BIKE OVERVIEW: Console Assembly Contact Heart Rate Pads Bottle Holder Reading Rack Seat Adjustment Pedals Handle Leveling Feet Truefitness.com / 800.426.6570 / 636.272.7100... - Page 18 CHAPTER 3: PRODUCT OVERVIEW BIKE OVERVIEW (CONTINUED): Console Assembly: The console allows the user to set up a workout program and control the bike during a workout (For console overview and operation instructions refer to the owner’s manual for the selected console option). Contact Heart Rate Pads: Allows the user to check their heart rate without wearing a wireless chest strap.
-
Page 19: Chapter 4: Programming & Operation Heart Rate Monitoring
HEART RATE CONTROL (HRC): Introduction: You are now the owner of the most sophisticated Heart Rate Control equipment available. TRUE HRC is unique and patented. It accommodates users from rehabilitation to world class athletes, and all those in between. TRUE HRC allows users to do a completely adjustment free heart rate controlled workout. - Page 20 HEART RATE CONTROL (continued): The TRUE HRC system is unique because users must enter the key parameters of the workout; target heart rate, weight, age, and time, prior to beginning the HRC workout. As users approach their target heart rate, the bike’s computer takes full control over the workout and changes the workout intensity automatically to keep users near their target heart rate.
-
Page 21: Console Overview
CHAPTER 4: PROGRAMMING & OPERATION CONSOLE OVERVIEW: Upper Console Display Lower Console Display Warning Change Display Decal Start Numeric Enter Workout Workload Keypad Keys Keys Truefitness.com / 800.426.6570 / 636.272.7100... - Page 22 CHAPTER 4: PROGRAMMING & OPERATION CONSOLE OVERVIEW (continued): Warning Decal: Important safety information for users to review prior to using the equipment. Start: Allows the user to begin a Quick Start workout or preset workout. Workout Keys: Allows the user to select one of the preset workouts. Workload Keys: Manually increases or decreases the workout intensity.
-
Page 23: Program Descriptions
CHAPTER 4: PROGRAMMING & OPERATION CONSOLE OVERVIEW (continued): Upper Console Display (continued): Value Display #1 Value Display #2 Value Display #3 Value Display#4 Distance – An Heart Rate – Beats per Time – The amount of estimate of how far minute display of the RPM –The users Standard Value... - Page 24 CHAPTER 4: PROGRAMMING & OPERATION PROGRAM DESCRIPTIONS (continued): Cardio Challenge: WORKLOAD and suggested PACE (RPM) increase to a maximum at the mid-point of the workout, then decrease to the finish. • Begin Pedaling. • Enter the user’s weight. • Press the CARDIO CHALLENGE workout button, followed by ENTER. •...
-
Page 25: Advanced Console Functions
WARNING: Misconfiguration of the console may cause damage to the unit and void the manufacturer warranty. If necessary, please contact TRUE Fitness Technical Support at 800-883-8783 for assistance. Diagnostics Mode: The Diagnostic Mode is designed to help determine faults or test functions of the unit. -
Page 26: Chapter 5: Care & Maintenance
It is important to perform the minor maintenance tasks described in this section. Failure to maintain the bike as described here could void the TRUE Fitness Warranty. To reduce the risk of electrical shock, always unplug the unit from its power source before cleaning or performing any maintenance tasks. -
Page 27: Other Scheduled Preventive Maintenance
*Note the user’s left side pedal is reverse threaded* OTHER SCHEDULED PREVENTIVE MAINTENANCE: TRUE recommends that yearly scheduled maintenance be performed by a qualified service technician. Please contact your dealer or visit www.truefitness.com to contact a local TRUE authorized service technician. -
Page 28: Chapter 6: Customer Service
HOURS OF OPERATION: 8:30 A.M. - 5:00 P.M. CST E-MAIL: service@truefitness.com CONTACTING SALES: Interested in TRUE Products? Please contact us with any sales or product inquires so that we may direct you to the appropriate sales representative to answer your questions. TRUE FITNESS HOME OFFICE 865 HOFF ROAD ST. -
Page 29: Reporting Freight Claims Or Parts Damage
Severe Damage: Obvious damage to external packaging / internal product. Please refuse the shipment and it will be returned to TRUE Fitness by the carrier. Contact the TRUE Fitness customer support team by calling 800.883.8783 or sales support team by calling 800.426.6570 Monday-Friday during normal business hours to notify us that the shipment has been refused. -
Page 30: Chapter 7: Additional Information
This troubleshooting guide is intended to assist in diagnostics only and is not all inclusive. Technical specifications, error codes and programming are subject to change without notice. TRUE accepts no liability for any damage or loss suffered by persons whom rely wholly or in part on any description or statement contained within this manual. Please visit www.truefitness.com to obtain the most recent version of all manuals and contact the TRUE Service Department at 800-... - Page 31 CHAPTER 7: ADDITIONAL INFORMATION TROUBLESHOOTING GUIDE (continued): Malfunction Possible Cause Corrective Action Transmitter belt contacts are not Readjust the transmitter belt so that it is in full contact with making good contact with the the skin skin Contacts on the transmitter belt Moisten the contacts on the transmitter belt are not moist Transmitter belt is not within 3...
-
Page 32: Specification Sheet
PS series. TRUE® uses the most durable materials available in this class to ensure that the PS100 will look good for the long haul. Six pre-programmed workouts provide a variety of training options for users with a wide range of abilities and goals. - Page 33 CHAPTER 7: ADDITIONAL INFORMATION RECUMBENT TECHNICAL Power Source Self-Generating SPECIFICATIONS Drive Motor Dual Stage Drive System with Poly-V Belts Crank 1-Piece Forged Steel Crank System with Sealed Bearings Resistance Source Hybrid Self-Generating Brake Resistance Levels Workload Range 30-450 Watts Frame Construction Robotically Welded Heavy-Gauge Steel Pedals Integrated Ratcheting Strap...
-
Page 34: Warranty Information
7. This Limited Warranty is in lieu of all warranties, express or implied, equipment failure resulting from or caused by improper assembly/ and in lieu of all other obligations or liabilities on the part of TRUE, installation, failure to follow instructions and warnings in owner’s... - Page 35 Write in Your Serial Number Here: consent of TRUE. Even jobbing out warranty labor requires TRUE’s written approval. Your serial number will be located on the bottom of the exercise bike.
- Page 36 If you prefer to mail your warranty card, have the owner of the product complete the information below and return it to TRUE Fitness within 30 days from the date of equipment installation.
Need help?
Do you have a question about the PS100 and is the answer not in the manual?
Questions and answers