Table of Contents
Advertisement
Quick Links
Advertisement
Chapters
Table of Contents

Summary of Contents for Docomo N-02B
- Page 1 N-02B ’09.12 INSTRUCTION MANUAL...
- Page 2 Before use, be sure to thoroughly read this manual to ensure that you use N-02B correctly. How to use N-02B The operations of N-02B are also described in "Instruction Manual (Detailed version)" (PDF file) other than this manual. "Instruction Manual" (this manual) : Provides information about screens ■...
-
Page 3: Table Of Contents
Contents FOMA terminal ..............2 What you can do with N-02B ...........3 Introduction Part names and functions ..........4 Usage style of N-02B ............6 Precautions (Always follow these directions) ....7 Before Using ..............18 Basic Screen Explanation ............22 Operation Character Entry ............... 28 Sound/Screen Setting ........... -
Page 4: Foma Terminal
The user hereby agrees that the user shall be solely responsible for the ・ result of the use of SSL/TLS. Neither DOCOMO nor the certifier as listed herein makes any representation or warranty as for security in the use of SSL/TLS. -
Page 5: What You Can Do With N-02B
What you can do with N-02B Lock function P.35 Various lock functions are available for using FOMA terminal safely. International roaming P.46 You can use the same FOMA terminal, phone number and mail address as those used in Japan overseas (3G/GSM areas are supported). -
Page 6: Part Names And Functions
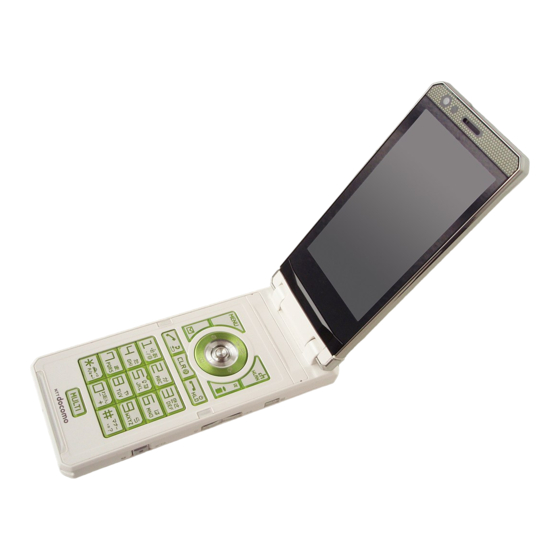
Part names and functions Illuminance sensor Front camera Detect brightness. Do Multi-function keys not cover with hand or : Up/Down key put sticker on it Move the cursor or ・ contents etc. upward or Earpiece downward Hear other party's voice Display the i-Widget/ ・... - Page 7 Infrared data port Charge lamp/Illumination Illumination window Display clock or FOMA terminal status Illumination FOMA antenna The FOMA antenna is built-in. Do not cover the antenna part with 1Seg antenna your hands. Rear camera Speaker (monaural) mark Read the IC card and make iC communications Back cover...
-
Page 8: Usage Style Of N-02B
Usage style of N-02B This FOMA terminal has three styles; folded, opened (Communication style), or folded with display rotated outward (Touch style). Folded Communication style Touch style In this manual, operations with the FOMA terminal opened (Communication ・ style) are mainly described. Even if touch operation is available, key operations description takes priority. -
Page 9: Precautions (Always Follow These Directions)
Precautions (Always follow these directions) To ensure that you use your Indicates that it is an FOMA terminal correctly, read instruction-based "Precautions" carefully before compulsory conduct (must be acted). use. Keep this manual after reading for future reference. Indicates that you must The precautions must be unplug the power code observed at all times since they... - Page 10 Use the battery pack and adapter 2. Turn off the power. specified by NTT DOCOMO for 3. Remove the battery pack the FOMA terminal. from the FOMA terminal. Third-party products might subject...
- Page 11 Please turn off your FOMA 2. Precautions for the terminal when inside an FOMA terminal airplane, hospital, or other area where use is prohibited. WARNING The device may affect electronic or medical equipment. If the Auto power Do not direct the infrared data function is set, make sure to disable the port towards your or another function before turning off the power.
- Page 12 If the display or camera lens is If the display is broken and the broken, be careful with the liquid crystal leaks, do not lick, broken glass and any exposed swallow, or touch it. Don't FOMA terminal parts. If the liquid crystal comes A protective film is used for the Display to into your eyes or mouth, avoid glass scattering.
- Page 13 Put insulation Do not throw the battery pack tape on the terminals of used battery pack and return it to a docomo Shop into fire. or Service Counter, or dispose of the Doing so may cause the battery pack...
- Page 14 If battery fluid comes into Do not put heavy objects on contact with your skin or the power cord of the adapter. clothing, stop using it Doing so may cause electric shock or Don't immediately and rinse with fire. clean water. Do not touch the power cords Battery fluid is harmful to your skin.
- Page 15 If water or other liquid gets Turn off the power in crowded into the adapter, immediately places such as peak-hour trains unplug it from the power if implanted electronic medical Unplug outlet or socket. devices may be in use near you.
- Page 16 FOMA terminal. scratch the LCD surface. Handle the FOMA Please be aware that DOCOMO bears no terminal carefully and clean it using a soft dry obligation or responsibility in the event cloth (such as a cloth used for glasses).
- Page 17 The available operating time of the UIM (FOMA card). battery pack depends on the conditions Please be aware that DOCOMO bears no of usage and battery pack. obligation or responsibility in the event Depending on the usage condition, the that data is altered or lost.
- Page 18 Concern about the communication using the Bluetooth Wireless LAN function. Please be aware that DOCOMO is not Do not use wireless LAN near magnetic responsible for data leak when making devices such as electrical appliances or data communications using Bluetooth.
- Page 19 Cautions 2.4GHz device cautions The operating frequency band of the WLAN Do not deform the FOMA terminal. Using is used by industrial, scientific, consumer an altered device is a violation of the and medical equipment including Radio Law. microwave ovens, premises radio stations A "Technical Conformity Mark "...
-
Page 20: Before Using
・ your phone number. This FOMA terminal does not operate with a blue UIM in it. If your UIM is blue, ・ check with a docomo Shop Service Counter for replacement. Remove the back cover ❶ ① Press the back cover in ①... - Page 21 Charging For the charging time and continuous talk time, refer to "Main specifications" ( P.94). → Charging with the desktop holder Plug the connector of the AC ❶ ❸ ① With the arrow adapter (optional) horizontally side facing up to the terminal on the side of the desktop holder (optional) ❶...
- Page 22 Turning power ON ❶ (1 second or longer) Standby screen If Initial setting screen appears ■ When you turn the power on for the first time after purchase, Initial setting screen appears. To turn the power off ■ Press for 2 seconds or longer. Configuring default setting <Initial setting>...
- Page 23 Checking your own phone number <My Profile> In My Profile screen, check your phone number (own number) stored in your UIM (FOMA card). ❶ To check your mail address ■ is0sj ❶ Only phone number stored by default in My Profile screen. ・...
-
Page 24: Screen Explanation
Screen Explanation Viewing display/icon Marks ( , , , etc.) displayed on the screen and the Indicator display are referred to as icons. Icons indicate the status of such as the FOMA terminal and signal reception. Icons indicating the status of the FOMA terminal ■... - Page 25 Reminders and Desktop Icons ■ In the middle of the screen, icons indicate the status of new arrivals. You can paste desktop icons, with which you can call functions. Reminders (examples) Missed call : Record message : Record VP message :...
- Page 26 Viewing main menu You can select various functions of the FOMA terminal from the main menu. The main menu here is in " (Standard)". ・ スタンダード Mail : Display the mail functions i-mode : Display i-mode i- ppli : Display the i- ppli menu Settings/NW Service : Display the setting menu of the FOMA terminal...
- Page 27 Selecting menu You can select various functions of the FOMA terminal from the main menu, which appears when you press on the standby screen. ❶ to move the highlight and (Select) Select the displayed menu sequentially If no key is pressed for 15 seconds while the main menu is displayed, the ・...
- Page 28 Key operation The soft keys (Function display) corresponding to , and the direction icons corresponding to are displayed on the screen. These icons appear only when the corresponding keys can be used. Performing the functions assigned to the function key Display samples and functions assignments ■...
- Page 29 Using Touchscreen The FOMA terminal display is a touchscreen display. Touch the screen with your finger to operate. Notes on use The touchscreen is designed to be touched lightly with a finger. Do not press the screen firmly with a finger or pointed objects such as fingernails, ballpoint pens, and pins.
-
Page 30: Character Entry
Character Entry Entering characters When entering information to save to the phonebook, or creating mails or schedules, enter text. Switching entry Entering characters Converting ① ② ③ modes entered text Press a dial key several Convert entered text Press (Chrct) on times to enter your to Kanji or Kana. - Page 31 Let's enter text. <Example : entering " (Autumn camp)"> 秋のキャンプ Enter Hiragana once twice to select conversion あ き candidate, then (Set) 5 times twice の き once once To lower case や 3 times 3 times ん ふ twice (Han-dakuten) ゚...
-
Page 32: Sound/Screen Setting
Sound/Screen Setting Changing ring tone Changing the ring tone for FOMA calls Settings/NW Service Incoming call ❶ Select ring tone FOMAphone Ring tone ❷ Melody Select ring tone Adjusting volume of ring tone Adjusting the volume of FOMA calls Settings/NW Service Incoming call ❶... - Page 33 Setting manner mode Set the FOMA terminal not to play ring tones or alarms through the speaker with a single key operation. To set or release the manner ■ appears on the standby screen. mode ❶ On the standby screen, (1 second or longer) Setting keypad sound OFF <Keypad tone>...
- Page 34 Making it difficult for others to see the display <Privacy angle> Privacy angle makes it difficult for others to see the display. On the standby screen, you can activate or deactivate this function. When setting Privacy angle, is displayed on the standby screen. Setting or canceling ■...
- Page 35 Setting lights for display and keypad <Backlight> Set the behavior of the display or backlight, adjust the brightness. Settings/NW Service Display Backlight ❶ ❷ Select an item Reducing battery consumption <ECO mode> When ECO mode is set, backlight/sound/screen settings are changed at once to reduce battery consumption.
- Page 36 Changing illumination when receiving <Illumination> Set the illumination flashing color or mode (pattern) used when you receive voice/videophone calls, mail, MessageR/F or i-concier information. Changing the Illumination of FOMA Phone ❶ Settings/NW Service Incoming call Illumination Set color FOMAphone ❷ Select a color ❸...
-
Page 37: Lock/Security
Any code is set at time of subscription ■ A 4-digit number is required to verify your identity when you subscribe to some services at a docomo Shop, docomo Information Center and " (Customer support)", or when you use network お客様サポート... - Page 38 The PUK (Personal Unlock Key) cannot be changed. If the wrong PUK (Personal Unlock Key) is entered ten times in a row, the UIM ・ (FOMA card) is then completely locked. In this case, contact a docomo Shop Service Counter. Notes on the security codes ■...
- Page 39 (Operating time : 24 hours a day) (Japanese) can lock the personal Omakase * My docomo is also available to set/release Omakase Lock via data of phonebook etc. PC, etc. (Japanese) Lock or IC card function of For details on Omakase Lock, refer to ・...
- Page 40 Rejecting a call Rejecting a call from a caller unset in Phonebook <Reject unknown> Set whether to accept or reject calls from callers not in the phonebook. Settings/NW Service Lock/Security ❶ Reject unknown ❷ Reject Accept Enter your security code This function is valid only for calls with caller ID.
- Page 41 Do not turn off the power while initializing. ・ Resetting Data by Remote Control Subscribe to this service (Business Inquiries mopera anshin manager), and you NTT DOCOMO corporate website may request the FOMA terminal data (memory in Phone/microSD From PC http://www.docomo.biz (Japanese) card/UIM (FOMA card)) be reset.
-
Page 42: Call Telephone
Call Telephone Making a call/videophone call Making a voice call by entering the phone number ❶ Enter the phone number starting with the area code, then (voice call)/ (V.phone) ❷ After the call ends, Ringing screen In-call screen Videophone operation ●... - Page 43 Making a voice call from Phonebook Add the phone number of the other party to the phonebook in advance. ( P.52) → Phonebook ❶ to select a phonebook, then (voice call)/ (V.phone) Phonebook list screen Making international voice calls <WORLD CALL> Use WORLD CALL to make international voice calls from Japan.
- Page 44 Receiving a call/videophone call ❶ When you receive an incoming call, ❷ After the call ends, Ringing Videophone screen ringing screen When you receive an Videophone operation ● incoming call, the ring : Adjust zoom tone sounds and the (1 second or longer) illumination flashes.
- Page 45 When you cannot answer a call Recording a voice and videophone message <Record message> When you cannot answer a voice or videophone call, the FOMA terminal can record a voice or videophone message. Settings/NW Service Incoming call ❶ Record message Phone V.phone Select...
- Page 46 Using various Network Services Available network services ■ Your FOMA terminal provides you with access to a range of useful DOCOMO network services. The network services are not available when you are outside the service ・ area or in a place where the signal is weak.
- Page 47 Services available for the FOMA terminal Available services Phone number Directory assistance (pay : service charge + call charge) (No area code) 104 * Unlisted phone numbers cannot be given. Telegram (pay : telegram charge) (No area code) 115 Time (pay) (No area code) 117 Weather (pay) Area code for weather...
- Page 48 Some services are not available, depending on what your carrier is and ・ where you are. For countries and operators, refer to "Mobile Phone User's Guide [International Services]" or visit the DOCOMO "International services website". Overseas usage fees (Communication, Packet communication) differ from ・...
- Page 49 Making a call to outside your destination country (including Japan) ❶ (1 second or longer) Country code Area code (City number) Other party's phone number ❷ After the call ends, To make an international videophone call ■ ❶ (1 second or longer) Country code Area code (City number)
-
Page 50: Mail
Mail i-mode mail Only by subscribing to i-mode, Mail can be exchanged between i-mode users or anyone who has an Internet e-mail address. You can send up to 10 attachments (images, moving picture files, etc.) of up to 2 MB including text. Also, the FOMA terminal is Deco-mail- compatible. - Page 51 Creating and sending Deco-mail/Decome-Anime <Deco-mail/Deco-Anime> Deco-mail Decome-Anime ■ ■ Deco-mail is a service that allows you to Decome-Anime is a service that allows decorate i-mode mail by changing the you to compose decorative mail character color/size and background using animation templates with Flash color, waving characters, etc.
- Page 52 Viewing received i-mode mail <Auto receive mail> When the FOMA terminal is in the service area, the i-mode center automatically sends i-mode mail. When the reception of i-mode mail is completed, " " appears on the standby screen, indicating the mail has not been read. ❶...
- Page 53 Area Mail setting Select an item. Using SMS <Send/Receive SMS> This service allows you to exchange text messages between DOCOMO terminals, or with subscribers to overseas operators other than DOCOMO. For countries and operators, refer to "Mobile Phone User's Guide ・...
-
Page 54: Phonebook
Phonebook Adding phonebook entries <Add to phonebook> FOMA terminal has two types of phonebooks : FOMA terminal phonebook that various functions can be set to and UIM (FOMA card) phonebook whose entries are available even in another terminal. Each phonebook can be used differently for your purpose. Adding a new phone number, mail address, etc. - Page 55 Editing phonebook entries <Edit phonebook> You can add or edit information in the phonebook, such as phone numbers or mail addresses. Editing FOMA terminal phonebook entries ❶ On Phonebook detail screen, (FUNC) Edit phonebook ❷ Add or edit entries (Finish) Phonebook detail screen Deleting phonebook entries...
-
Page 56: I-Mode/Full Browser
i-mode/Full Browser i-mode You can use online services such as site connection, accessing to Internet, i-mode mail, with i-mode by using display of i-mode support FOMA terminal (i-mode terminal). i-mode requires a subscription and is a fee based service. ・ For details on i-mode, refer to "Mobile Phone User's Guide [i-mode] FOMA ・... - Page 57 Displaying web pages designed for PC <Full Browser> The Full Browser function now makes it even easier to view websites intended for computers. Note that communications charges may be high if large volumes of data ・ are transmitted by viewing websites containing many image data or downloading files.
- Page 58 Operating the Site Operating in Communication style Scroll in the direction Jump to the next page that the key is pressed ) : Scroll up マナー or down by screen Jump to the previous page Operating in Touch style When Touch style is activated, the touch key operations are available. Operate a window, ①...
-
Page 59: I-Channel
The ticker on the standby screen shows latest information that is automatically delivered to your terminal. "Basic Channel" : This channel is distributed by DOCOMO. Packet communications charges do not apply to automatically update basic channels. -
Page 60: Map/Gps
GPS, which stands for "Global Positioning System", is a technology that provides mobile terminals with position information. Under no circumstances shall DOCOMO be held liable for any loss or damage, ・ due to loss of opportunity such as positioning (communicating) result check, resulting from external causes such as failure, malfunction or battery death of the FOMA terminal or blackout. - Page 61 Set whether to regularly send automatically collected location information by AUTO-GPS function to DOCOMO. Automatically sending location information to DOCOMO enables you to use i-concier or other services that are linked to services provided by DOCOMO. To use services, you need to apply for them or set them.
-
Page 62: Camera
Camera Viewing and operating shooting screen Shooting in Communication style ① ⑨ ⑩ ② ③ ③ ⑥ ④ ④ ⑦ ⑦ ⑤ ⑤ ⑧ ⑧ Photo (still image) shooting screen Movie (moving picture) shooting screen Focus frame Face select mode ①... - Page 63 Shooting still images/moving pictures <Photo mode/Movie mode> Shooting still images ❶ Press Frame the shot, (Record) ❷ (Save) Shooting moving pictures ❶ Press (Pressing down) on Photo shooting screen, Frame the shot, (Record) ❷ To stop shooting, (Stop) (Save) Viewing still images/moving pictures after shooting Viewing still images/moving pictures in Data box Data box My picture...
-
Page 64: 1Seg
1Seg Using 1Seg ■ 1Seg service is provided by broadcasting companies (broadcasters). Packet communications charges do not apply. For details on NHK receiving fees, contact NHK. * Packet communications charges apply to view data broadcast site and i-mode site. Information charges may apply for some sites (i-mode pay sites). * For 1Seg service details, visit the following website: The Association for Promotion of Digital Broadcasting (Dpa) From PC : http://www.dpa.or.jp/... - Page 65 Watching 1Seg/Recording and playing video Before using 1Seg for the first time When you use 1Seg for the first time or move to another area, set the channels. 1Seg Channel setting ❶ Select area ❷ Select an area or prefecture Watching 1Seg 1Seg Activate 1Seg...
-
Page 66: Music
Music Music&Video Channel Music&Video Channel is a service that automatically performs overnight downloads of programs of up to approximately one hour in length. Also, up to approximately 30 minutes of high quality video programs can also be delivered. After just configuring it once, Music&Video Channel automatically updates content, so you can always carry the latest videos and audio programs with you. - Page 67 Setting/Playing programs Choose a program you want to enjoy, and the program data will be automatically downloaded overnight. You can set 2 programs at a time. Setting a program MUSIC Music&Video Channel Set program ❶ ❷ Follow the on-screen instructions to set a program Playing a program MUSIC Music&Video Channel...
- Page 68 Viewing and operating Music Player screen Music Player screen Image/Moving picture ① Track ② Title ③ ① Artist name ④ Elapsed time (minutes : seconds)/Total playback ⑤ ② time (minutes : seconds) ⑦ ③ Repeat status/Sound quality (Equalizer)/Sound ⑥ ④ ⑧...
- Page 69 Downloading music data from sites Handling music data ■ Before downloading music data from websites, confirm the terms of use ・ (agreement, prohibited actions, etc.). WMA files protected by copyright protection technology are played ・ using the specific information on your FOMA terminal. When the specific information on your FOMA terminal is changed due to malfunction, repairs or model change, WMA files saved before information changes may not be played.
- Page 70 Playing music data In addition to the pre-installed i-motion, you can play i-motion, movie or Chaku-Uta-Full® downloaded with i-mode Browser or Full Browser, Music&Video Channel program, or music data transferred from music CDs. Data box ❶ ❷ Select the folder of content that you want to play Select a folder Select a track...
-
Page 71: I- Ppli
i- ppli i- ppli are software applications that run on i-mode compatible handsets. You can automatically receive updated stock prices, weather information, etc., and play games without being connected to the network, by downloading* i- ppli from i-mode sites. * : Packet communications charges will apply. Packet communications charges incurred overseas differ from those in ・... - Page 72 Using i-Widget i-Widget is a convenient function that allows you to use a single i-Widget ) to access frequently used content (Widget Appli) such as button ( calculator, clock, and stock price information. When i-Widget screen is displayed, multiple Widget Appli may be connected to network.
-
Page 73: I-Motion/Movie
i-motion/Movie i-motion is sounds, moving pictures, etc. Download i-motion from i-motion sites to the FOMA terminal. You can download and play various movies provided on websites such as portal sites or moving picture sites. * When downloading/streaming movies, the received file size may become very large. -
Page 74: Osaifu-Keitai
Transfer Service. For important data, please be sure to use any services supporting the backup service. Please be aware that DOCOMO is not responsible for disappearance and ・ alteration of the IC card data, any monetary injuries about Osaifu-Keitai services under any circumstance such as malfunction or changing your model. -
Page 75: I-Concier
Pop up When you receive information, " " message message appears at the top of the screen. On the standby screen Select a " " ® (Butler Sheep)" ® (Butler Sheep)" ひつじのしつじくん ひつじのしつじくん pop up message ©NTT DOCOMO ©NTT DOCOMO... -
Page 76: Convenient Tools
FOMA terminal, "4942857113068" is displayed. QR code ・ When you scan the QR code shown to the right with the FOMA terminal, " (NTT DOCOMO, INC.)" is displayed. 株式会社 ドコモ CODE128 ・ To scan CODE128, you need to download i- ppli that support CODE128. -
Page 77: Data Management
This FOMA terminal supports commercially available microSD cards of up to 2 GB and microSDHC cards of up to 16 GB (as of October, 2009). Make sure to format microSD card on N-02B. You may not be able to use ・... - Page 78 Using microSD card Formatting microSD card Note that all data in the microSD card will be deleted when you format it. ❶ LifeKit microSD Refer microSD data microSD format (FUNC) ❷ Enter your security code Viewing data in the microSD card To display schedule ■...
- Page 79 Registering Bluetooth devices If the Bluetooth device you want to use has not been registered, register it. Up to 10 Bluetooth devices can be registered. If you register a Bluetooth device, leave it on registration standby beforehand. LifeKit Bluetooth Device list ❶...
- Page 80 Sending/receiving data by Infrared communication <Infrared data exchange> Exchange data such as phonebook entries and received mail with other devices equipped Infrared data port Infrared data port with the infrared data exchange. Set the other party's device to ・ Within a ±15° circuit Within a ±15°...
-
Page 81: Support
If you are still unable to identify the problem after checking the points, please ・ contact Repairs on the last page of this manual or a repair counter designated by DOCOMO. The power does not turn on Is the battery pack properly attached? P.18... - Page 82 The power is turned off or turned back on suddenly Solid connectors of the battery pack may result in poor connections and loss ● of power. When soiled, wipe with dry cloth or cotton swab. Key/Touchscreen operations are not available If you bring the FOMA terminal near magnetic products, you may not be ●...
- Page 83 使いかたナビ still have problems, please contact Repairs on the last page of the manual. If, after contacting DOCOMO, you are informed that your FOMA terminal needs repairs ● Bring it to a repair counter designated by DOCOMO. The repair counter is only open during business hours.
- Page 84 : - Put stickers, etc. on the LCD or keys - Decorate the FOMA terminal using adhesives, etc. - Replace the external parts, etc. with non-DOCOMO components If malfunction or damage occurs as a result of modification, charges will ・...
- Page 85 * Packet communications charges do not apply to perform software updates. The latest information regarding software updates can be viewed on the NTT DOCOMO websites or in " " (Customer Support) of お客様サポート...
- Page 86 Running software update by selecting the Icon Select the icon (Update icon) on the standby screen to update software. ❶ Select the Update icon ❷ Enter your security code Update icon When "Update is needed" appears ■ To download the software immediately, select "Now update". To update later, select "Reserve"...
- Page 87 The pattern data is specific to a certain model of FOMA terminal. ・ Therefore, DOCOMO may stop distributing pattern data for a model 3 years after the model is first released. Updating pattern data <Update>...
- Page 88 : Use in Japan only. : To attach N-02B to the In-Car Holder, attach to the 4th position shown in listed : ② in "In-Car Holder 01 Manual". In this case, it is recommended to attach N-02B in communication style.
- Page 89 Menu list settings are reset to default by "Reset settings". Some functions that cannot be reset to default settings (or default states) ・ may be included in settings. Main item Sub item Branch item Mail Inbox Inbox MessageR MessageF Outbox Outbox Draft Mail history box...
- Page 90 Main item Sub item Branch item i-mode i-mode settings Reset One-touch mlt win. Group 1-20 Full Browser Home ppli Software list(phone) To IC card list Search by i-mode ppli call logs ppli settings Auto-start setting Disp. software info i-Widget roaming set. i-Widget sound effect AUTO-GPS preferred set ppli call settings...
- Page 91 Main item Sub item Branch item Settings/NW Service Lock/Security Change security code IC card authentic. PIN setting Scanning function Call time/Charge Call data Notify cost limit Reset total Auto reset Clock Set main time Set sub clock Clock display Alarm setting Auto power ON Auto power OFF Incoming call...
- Page 92 2in1 setting Nuis. call blocking Caller ID request Arrival call act Set arrival act Remote control Dual network English guidance Additional service Contact DOCOMO Multi Number OFFICEED Overseas service Voice mail(Int.) Call forwarding(Int.) Roam.guidance(Int.) Remote access(Int.) Caller ID req.(Int.) MissedCallNotice(Int.)
- Page 93 Main item Sub item Branch item Settings/NW Service Other settings Auto-change Screen ch-button setting Closed illum. Open-Close sound Reset settings Initialize Software Update Quick search URL Data box My picture i-mode Camera Automatic backup Deco-mail picture Deco-mail pictograms Auto Decomail Pre-installed Secret Original animation...
- Page 94 Main item Sub item Branch item Data box Document viewer SD other files LifeKit Bar code reader Receive Ir data Receive Receive all microSD Refer microSD data Backup/Restore Camera Movie mode Photo mode Medias viewer Enjoy Exercise Medias viewer Life history viewer Map/GPS imadoco search imadoco kantan search...
- Page 95 Main item Sub item Branch item Phonebook Phonebook Own data Received calls All calls Missed calls Unknown calls Dialed calls Blog/Mail member Blog/Mail member 1-20 Choku-Den Storage numbers 1-5 Common phrases Folder 1-5 Security Folder Own dictionary DL dictionary MUSIC MUSIC Player All tracks Playlist...
- Page 96 Main specifications Phone Product name N-02B Size (When closed) Height approx. 113 mm x Width approx. 50 mm x Thickness approx. 16.9 mm (Thickest : Approx. 22 mm) Weight Approx. 147 g (Battery attached) Continuous standby time Single [FOMA/3G] Stationary ("Auto"...
- Page 97 *5 : Up to 100 data can be additionally stored in the Secret Folder. *6 : Includes "Welcome " (Welcome docomo Movie), " ドコモ動画 緊急速報「エリアメール」の " (Guide to Early Warning "Area Mail") and "N-02B " (N-02B's Great ご案内 のココがスゴイ Features) in the "Inbox" folder.
- Page 98 All phone models should be confirmed to comply with the regulation, before they are available for sale to the public. The highest SAR value for this model phone N-02B is 0.236 W/kg. It was taken by the Telecom Engineering Center (TELEC), a Registered Certification Agency on the Radio Law.
- Page 99 by the FCC with the phone transmitting at its highest certified power level in all tested frequency bands. Although the SAR is determined at the highest certified power level, the actual SAR level of the phone while operating can be well below the maximum value.
- Page 100 Declaration of Conformity The product "N-02B" is declared to conform with the essential requirements of European Union Directive 1999/5/EC Radio and Telecommunications Terminal Equipment Directive 3.1 (a), 3.1 (b) and 3.2.
- Page 101 "Public mode", "OFFICEED", "Security trademarks of US Sun Microsystems, Inc. Scan", "2in1", "docomo PRIME series" and in the United States and other countries. "FOMA" logo are trademarks or registered T9® is a trademark or registered trademark ・...
- Page 102 Wi-Fi CERTIFIED ™ , WMM ™ , WPA ™ , contents. Non-protected content is not ・ WPA2 ™ and Wi-Fi Protected Setup ™ are affected by disabling the function. Please trademarks of Wi-Fi Alliance. note that, if downloading the license to use All other company names and product protected content, Microsoft may include the ・...
- Page 103 The Copyright Holders are trademarks of Bluetooth SIG, INC, and NTT not responsible and shall not be held DOCOMO is licensed to use them. Other responsible in any manner for identifying trademarks and names belong to their or failing to identify any or all such third respective owners.
-
Page 104: Index
Index Full Browser ..........54 Bookmark ...........56 AC adapter..........19 Operating a site ........56 Adapter Screen memo ..........56 Handling .............12 View .............55 After-sales service ......... 81 Alarm ............74 GPS ............58 AUTO-GPS ..........59 Backlight ..........33 Position location ........58 Bar code reader ........ - Page 105 Edit entries ..........53 Power on/off .......... 20 Lock/Security ......... 35 Precautions ..........7 Dial lock ............37 Privacy angle.......... 32 IC card lock ..........37 Keypad lock ..........37 Omakase Lock ...........37 Received calls Original lock ..........37 Make phone calls ........40 Redial ............40 Reset settings ........
- Page 106 * Packet communications charges do not apply to use via i-mode. Charges will apply if using the service from overseas. * "docomo ID and password" are required to use this site from a PC. * Please contact General Inquiries on the last page of this manual if you forget or do not have "network PIN"...
- Page 107 ●Please confirm the phone number before you dial. ●For Applications or Repairs and After-Sales Service, please contact the above-mentioned information center or the docomo Shop etc. near you on the NTT DOCOMO website or the i-mode site. NTT DOCOMO website http://www.nttdocomo.co.jp/english/ i-mode site iMenu ⇒お客様サポート...
- Page 108 Connecting to a WLAN-compatible PC ........42 AT Command List ................ 43 About Manual for PC Connection This manual describes necessary information for data communication using the N-02B and how to install "FOMA communication setting file" and "DOCOMO Connection Manager" provided in the provided CD-ROM.
-
Page 109: Data Communication
This is suitable for exchanging small amount of data at high speed. a When you use packet communication with DOCOMO PDA "sigmarionⅢ" , the communication speed may be lower. It is not compatible with FOMA HIGH-SPEED Area communication. - Page 110 64K data communication is charged according to the length of time the line is connected, regardless of the amount of data. Use an access point that supports FOMA 64K data communication, such as DOCOMO Internet connection service “mopera U”, or ISDN synchronized 64K access point.
- Page 111 Internet. These fees must be paid directly to the Internet service provider in addition to service fees of FOMA service. Contact your Internet service provider for details. DOCOMO Internet connection service "mopera U" is available. "mopera U" is a pay service for which you need to apply.
-
Page 112: Before Using
Internet Explorer. There is no matter with using the software. Click "はい " (Yes). NOTE d You can transmit data with the FOMA terminal connected to the DOCOMO PDA "sigmarion Ⅲ ". d This FOMA terminal is not compatible with Remote Wakeup function. -
Page 113: Checking The Procedure
Installing the FOMA communication setting file embeds each driver into Windows. Using DOCOMO Connection Manager, you can easily set up packet communication and 64K data communication and create a dial-up connection. Flow chart for completing the data communication setup ■... - Page 114 Connect to PC (p.16) a Install the FOMA communication setting file from the "CD-ROM for N-02B" or by downloading from the DOCOMO website. →p.9 a Connect the FOMA terminal to the PC with the FOMA USB Cable with Charge Function 02 (optional). →p.7, 9 Check the setting after installation(p.14)...
- Page 115 Setting the USB mode setting to "Communication mode" d Set the mode before connecting to PC. d Setting is not required when using Bluetooth connection or Wi-Fi connection. i "Settings/NW Service" "External connection" "USB mode setting" "Communication mode" Connecting the devices The following procedure explains how to connect the FOMA USB Cable with Charge Function 02 (optional).
- Page 116 Disconnecting the devices The following procedure explains how to disconnect the FOMA USB Cable with Charge Function 02 (optional). Remove the FOMA USB Cable with Charge Function 02 from the USB terminal of the PC Pull the FOMA USB Cable with Charge Function 02 out horizontally while pressing the release buttons of the external connector of FOMA USB Cable Close the external connector cap of the FOMA terminal...
-
Page 117: Setting The Pc
The following procedure explains how to connect the FOMA terminal to PC and how to install the FOMA communication setting file (drivers). Connecting the FOMA terminal to PC Start up Windows and insert the "CD-ROM for N-02B" in the CD-ROM drive of your PC Click "... - Page 118 d For Windows Vista Connect the FOMA USB Cable with Charge Function 02 (optional) to the FOMA terminal When the FOMA USB Cable with Charge Function 02 has been connected to the PC in Step 4 of "Connecting the FOMA terminal to PC"...
- Page 119 If the "新しいハードウェアの検出 ウィザード" (Find new hardware wizard) screen appears, select "コンピュータを参照してドライ バソフトウェアを検索します" (Search computer for the optimal driver software) Specify the folder to search and click "次へ" (Next) For Windows Vista (32 bit) The folder name is "<CD-ROM drive>: ¥N-02B_USB_Driver_Vista32¥WinVista32".
- Page 120 d For Windows XP Connect the FOMA USB Cable with Charge Function 02 (optional) to the FOMA terminal When the FOMA USB Cable with Charge Function 02 has been connected to the PC in Step 4 of "Connecting the FOMA terminal to PC"...
- Page 121 The CD-ROM drive name differs depending on the PC. Confirm the driver name and click "次へ" (Next) In this case, the driver's name appears as "N-02B". When the message "新しいハードウェアの検索ウィザードの完了" (Complete the find new hardware wizard) appears, click "完了" (Finish) Install other drivers See Steps 1 to 7 and install all other 3 drivers (p.14).
- Page 122 Checking the installed driver Check that the FOMA communication setting file (drivers) has been correctly installed. This section describes an example using Windows Vista. " → "コントロールパネル" (Control Panel) Select " For Windows XP Select " スタート " (Start)→ " コントロールパネル " (Control Panel) For Windows 2000 Select "...
- Page 123 When "FOMA N02B USB" is not displayed in the "プログラムと機能 " (Applications and functions) on the Windows, perform the following procedure: ①Insert the "CD-ROM for N-02B" in the CD-ROM drive of your PC ②Open " " →" コンピュータ" (Computer) For Windows XP, open "...
-
Page 124: Preparing Bluetooth Communication
Preparing Bluetooth Communication Perform data communication by connecting a Bluetooth communication compatible PC to the FOMA terminal wirelessly. Register and connect the PC to the FOMA terminal To connect a PC to the FOMA terminal for the first time, register the PC to the FOMA terminal. i "LifeKit"... - Page 125 Select "デバイスマネージャ " (Device Manager) and click "続行" (Continue) For Windows XP and Windows 2000 Click the " ハードウェア " (Hardware) tab and click "デバイスマネージャ " (Device manager) Click each device to check the modem name and the COM port number The modem name and the COM port number are displayed under "...
-
Page 126: Docomo Connection Manager
DOCOMO Connection Manager "DOCOMO Connection Manager" is a useful software for performing the flat-rate data communications and the measured-rate data communications. "DOCOMO Connection Manager" enables simplification of mopera U subscription, or appropriate setting on PC depending on the subscription. The fare counter function is also available for checking an indication of the data traffic or usage amount. - Page 127 ① Prepare the FOMA terminal, and FOMA USB Cable with Charge Function 02 (optional) or FOMA USB Cable (optional) ② Confirm the services and contract details with the Internet Service Provider ③ When the connection software other than DOCOMO Connection Manager is installed, disable it if necessary "Other connection software than DOCOMO Connection Manager"→ p.19...
- Page 128 Installing DOCOMO Connection Manager d When installing "DOCOMO Connection Manager", be sure to log on as Administrator. If you attempt to install the software with another account, an error may occur. Contact your PC's manufacturer or Microsoft for information on how to set Administrator privileges on your PC.
- Page 129 Confirm the precautions and click "次へ" (Next) Upon confirming the user agreement, click "使用許諾契約の 条項に同意します" (Agree) to agree to it, and click "次へ" (Next) Select the installation location and click "次へ" (Next) If you want to change the location, click " 変更 " (Change), specify the location and click "次へ"...
- Page 130 For Windows Vista and Windows XP Open " " or " スタート " (Start) → " すべてのプログラム " (All programs) → "NTT DOCOMO" → " ド コモ コネクションマネージャ " (DOCOMO Connection Manager) → " ドコモ コネクションマネー ジャ " (DOCOMO Connection Manager) For Windows 2000 Open "...
-
Page 131: Executing Set Data Communication
Click the tab of the desired connection method, and click "接続する" (Connect) For details, refer to " ドコモ コネクションマネージャ 操作マニュアル " (DOCOMO Connection Manager operating manual). When connection is not available, check “Setting up Dial-up Network” (p.24) and “Setting up Dial- up”... -
Page 132: Setting Up Dial-Up Network
Setting up Dial-up Network This section describes how to set up a dial-up connection for packet communication / 64K data communication without using DOCOMO Connection Manager. The flow of operation is described below. d It is unnecessary to set up the dial-up network for 64K data communication. Go on to "Setting up Dial-up"... - Page 133 Click the "モデム" (Modem) tab to confirm the COM port of the "接続 先" (Access point) column of "FOMA N02B" and click "OK" When connecting wirelessly using Bluetooth communication, confirm the COM port number of the in-use Bluetooth linked standard modem or Bluetooth modem provided by a Bluetooth device maker in the "接続先...
- Page 134 Click the "モデム" (Modem) tab to confirm the COM port of the "接続 先" (Access point) column of "FOMA N02B" and click "OK" When connecting wirelessly using Bluetooth communication, confirm the COM port number of the in-use Bluetooth linked standard modem or Bluetooth modem provided by a Bluetooth device maker in the "接続先...
- Page 135 Phone number Memory number of Phonebook Other party's name ─ How to register Register using PC ○ (DOCOMO Connection Manager, ○ (Dedicated software required) etc.) Register using Mobile phone × (Cannot even confirm) ○ How to use Specify cid to connect...
- Page 136 Click "スタート" (Start) → "すべてのプログラム" (All programs) → "アク セサリ" (Accessories) → "通信" (Communication) → "ハイパーターミナ ル" (Hyper terminal) to start Hyper terminal For Windows 2000 Open " スタート " (Start) → " プログラム " (Programs) → " アクセサリ " (Accessories) → " 通信 " (Communication) →...
- Page 137 Enter the access point (APN) and press Enter in the format of AT+CGDCONT=<cid>, "PDP_type", "APN" <cid>: Enter any number between 5 and 10. Please be cautious because if cid has been already set, the setting will be overwritten. "PDP_type": Enter "PPP" or "IP". "APN":...
- Page 138 イル" (File) menu NOTE d The Caller ID needs to be set to "Notify" to use DOCOMO's internet connection service mopera U or mopera. About 186 (Notify)/184 (Not notify) in Dial-up Network You can attach 186/184 to the access point number in the Dial-up network settings as well.
-
Page 139: Setting Up Dial-Up
Setting up Dial-up d This section takes accessing mopera U by packet communication for example. d To connect using packet communication, enter "*99***3#" as the number of access point for mopera U or "*99 ***1#" for mopera. To connect using 64K data communication, enter "* 8701"... - Page 140 Right-click the icon created for the dial-up and click "プロパティ " (Properties) Confirm the settings on the "全般" (General) tab If two or more modems are connected to the When connecting using the FOMA USB Cable with Charge Function 02, confirm that only "...
- Page 141 Clear all the boxes and click "OK" Click "OK" Setting up dial-up on Windows XP Open "スタート" (Start) → "すべてのプログラム" (All programs) → "アク セサリ" (Accessories) → "通信" (Communication) → "新しい接続ウィ ザード" (New connection wizard) When the "新しい接続ウィザード" (New Connection Wizard) screen appears, click "次へ"...
- Page 142 Enter any name you want in the "ISP 名 " (ISP Name) and click "次へ" (Next) Enter the number of the access point in the "電話番号" (Telephone Number) column and click "次へ" (Next) This screen is an example of accessing mopera U by packet communication.
- Page 143 Select the icon created for the dial- up and open "プロパティ " (Properties) in the "ファイル" (File) menu Confirm the settings on the "全般" (General) tab If two or more modems are connected to the When connecting using the FOMA USB Cable with Charge Function 02, confirm that only "...
- Page 144 When the Step 14 screen reappears, click "OK" Setting up dial-up on Windows 2000 Open "スタート" (Start) → "プログラム" (Programs) → "アクセサリ" (Accessories) → "通信" (Communication) → "ネットワークとダイヤル アップ接続" (Network and Dial-up connections) Double-click "新しい接続の作成" (Create a new connection) in Network and Dial-up Connections If the "所在地情報"...
- Page 145 Enter the number of the access point in the "電話番号" (Telephone number) column and click "詳細設 定" (Advanced settings) Uncheck " 市外局番とダイヤル情報を使う " (Use Area Code and Dial information). This screen is an example of accessing mopera U by packet communication. Set up the "接続"...
- Page 146 Enter any name you want in the "接続名" (Connection name) and click "次へ" (Next) Select "いいえ" (No) and click "次へ" (Next) Click "完了" (Finish) Select the icon created for the dial-up and open "プロパティ " (Properties) in the "ファイル" (File) menu Confirm the settings on the "全般"...
- Page 147 Click the "ネットワーク" (Network) tab and set up each setting Select "PPP: Windows 95/98/NT4/2000, Internet" in the " 呼び出すダイヤルアップサー バーの種類 " (Type of the dial-up server to call). Check only "インターネットプロトコル(TCP/ IP)" (Internet Protocol (TCP/IP)) for components. Click "設定" (Settings) Clear all the boxes and click "OK"...
- Page 148 Select the access point and click "接続" (Connect) Confirm the settings and click "ダ イヤル" (Dial) This screen is an example for mopera U connection. You can leave user name and password blank for mopera U or mopera connection. <The Connecting screen appears> While this screen appears, the log-on process such as confirmation of the user name and password is performed.
- Page 149 Check the followings if you cannot connect to the network or dial-up successfully. Problem Points to check "N-02B" is not recognized ・ Check if your PC satisfies the required operational environment (p.4). ・ Check if the FOMA terminal is connected to the PC and the power is turned on.
-
Page 150: Connecting To A Wlan-Compatible Pc
"次へ" (Next) "WPA2- パーソナル " (WPA2-personal) under " セキュリティの種類" (Security type) has the same meaning of "WPA2-PSK". If encryption function is set to N-02B Set " 暗号化の種類 " (Encryption type) and " セキュリティキーまたはパスフレーズ " (Security key or passphrase) options to the same settings as N-02B. -
Page 151: At Command List
AT Command List AT commands available on FOMA terminal d The following abbreviations are used in the AT command list; [&F] : Command of which setting is initialized by AT&F command. [&W] : Command of which setting is saved by AT&W command. The setting can be retrieved by ATZ command. - Page 152 AT command Outline Parameter/description Command execution example AT&W Stores the current settings. Only = 0 can be specified (can be AT&W0 omitted). AT&W AT&W? ERROR AT&W=? ERROR AT * DANTE AT * DANTE Displays the FOMA 0: FOMA terminal signal reception level is displayed terminal signal reception as out of area.
- Page 153 AT command Outline Parameter/description Command execution example AT+CBC Displays the battery status Result: +CBC:<bcs>,<bcl> AT+CBC of the FOMA terminal. bcs: +CBC:0,70 0 : FOMA terminal is powered by the battery. 1 : FOMA terminal is not powered by the battery. AT+CBC? 2 : FOMA terminal is not connected to the battery.
- Page 154 AT command Outline Parameter/description Command execution example AT+CLIP= Displays the other party's = 0 : Not display the result (initial value) AT+CLIP=0 Caller ID on a PC when a = 1 : Display the result 64K data communication call is received. AT+CLIP? AT+CLIP? +CLIP:0,1...
- Page 155 AT command Outline Parameter/description Command execution example AT+COPS Selects the network Format : AT+COPS=<mode>,2,<oper> AT+COPS=0 operator to connect. mode=0 : automatic (searches the network AT+COPS? and switches the network operator +COPS:0 automatically) mode=1 : manual (connects to the network AT+COPS=? operator specified in <oper>) +COPS:(2,,,"44F001"), mode=2 : Disconnects the connection to the...
- Page 156 AT command Outline Parameter/description Command execution example AT+CPIN Enters the PIN code in the Format: AT+CPIN="<pin>","<newpin>" (The status in which FOMA terminal. +CPIN: READY is This command is to enter the PIN1, answered when PIN2, or PUK code - depending on +CPIN? is entered) the state of the result code returned AT+CPIN="1234"...
- Page 157 AT command Outline Parameter/description Command execution example AT+CREG= Specifies whether the = 0 : Not informed (initial value). AT+CREG=1 result screen is present = 1 : Informed. regarding the inside/ (Set to informed) Informed when switching between outside the service area "Inside the service area"...
- Page 158 FOMA communication) omitted). terminal. NO CARRIER Displays the ID code. = 0 : Displays "NTT DoCoMo". ATI0 NTT DoCoMo = 1 : Displays the product name (same with +GMM). ATI1 = 2 : Displays the version of the FOMA FOMA N02B terminal (same with +GMR).
- Page 159 AT command Outline Parameter/description Command execution example ATS0= Specifies how many times = 0 : No automatic answer (initial value). ATS0=0 the FOMA terminal rings = 1- 255: A call is automatically answered before it automatically ATS0? after the specified number of receives a call.
- Page 160 AT command Outline Parameter/description Command execution example ATS104= Sets the calling sub = 0 : # ATS104=0 address character. = 1 : % (initial value) = 2 : & ATS104? ATS104=? [&F] ERROR Specifies whether the = 0 : Returns the result code in numeral ATV1 result code is returned in value.
- Page 161 d Supplementary explanation of AT command ■ Commands which do not function The following commands do not generate errors but will not function as a command: ・ ATT (Tone setting) ・ ATP (Pulse setting) ■ Command name: +CGDCONT=[parameter] ・Outline Sets the access point name (APN) for packet origination. Though this command is a setting command, it will not be recorded in non-volatile memory written by [&W], nor reset by [&F] or [Z].
- Page 162 ・Command execution example Only the following 4 patterns can be set. (1) is set as an initial value to each cid. Command for permitting all speeds of both uplink and downlink (when cid is 2) AT+CGEQMIN=2 Command for permitting only the speed of uplink 5,760kbps and downlink 7,232kbps (when cid is 4) AT+CGEQMIN=4,,5760,7232 Command for permitting uplink 5,760kbps and all speeds of downlink (when cid is 5) AT+CGEQMIN=5,,5760...
- Page 163 Result codes ■ Result codes related with data communication Number Character indication Description indication Successfully executed. CONNECT Connected. RING Incoming call. NO CARRIER Line disconnected. ERROR Command not acceptable. NO DIALTONE Unable to detect dialing tone. BUSY Busy tone detected. NO ANSWER Time out in connection completing.
- Page 164 Result code display example ■ When ATX0 is set Regardless of the AT¥V n command (p.50) setting, only CONNECT appears when the connection is completed. Character indication example: ATD * 99 *** 1# CONNECT Number indication example: ATD * 99 *** 1# ■...
- Page 165 Kuten Code List...
- Page 166 Kuten Code List <Guide to the kuten code table> First enter “digits 1-3 of the kuten code” then “digit 4”. d Some kuten codes in the table here may look different from what actually appear on screens. First to third First to third First to third Fourth digit of Kuten codes...
- Page 167 First to third First to third First to third Fourth digit of Kuten codes Fourth digit of Kuten codes Fourth digit of Kuten codes digits of digits of digits of Kuten codes Kuten codes Kuten codes 糊 袴 股 胡 菰 虎 誇 跨 鈷 雇 宕...
- Page 168 First to third First to third First to third Fourth digit of Kuten codes Fourth digit of Kuten codes Fourth digit of Kuten codes digits of digits of digits of Kuten codes Kuten codes Kuten codes 偃 假 會 偕 偐 偈 做 偖 偬 偸 愴...
- Page 169 First to third First to third First to third Fourth digit of Kuten codes Fourth digit of Kuten codes Fourth digit of Kuten codes digits of digits of digits of Kuten codes Kuten codes Kuten codes 燹 燿 爍 爐 爛 爨 爭 爬 爰 艝...
Need help?
Do you have a question about the N-02B and is the answer not in the manual?
Questions and answers