Advertisement
Quick Links
Advertisement

Related Manuals for Albrecht AE69-2H

Summary of Contents for Albrecht AE69-2H
- Page 1 AE69-2H Scanning Receiver...
-
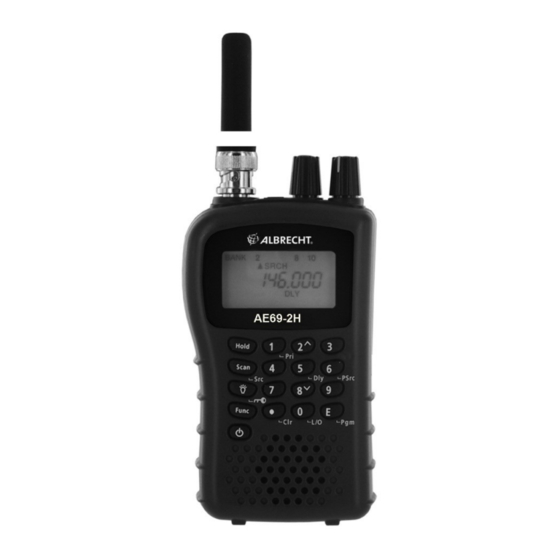
Page 2: Ae69-2H Controls And Display
AE69-2H Controls and Display Antenna (See “Connecting the Antenna” on Page 12) Headphone Jack Squelch Volume Display Keypad DC socket Power... -
Page 3: Table Of Contents
Contents AE69-2H Controls and Display ......2 Introduction ............. 4 Precautions ............. 4 Earphone Warning ..........4 Safety Warning ............4 Legal notes: ............4 Feature Highlights ..........6 About this Manual ..........7 Understanding Scanning ........7 What is Scanning? .......... -
Page 4: Introduction
Turn down volume before connecting the earphone and then adjust volume to suit. Safety Warning Albrecht does not declare this unit to be waterproof. To reduce the risk of fire or electrical shock, do not expose this unit to rain or moisture. - Page 5 This table lists the frequency ranges, default frequency step and type of transmissions you can hear for each range. The scanner has 3 Band Plans, which are useful for major regions in Europe. Band Plan 2 is optimized for Germany. Frequency ranges Band Plan 1 Frequency Range MHz Steps Radio Service...
-
Page 6: Feature Highlights
• Make sure the power is turned off. • While holding down 1, 2 or 3 key, turn on the scanner. Note: Please carry out a memory initialization (Reset, see page 23 after band plan was changed. Feature Highlights Chain Search - lets you enter personal search bands in 5 locations and search all locations in a chain of frequency bands. -
Page 7: About This Manual
What is Searching? The AE69-2H can search for active frequencies. This is different from scanning because you are searching for frequencies that have not been programmed into the scanner. When you select frequency bands to search, the scanner searches for any active frequency within the lower and upper limits you specify. -
Page 8: Simplex Operation
• Broadcast AM/FM/TV stations (not to be received with this scanner model) • Many other business radio users When you want to store a conventional system, all you need to know is the frequencies they operate on. When you are scanning a conventional system, the scanner stops very briefly on each channel to see if there is activity. -
Page 9: Included With Your Scanner
Included with Your Scanner Owner’s Manual ・ Scanner and Antenna ・ Belt Clip (with 2 screws) ・ Note: If any of these items are missing or damaged, contact your place of purchase. Batteries are not included. Setting Up Your Scanner These guidelines will help you install and use your new scanner: •... -
Page 10: Using Rechargeable Batteries
Cautions: • Use only fresh batteries of the required size and recommended type. • Always remove old or weak batteries. Batteries can leak chemicals that destroy electronic circuits. • When flashes and a beep can be heard every 15 seconds, the battery is empty and you should replace both batteries. -
Page 11: Using Ac Power
about 14 hrs to bring them to a full charge. WARNING! Do not connect any AC adapter to the scanner if non-rechargeable standard batteries are installed and the switch is still in NI-MH BATT position or if you are not sure in which position switch Please... -
Page 12: Attaching The Belt Clip
Attaching the Belt Clip To make your scanner easier to carry when you are on the go, use the supplied belt clip. Use a Phillips screwdriver and the supplied screws to attach the clip to the scanner. Connecting the Antenna To attach the supplied flexible antenna to the connector on the top of your scanner, align the slots around the antenna's connector with the tabs on the scanner's BNC connector. -
Page 13: Connecting An Earphone/ Ext. Speaker
the scanner, use RG-213/U or “air cell” type low loss coaxial cable. You can get a BNC adapter at your local electronics store. Connecting an Earphone/ ext. Speaker For private listening, you can plug a 3.5 mm mini plug earphone or mono or stereo headphones (not supplied) into the headphone jack on top of your scanner. -
Page 14: A Look At The Keypad
A Look at the Keypad Your scanner's keys have various functions labeled on the key tops and below the keys. To select the function labeled on a key, simply press the key. To select the function labeled below a key: •... - Page 15 2 – Enters “2”. Func + – Selects the search direction. 3 – Enters “3”. 4 – Enters “4”. 5/Dly 5 – Enters “5”. Func + Dly – Sets and turns the delay function on or off. 6/PSrc 6 – Enters “6”. Func + PSrc –...
-
Page 16: A Look At The Display
A Look at the Display The display has indicators that show the scanner's current operating status. display information helps understand how your scanner operates. BANK (search band number) appears with numbers (1-5). appears when you lock the keypad. appears only when the function mode is on. appears while you store a frequency into a channel. -
Page 17: Operation
Operation Turning the scanner on and setting squelch Note: Make sure the scanner's antenna is connected before you turn it on. • Turn Squelch fully counterclockwise. • Press and hold for about 2 seconds to turn the scanner on. • Then turn Volume clockwise until you hear a hissing sound. -
Page 18: Manually Selecting A Channel
Notes: • If you have not stored frequencies into any channels, the scanner does not scan. • If the scanner picks up unwanted partial, or very weak transmissions, turn Squelch clockwise to decrease the scanner's sensitivity to these signals. To listen to a weak or distant station, turn Squelch counterclockwise. -
Page 19: Chain Search Mode
5 Search Bands Band Plan 2 Frequency Range MHz Steps 84.0150 - 87.2550 20 kHz 144.0000 - 145.9875 12.5 kHz 156.0000 - 162.0250 12.5 kHz 162.0300 - 173.9900 10 kHz 406.0000 - 439.99375 6.25 kHz 5 Search Bands Band Plan 3 Frequency Range MHz Steps 25.0000 -... -
Page 20: Setting The Search Range
chain search hold mode. • Press Func + Pgm in chain search mode or chain search hold mode. The lowest blank channel appears. • Press E + Pgm to store the frequency into the blank channel. To select another channel, press Func + or Func + before you press E / Pgm. -
Page 21: Delay
scanner stops on the frequency during a search or a search hold. • The scanner stores the frequency in memory and automatically resumes the search if it is not in hold. Follow these steps to clear a single frequency from skip memory so the scanner stops on it during a search. -
Page 22: Priority
that have a continuous transmission. • To lock out a channel, manually select the channel, then press Func + L/O. In the display L/O appears. Note: You can still manually select locked-out channels. • To remove the lockout from a channel, manually select the channel, then press Func + L/O. -
Page 23: Using The Display Backlight
• To turn on the display light for easy viewing at night, press The display lights for 15 seconds. • To turn off the light sooner, press again. Troubleshooting If your AE69-2H is not performing properly, try the following steps. Problem Possible Suggestion cause The scanner Check the batteries. -
Page 24: Resetting The Scanner
The squelch Adjust the squelch threshold. might need See“Turning On The to be Scanner and Setting Squelch”. adjusted. One or more Make sure the channels you channels want to scan are not might be locked out. locked out. The antenna Check the antenna connection. -
Page 25: Birdies
noise, move it or its antenna away from the source of the noise. If possible, a higher elevation might provide better reception. • Also try changing the height or angle of the antenna. Cleaning • Switch off the unit and take out batteries before cleaning. •... -
Page 26: European 2 Years Warranty
Please contact the dealer or person where you have purchased your Albrecht Scanner. - Page 27 (FAQ) before you send your Scanner back to the service center. Optional Accessories Albrecht recommends to use following accessories. These are only examples, You will find our whole range of accessory items in our catalogue.
- Page 28 CE Konformitätserklärung/ Declaration of Conformity Hiermit wird erklärt, dass unser Produkt / herewith we declare that our product Empfangsgerät für Funkanwendungen (Scanner) AE69-2H den folgenden europäischen Normen entspricht: / is in conformity to following European Standards EU-Richtlinien / EU directives 73/23/EEC (LVD); 89/336 EEC (EMC) and 99/5/EEC (R&TTE)
Need help?
Do you have a question about the AE69-2H and is the answer not in the manual?
Questions and answers