
Summary of Contents for Power Dynamics 179.110
- Page 1 WIRELESS MICROPHONE SYSTEM 179.110 Instruction Manual Gebruiksaanwijzing Gebrauchsanleitung...
-
Page 2: System Feature
Thanks for purchasing this product, please read this instruction carefully so that can understand how to operate the product of style you bought correctly. Please store this instruction in a safe place after reading as a reference in the future. This series of professional wireless microphone system used a super steady PLL-synthesized control technique and match with the high efficient, low consumption discharging technique and the super sensitive discharging receiving technique, also apply an independent developed mobile frequency compression, expander circuit, image... -
Page 3: System Type
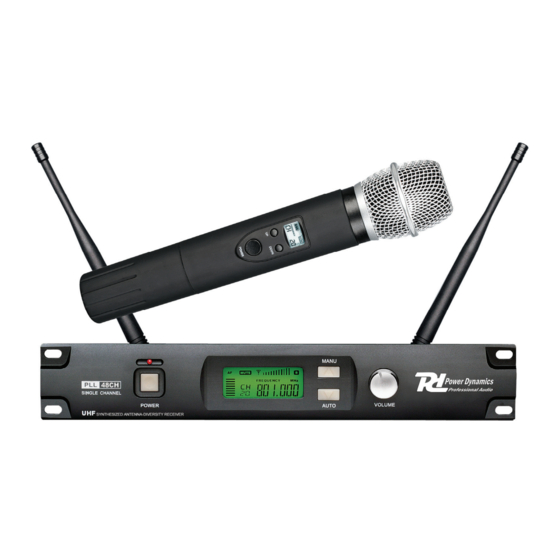
Use the dynamic type and Uni-directional cartridge, clear to show the sound. High efficient and low consumption design. Use the high extension antennas, the operating distance will reach 100m. A self-contained input & output connector, convenience to connect the sound equipment 10. - Page 4 2. Power On Indicator: This light glows when the receiver is plugged into and electrical outlet and switch is pushed, it indicates that the receiver is on. 3. LCD Information Display: show system frequency/RF signal strength/AF audio level strength ect.. 4.
-
Page 5: System Connections
SYSTEM CONNECTIONS 1. Receiver Power Connection: Connect the AC adapter into the DC power connector on the back of the receiver. Plug the AC adapter into a 220~240VAC/50Hz outlet. 2. Antenna Connection: Attach the two antenna to the ANTENNA connectors. 3. -
Page 6: Transmitter Connections
TRANSMITTER CONNECTIONS 1. Lavalier microphone connection. 2. Headset microphone connection. 3. Guitarist microphone connection. 4. Transmitter Battery Installation: Open the battery cover and insert two AA (1.5V) Alkaline batteries. (Att. the battery polarity) - Page 7 RECEIVER OPERATION INSTRUCTION (CHANNEL DATA SETTING) 1. Turn on the receiver Length press 2. Channel Set Up: Press Up and Down button 10 select the channel data. 2.1 Length press "MANU" 10 enter channel setting mode, the figure is flashing, during three seconds after operation is finished.
- Page 8 The warranty is not applicable in case of accidents or damages caused by inappropriate use or disrespect of the warnings contained in this manual. Power Dynamics cannot be held responsible for personal injuries caused by a disrespect of the safety recommendations and warnings. This is also applicable to all damages in whatever form.
- Page 9 Hartelijk dank voor de aanschaf van deze Power Dynamics draadloze microfoonkit. Lees de gebruiksaanwijzing aandachtig door alvorens het apparaat in bedrijf te stellen. WAARSCHUWING Lees altijd eerst de gebruiksaanwijzing voordat u een apparaat gaat gebruiken. Bewaar de handleiding zodat elke gebruiker hem eerst kan doorlezen.
- Page 10 SYSTEEM TYPE 179.122 UHF handmicrofoon 179.124 UHF body-pack systeem 179.106 Tie clip lavalier dasspeld microfoon. 179.108 Hoofdband microfoon voor allerhande handsfree toepassingen. 179.109 Gitaarkabel voor gebruik met een electrische gitaar en andere electrische instrumenten. INTRODUCTIE Handmicrofoon Bodypack zender Enkel kanaals antenne diversity ontvanger ENKEL KANAALS ONTVANGER 1.
- Page 11 6. Volumeregeling 7. Antennes 8. Antenne aansluitingen. 9. XLR uitgangs connector: Gebalanceerde uitgang om aan te sluiten op de ingang van uw mixer/versterker. 10. Squelch regeling: Om het signaal te verbeteren en ruis te onderdrukken. Deze instelling is in de fabriek vooraf geprogrammeerd. 11.
- Page 12 SYSTEEM AANSLUITINGEN 1. Netaansluiting : Sluit de adapter aan op het lichtnet (230Vac/50Hz) en plaats de voedingsplug in de ontvanger op de achterzijde. 2. Antenna aansluiting: Sluit beide antennes aan. 3. Audio aansluiting : Sluit de audio-apparatuur aan op de ontvanger.
- Page 13 BODYPACK AANSLUITINGEN 1. Dasspeld microfoon aansluiting. 2. Hoofdband microfoon aansluiting. 3. Gitaarsysteem aansluiting. 4. Batterijen plaatsen: Plaats 2x AA (1.5V) Alkaline batterijen. (Controleer batterij polariteit)
- Page 14 Ontvanger bediening (Kanaal DATA SETTING) 1. Zet de ontvanger aan. Toets vasthouden 2. Kanaal Set Up: Toets ▲(up) en ▼(down) om de kanaal data te selecteren. 2.1 Houd toets "MANU" vast om in de kanaal-setting-mode te komen, de info knippert gedurende 3 seconden na bediening, het systeem locked, slaat de data op en gaat daarna uit de mode.
- Page 15 Tevens aanvaardt Power Dynamics geen enkele aansprakelijkheid in geval van persoonlijke ongelukken als gevolg van het niet naleven van veiligheidsinstructies en waarschuwingen. Dit geldt ook voor gevolgschade in welke vorm dan ook.
-
Page 16: System Eigenschaften
Lassen Sie das Gerät erst auf Raumtemperatur kommen. Wenn das Gerät sichtbar beschädigt ist, darf es NICHT an eine Steckdose angeschlossen und NICHT eingeschaltet werden. Benachrichtigen sie in diesem Fall Power Dynamics Vor Kindern schützen. Stecker niemals mit nassen Händen anfassen. - Page 17 SYSTEM 179.122 UHF Handmikrofon 179.124 UHF Bodypack Sender System 179.106 Krawatten Mikrofon 179.108 Kopfmikrofon System für Handsfree Verwendung 179.109 Kabel für Gitarre oder andere elektrische Instrumente EINFÜHRUNG Handmikrofon Bodypack Sender Antenne diversity Empfänger 1-KANAL EMPFÄNGER 1. Ein/Aus-Taste. 2. Betriebsanzeige: Leuchtet, wenn der Empfänger angeschlossen ist und der Netzschalter gedrückt wird.
-
Page 18: Sender Funktionen
6. Lautstärke Regler 7. Antennen 8. Antennen Anschluß. 9. XLR Ausgang: Symmetrischer Ausgang zum Anschluss an dem Eingang des Mixers / Verstärkers. 10. Squelch Regler: Zur Verbesserung des Signals und um das Rauschen zu reduzieren. Diese Einstellung ist Werkseitig vorprogrammiert. 11. - Page 19 SYSTEM ANSCHLÜSSE 1. Schließen Sie das Netzteil an das Stromnetz (230VAC/50Hz) und schließen Sie die Klinkenbüchse an auf der Rückseite. 2. Antennen-Anschluss: Die beide Antennen mit den Einbaubüchsen verbinden. 3. Audio-Anschluss: Die Audio-Geräte mit dem Empfänger verbinden.
- Page 20 BODYPACK SENDER ANSCHLÜSSE Krawattenmikrofon Anschluß Kopfmicrofon Anschluß Gitarre Anschluß 4. Batterien einlegen : 2x AA (1.5V) Alkaline Batterien. (Auf polarität achten)
- Page 21 EMPFÄNGER BEDIENUNG (KANAL DATA-SETTING) 1. Schalten Sie den Empfänger ein. Taste festhalten 2. Kanal Set Up: Drücken Sie ▲(up) und ▼(down) um die Kanal Daten zu wählen. 2.1 Halten Sie die "MANU" Taste fest um in den Kanal-setting-Modus zu kommen, die Info blinkt während 3 Sekunden, das System “locked”, speichert die Daten und verläßt den Modus.
-
Page 22: Technische Daten
Garantieanspruch. Der Garantieanspruch verfällt ebenfalls bei Unfällen und Schäden in jeglicher Form, die durch unsachgemäßen Gebrauch und Nichtbeachtung der Warnungen und Sicherheitshinweise in dieser Anleitung entstanden sind. Power Dynamics ist in keinem Fall verantwortlich für persönliche Schäden in Folge von Nichtbeachtung der Sicherheitsvorschriften und Warnungen. Dies gilt auch für Folgeschäden jeglicher Form. - Page 24 Specifications and design are subject to change without prior notice.. www.tronios.com Copyright © 2010 by TRONIOS the Netherlands...
Need help?
Do you have a question about the 179.110 and is the answer not in the manual?
Questions and answers