
Related Manuals for LevelOne FCS-6020

Summary of Contents for LevelOne FCS-6020
- Page 1 FCS-6020 User Manual FCS-6020 PT Network Camera, 2-Megapixel, Say & Night, PoE 802.3af, IR LEDs, User Manual Version 1.0 1/56...
-
Page 2: Table Of Contents
FCS-6020 User Manual Table of Contents Overview ....................... 3 Package Contents ....................4 Hardware Description ................... 5 Hardware Installation .................... 7 Connect to the Network Camera ................. 10 Install the IP Finder program ................ 10 Bonjour program ..................17 ip-discovery.com(Free DDNS service) ............18 Initial Access to the Network Camera .............. -
Page 3: Overview
When motion is detected at the specified regions, the system can send an E-mail alert or send captured images via FTP upload to a designated storage server. The FCS-6020 is indisputably the top choice for reliable and high performance surveillance. -
Page 4: Package Contents
FCS-6020 User Manual Package Contents Network Camera Power Adapter Camera Stand LAN Cable Quick Installation Guide CD Manual / Utility If any of the above items are missing, please contact your dealer immediately. Note: Using a power supply with a different voltage than the one included with the Network Camera may cause damage and void the warranty for this product. -
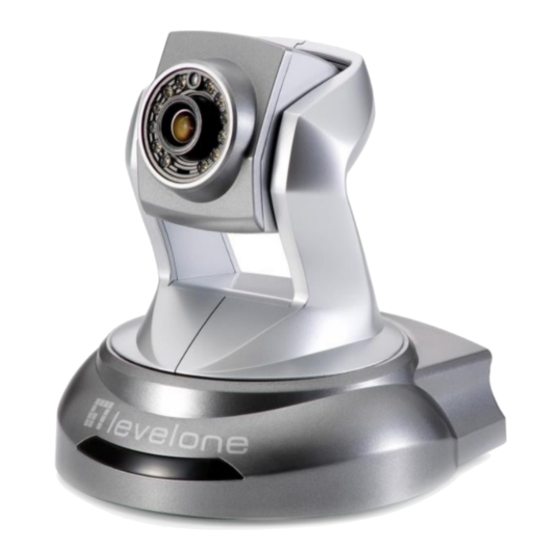
Page 5: Hardware Description
FCS-6020 User Manual Hardware Description 1. Light Sensor Automatically detects lighting condition to turn IR LEDs on/off. 2. Infrared LEDs There are twelve Infrared (IR) LEDs in front of camera for night vision purpose. The IR LEDs will auto or manual turn on when the camera is in the dark environment. - Page 6 FCS-6020 User Manual Beside the DC power Jack, the LAN socket is an RJ-45 connector for connections to 10Base-T or 100Base-TX Fast Ethernet cabling. Please use a Cat 5 ―straight through‖ cable to connect the Network Camera to an Ethernet network switch or hub.
-
Page 7: Hardware Installation
FCS-6020 User Manual Hardware Installation 1. Attach the Network Camera with the included stand 2. Place the Camera on the table or fix it onto ceiling or wall Use screws to fix the Network Camera onto the ceiling or wall. You could also place the Network Camera on the table directly. - Page 8 FCS-6020 User Manual 4. Connect the external power supply to the network camera Connect the attached power adapter to the DC power jack of the Network Camera. Note: Use the power adapter, 12VDC, included in the package and connect it to wall outlet for AC power.
- Page 9 FCS-6020 User Manual 9/56...
-
Page 10: Connect To The Network Camera
FCS-6020 User Manual Connect to the Network Camera Install the IP Finder program When you installed your Network camera on your LAN environment, you may install ―IP Finder‖ to discover Network camera’s IP address. The Administrator must place the product software CD into the CD-ROM drive of the PC running in Microsoft Windows. An auto-run program will pop up (If the program is not on auto-run, go to the root directory of the software CD and click on ―autorun.exe‖). - Page 11 Network Camera User’s Manual ―IP Finder‖ is used to search the IP address of Network Cameras or Video servers on a LAN. After searching, Video Servers or Network Cameras will be located by the IP Finder. 11/56...
- Page 12 Network Camera User’s Manual Search Camera Click search Camera button, The program will search for all family network devices on the same LAN. After searching, the main installer window will pop up. Click on the MAC and model name which matches the product label on your device to connect to the Network Camera via Internet Explorer.
- Page 13 Network Camera User’s Manual Setup Camera Auto Install Wizard will be started and that it can auto guide through the installation process. Press the “Next” button execute next process. For more information, please refer to the Network section on page 33. 13/56...
- Page 14 Network Camera User’s Manual 14/56...
- Page 15 Network Camera User’s Manual 15/56...
- Page 16 Network Camera User’s Manual 16/56...
-
Page 17: Bonjour Program
Network Camera User’s Manual Bonjour program Safari browser supports Bonjour search program the will search for all family network devices on the same LAN. 17/56... -
Page 18: Ip-Discovery.com(Free Ddns Service)
Network Camera User’s Manual ip-discovery.com(Free DDNS service) When you want to connect the network camera over Internet, you can use the service ― ‖. The ―ip-discovery.com‖ is a free DDNS server for C2.mylevel1.com this camera. Make sure that the router must start UPnP and DHCP server functions. -
Page 19: Initial Access To The Network Camera
Network Camera User’s Manual Initial Access to the Network Camera For the initial access to the Network Camera in Windows, the web browser may prompt for permission to install a new plug-in for the Network Camera. This plug-in has been registered for certificate and is used to display the video in the browser. Users may click on to proceed. -
Page 20: Primary User's Capability
Network Camera User’s Manual Primary user’s capability Main Screen with Camera View The main page has three parts: 1. Configuration functions: The camera can be configured using these user interfaces. 2. Pan/Tilt & connection control buttons: These buttons provide the direction to control the pan and tile of camera. - Page 21 Network Camera User’s Manual Camera View: Click this button to capture and save still images. The captured images will be displayed in a pop-up window. Right-click the image and choose ―Save Picture As‖ to save it in JPEG format. This button lets you open a digital zoom, and to control the window to enlarge a specified area in the camera view.
- Page 22 Network Camera User’s Manual Pan/Tilt & connection control buttons: 1. Connection: User can choose Remote or Local mode for best connection quality. 2. Video Stream: User can choose stream1 or stream2. 3. Digital Output: Clicking on the ―On‖ or ―Off‖ button turns the digital output to either on or off status.
-
Page 23: Client Setting
Network Camera User’s Manual Client Setting 1. Video output setting: Set video output format. - Stream: Select use multiple stream video. - Picture: Select use serial video picture. 2. Internet Protocol Options: Set internet protocol. - UDP: Select to use UDP protocol. - TCP: Select to use TCP protocol. - Page 24 Network Camera User’s Manual The HTTP protocol allows for less packet loss and produces a more accurate video display. The downside with this protocol is that the real-time effect is worse than that with the UDP protocol. The TCP guarantees the complete delivery of streaming data and thus provides better video quality.
-
Page 25: Definitions In Configuration
Network Camera User’s Manual Definitions in Configuration Please note that only the Administrator can access the system configuration. Each category in the left column will be explained on the following pages. System parameters Firmware version 1. General Setting (1) Host name The text displays the title on the top of the main page. - Page 26 Network Camera User’s Manual 2. Time Setting (1) Time zone Choose a time zone from the pull down menu. (2) Daylight saving Enable or disable daylight saving time. (3) Current Time Set the time of the network camera. (A) Keep current date time Click on this to keep the current date and time of the network camera.
-
Page 27: User Management
Network Camera User’s Manual User Management Security setting The administrator account name is ―root‖, which is permanent and can not be deleted. If you want to add more accounts in the Manage User column, please set a password for the ―root‖ account first. The network camera can provide up to twenty accounts. - Page 28 Network Camera User’s Manual 3. Manage user (1) Add a new user: Administrators can add up to 20 user accounts. (A) Input the new user’s name and password. (B) Select the privilege level for the new user account. Click Finish to enable the setting.
-
Page 29: Network
Network Camera User’s Manual Network Any changes made on this page will restart the system in order to validate the changes. Make sure every field is entered correctly before clicking on “Finish” Network Setting LAN / PPPoE The default setting is LAN. Select PPPoE if using ADSL dialup. 1. - Page 30 Network Camera User’s Manual (1) Get IP address automatically (2) Use fixed IP address - IP address: This is necessary for network identification. - Subnet mask: This is used to determine if the destination is in the same subnet. The default value is ―255.255.255.0‖. - Default router: This is a gateway used to forward frames to destinations in a different subnet.
- Page 31 Network Camera User’s Manual to connect to the wireless device with the highest transmitting rate. (2) Security: Select the data encryption method - None: Do not use data encryption. - WEP: Allows communication only with other devices which are with identical WEP settings.
- Page 32 Network Camera User’s Manual setting). - Open communicates the key across the network. - Shared allows communication only with other devices, which are with identical WEP settings. (5) Key length: The administrator can select the key length of 64 or 128 bits. 64 bits is the default setting.
-
Page 33: Access List
Network Camera User’s Manual Access list Access list setting 1. Add denied address: This rule allows the user to assign a range of IP addresses to the Deny List. 2. Delete denied address: Delete IP address list from the Address List. 33/56... -
Page 34: Audio And Video Setting
Network Camera User’s Manual Audio and Video setting General Setting 1. Color mode: Select use color or monochrome video display. 2. Video orientation: The orientation of video (1) Flip: Vertically rotate the video. 34/56... - Page 35 Network Camera User’s Manual (2) Mirror: Horizontally rotates the video. 3. Environment: The orientation of video (1) Indoor: This option is usually selected when the Network Camera is placed in indoor environments. (2) Outdoor: This option is usually selected when the Network Camera is placed in outdoor environments.
-
Page 36: Video Record
Network Camera User’s Manual Video record Schedule mode (1) Every day: Enable/Disable every day application. (2) Week day: Enable/Disable week day application. (3) Selected day: Enable/Disable selected day application. Schedule information (1) Enter the Start time and Stop time for day mode. Note that the time format is [hh:mm] and is expressed in 24-hour clock time. - Page 37 Network Camera User’s Manual the transaction stage when a storage space is full and the incoming streaming data is about to overwrite the previously saved videos. Record parameters (1) Source: Select a stream for the recording source. (2) Recording interval: Select the recording time interval. (3 )Prefix file name: You can setting the file name, and enable or disable to add the date and time on file name.
-
Page 38: Stream
Network Camera User’s Manual Stream Audio codec setting (1) Audio codec type: There are two choices of audio codec types available: AMR and AAC. (2) Bit rate -- AMR The bit rates are selectable at the following rates: 4750,5150,5900,6700,7400,7950,10200 and 12200. -- AAC The bit rates are selectable at the following rates: 8Kbps, 16Kbps, 24Kbps and 32Kbps. - Page 39 Network Camera User’s Manual on requirement or application. (3) Video size: Click the drop down bar to choose the quality of image (4) Connection type: User can select this button to choose the better video & links quality. (Internet mode or Intranet mode) (5) Frame rate: This limits the maximal refresh frame rate per second.
-
Page 40: Camera Control
Network Camera User’s Manual Camera control Camera control The pan and tilt functions can be controlled with these buttons. The Left button controls the camera to the left; the Right, Up, and Down buttons control the camera accordingly. 40/56... - Page 41 Network Camera User’s Manual (1) UL, UR, LL and LR buttons control the camera to an oblique angle. And Home button controls the camera to the center. (2) Pan angle: This sets the range of the horizontal movement of the camera. The larger value is setting, the larger movement of Left or Right is performed by the camera.
-
Page 42: Application
Network Camera User’s Manual Application Schedule mode (1) Every day: Enable/Disable every day application. (2) Week day: Enable/Disable week day application. (3) Selected day: Enable/Disable selected day application. Schedule information (1) Enter the Start time and Stop time for day mode. Note that the time format is [hh:mm:ss] and is expressed in 24-hour clock time. - Page 43 Network Camera User’s Manual Trigger mode (1) Video motion detection: Enable/Disable video motion application. (2) Periodically: This option allows the Network Camera to trigger periodically for every other defined minute. (3) Digital input: This option allows the Network Camera to use an external digital input device or sensor as a trigger source.
- Page 44 Network Camera User’s Manual -- Password: Enter the password of the FTP account. -- FTP folder name: Enter the folder where the media file will be placed. If the folder name does not exist, the Network Camera will create one on the FTP server.
-
Page 45: Storage
Network Camera User’s Manual Storage Manage the storage device (like SD card or USB flash disk). Storage Status Displays the storage device information. File operation Move the mouse over the file. Press the mouse right button that Right-click menu is displayed. You can delete files. Move the mouse over the directory. -
Page 46: Syslog
Network Camera User’s Manual Syslog The Network camera supports log the system messages on remote server. The protocol is compliant to RFC 3164. If you have external Linux server with sys log service, use ―-r‖ option to turn on the facility for receiving log from remote machine. -
Page 47: Status And Parameters
Network Camera User’s Manual Status and Parameters Upnp port forwarding User can find a lot of information about the system such as Traversing NAT Public IP and so on. User also can get the number of current viewer of the Network Camera here. 47/56... -
Page 48: Maintenance
Network Camera User’s Manual Maintenance 1. Reboot system: The Reboot button will reboot the Network Camera. It’s useful while the Network Camera has problems and needs to be rebooted. 2. Restore system: Click on Restore button on the configuration page to restore the factory default settings. - Page 49 Network Camera User’s Manual Warning: The upgrade firmware procedure cannot be interrupted. If the power and/or network connection are broken during the procedure, it might possibly cause serious damage to the Network Camera. Note: When upgrading firmware please wait for 90~180 seconds, and then you can connect to Network Camera again.
-
Page 50: Appendix
Network Camera User’s Manual Appendix A. Troubleshooting & Frequently Asked Questions Q1: Status led does not light up. A1: First, make sure that「Configuration>System>Turn off the LED indicator」is disabled. If it is, check the item, and the led should light up. Second, if red led does not light up, please check that the power adapter in the package is plugged correctly. - Page 51 Network Camera User’s Manual 6. Type IP address:8080 at browser. Then you can see camera through Internet. 7. You can also type the DDNS name at below label of camera on browser URL field. For example, you may type user01.C2.mylevel1.com:8080. (2) By Setting Port Forwarding Manually 1.
- Page 52 Network Camera User’s Manual 2. Go to camera Network page. Disable UPnP port forwarding function. 3. Type IP address at browser. Then you can see camera through Internet. 4. You can also type the DDNS name at below label of camera on browser URL field.
- Page 53 Network Camera User’s Manual first time? A6: Make sure the subnet of network camera is same as your PC. If the local area network supports DHCP, the camera is ―Get IP address automatically‖ in the ―Network‖ page default. If the local area network does not support DHCP, change your PC IP address to ―192.168.0.xxx‖.
- Page 54 Network Camera User’s Manual possible interference is (1) the direction of antenna (2) the material and architecture of building (3) the temperature of environment (4) the position of the network camera. Q12: The process of upgrade firmware aborted. A12: Contact your dealer for further help. Q13: Cannot access the login page and other web pages of Network Camera from Internet Explorer A13:...
-
Page 55: Technical Specifications
Network Camera User’s Manual B. Technical specifications FCS-6020 Camera Image Sensor 2-Megapixel 1/2.7" Progressive CMOS Effective Pixels 1920x1080 Lens Board lens, fixed-focal, f=4.0 mm, F2.0 62 ゚ Angle of View (H) Color: 1.5 lux at F2.0 Minimum Illumination B/W: 1.0 lux at F2.0 IR Cut Filter Removable infrared-cut filter for day &... - Page 56 OS: Microsoft Windows 7/Vista/XP Browser: Internet Explorer 6.x or above, Firefox, Chrome, Safari Viewing System Requirements Cell phone: 3GPP player Real Player: 10.5 or above Quick Time 6.5 or above Bundled Software Bundled with 64-Channel LevelOne OneSecure surveillance management software 56/56...
Need help?
Do you have a question about the FCS-6020 and is the answer not in the manual?
Questions and answers