Table of Contents
Advertisement
Quick Links
Advertisement
Table of Contents

Summary of Contents for Fantec FHDL
- Page 1 ENGLISH...
-
Page 2: Table Of Contents
Table of Contents 1. Introduction .......................... 3 1.1 Preface ........................3 1.2 Packing List ......................... 4 1.3 Cautions ........................4 1.4 Connection ........................6 1.5 Power On / Off ......................10 1.6 Menu Language ......................10 ... -
Page 3: Introduction
1. Introduction 1.1 Preface Thank you very much for purchasing FANTEC FHDL. We hope you will enjoy using it as a great home entertainment partner. This player has the following functionality. A/V Output • HDMI V1.3 for high-definition video and digital audio •... -
Page 4: Packing List
The actual contents in the package might be different from the packing list in this manual. 1.3 Cautions The FANTEC FHDL design and manufacture has your safety in mind. In order to safely and effectively use this player, please read the following before usage. - Page 5 1.3.5 Disposing of the Player When you dispose of the player, be sure to dispose it appropriately. Some countries may regulate disposal of electrical device, please consult with your local authority. 1.3.6 Hard Disk Cautions The player uses an internal hard disk for data storage, in normal case, format or repair is not required.
-
Page 6: Connection
1.4 Connection 1.4.1 Connecting the Power Supply (1) Follow the picture and connect the AC adaptor to the player’s DC IN jack; (2) Follow the picture and plug in the AC adaptor to the power outlet. 1.4.2 Connecting to a PC (1) Make sure the player is powered on;... - Page 7 1.4.3 Connecting a USB Device (1) Make sure the player is powered on; (2) Plug in the USB stick or USB HDD etc. to the USB HOST port of this player. In this way, you can browse contents on the USB device. 1.4.4 Connecting to a TV 1.4.4.1 A/V OUT (1) Follow the picture and plug in the 3 color connector to the player’s A/V OUT jack;...
- Page 8 1.4.4.2 SCART OUT (1) Follow the picture and plug one connector on the SCART cable to the player’s SCART socket; (2) Follow the picture and plug the other connector on the SCART cable to the TV’s SCART socket. 1.4.4.3 Y/Pb/Pr Component OUT (1) Follow the picture and plug in the 3 color connector to the player’s Y/Pb/Pr jack;...
- Page 9 1.4.4.4 HDMI OUT (1) Follow the picture and plug one connector on your HDMI cable to the player’s HDMI jack; (2) Follow the picture and plug the other connector on your HDMI cable to the TV’s HDMI jack. Note: The HDMI cable is an optional accessory sold separately. In this way, you can have the highest quality video and audio via a single cable.
-
Page 10: Power On / Off
1.4.6 Connecting to a LAN To connect to a LAN (Local Area Network) you require a cat5, cat5e or cat6 network cable (not supplied). (1) Connect one of the crystal plugs on the cable to the player’s RJ45 LAN socket; (2) Connect the other crystal plug on the cable to a RJ45 LAN port on your router, switch, or hub devices. -
Page 11: Hdd Format
1.7 HDD Format For users who wish to install a new SATA HDD into the player, please refer to the following procedures to format the hard disk on the player before usage. Note: This page can be also accessed via Setup->System->HDD Format menu. Step 1: Select OK on the Warning page, press ENTER to confirm. -
Page 12: About The Player
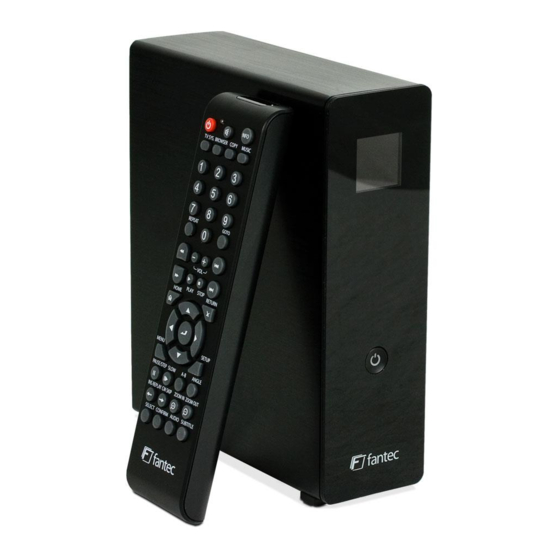
2. About the Player 2.1 Remote Control All procedures in this manual can be carried out using the remote control buttons. See the following for details on each button and its function: 1. STANDBY 2. MUTE 3. TV SYSTEM 4. BROWSER 5. - Page 13 Press to decrease the volume. VOL- Press to fast forward the current playback. Press repeatedly to select speeds. PLAY Press to begin playback. HOME Press to enter the home screen. Press the arrow buttons to select menu options, and the ENTER Navigational buttons button to confirm.
-
Page 14: Front Panel
2.2 Front Panel 1. LCD screen 2. Working indicator 3. Power indicator & button 2.3 Rear Panel 1. Air Flow hole 2. USB DEVICE port 3. USB HOST port x 2 4. S/PDIF COAXIAL & OPTICAL jack 5. RJ45 LAN socket 6. -
Page 15: Setup Menu
3. Setup Menu The Setup menu allows you to personalize and configure the preferences for your player. To select a Setup option: Select the Setup icon on the home screen, or press the SETUP button on the remote control. Use the LEFT/RIGHT navigational buttons to select an option, and then press ENTER. There are five Setup options, including Audio, Video, Network, System, and MISC. -
Page 16: Changing Video Settings
SPDIF Output Choose among LPCM Dual CH and Passthrough. Note: In raw mode, Dolby Digital, DTS sound can be by passed to the HDMI TV or Digital amplifier. Due to the bandwidth requirement, Dolby Digital Plus sound and Dolby TrueHD only can be by passed through HDMI cable. -
Page 17: Changing Network Settings
Saturation Adjust the level of saturation. Video System Select to adjust video output resolution: NTSC / PAL / 480P / 576P / 720P 50HZ / 720P 60HZ / 1080I 50HZ / 1080I 60HZ / 1080P 50HZ / 1080P 60HZ. 1080P 24FPS Choose this option to enable or disable 1080P 24HZ support. - Page 18 This player can store up to three wireless network connections. Press ENTER to go to next step, press RETURN to cancel, and press PLAY to connect. Get Connection Mode Choose between Infrastructure (AP), Peer to Peer (Ad Hoc) or WPS(AP).Press ENTER to go to next step, and press RETURN to cancel.
- Page 19 Encryption keys can be inputted via the virtual keyboard. Press the navigational buttons to select, ENTER to input, CAPS to switch between uppercase and lowercase, <- to delete a character, -> to insert a space, shift to make more symbols available, and OK to confirm. DHCP IP (AUTO) Select to obtain IP address automatically.
- Page 20 Peer to Peer (Ad Hoc) Peer to Peer mode, which is also called Ad Hoc mode or computer-to-computer mode, is used to connect wireless clients directly together, without the need for a wireless router or access point. Ad-Hoc Setup Press ENTER to go to next step, press RETURN to cancel, and press PLAY to connect. WPS (AP) WPS, Wi-Fi Protected Setup, is used to connect a wireless router directly, without searching SSID and inputting password.
-
Page 21: Changing System Settings
NAS Mode Select to turn NAS function On/Off. Select to turn BitTorrent download o On/Off. Host Name Select to key in your desired host name to be seen in your network. Remote Control Select to turn on / off network based remote control. Please refer to chapter ’12. Virtual Remote Control’... - Page 22 Menu Language Select to choose the OSD (On-Screen Display) language. (English, Espanol, French, German, Italiano, Dutch, Russky, Polski, Cesky, Slovensky, Romania, Portugees, Hebrew, Magyar, Slovenscina) Text Encoding Select to set the text encoding option (subtitle display). System Update Select Extension Package Upgrade to update extension files for BT download, NAS, and Web server.
-
Page 23: Miscellaneous
Manual Press the left / right button to select each field and the up / down button to adjust each setting. Numeric buttons are available here. Press the enter button to confirm. HDD Format Select to format the built-in HDD. Note: Please take care that all data on the hard disk will be removed after formatting. - Page 24 Transition Effect Select to set the transition effect for photo slide show. Ken Burns Apply PAN-Scan effects during Photo playback. Background Music Select to set the background music options while view pictures: Off / Folder / Playlist. Seamless Playback Uninterrupted playback of video files(.ts and .m2ts) (the naming of the files should be alike “abc01.ts”...
-
Page 25: Browser Menu
4. Browser Menu The browser menu allows you to browse and play media files stored on USB devices, Local HDD, Network, UPnP-server, and Playlist. To enter the menu, select the Browser icon on the home screen, or press the BROWSER button on the remote control. The following buttons can be used while navigating the browser menu. -
Page 26: Browsing Music
4.2 Browsing Music In this mode, all folders and supported audio files in current directory will be displayed. The following buttons can be used to control music playback. Button Function PLAY Begin playback. PAUSE / STEP Pause playback. FR / FF Fast rewind or fast forward. -
Page 27: Browsing Movies
4.4 Browsing Movies In this mode, all folders and supported video files in current directory will be displayed. The following buttons can be used to control video playback. Button Function PLAY Begin playback. PAUSE / STEP Pause playback; Press again to step to next frame. SLOW Play video in slow motion. -
Page 28: A/V Streaming Via Network
4.5 A/V Streaming via Network You can stream the media files shared on the home network (Ethernet or WLAN). Please refer to ’3.3 Changing Network Settings’ for details about network settings. There are two ways to locate media files shared on your local network in the Network menu. One is to browse through Workgroup;... - Page 29 4.5.2 Browsing through ‘My_Shortcuts’ You can also set ‘Specific File Server IP’ and access it from ‘My_Shortcuts’ in the menu. Press the MENU button and a popup menu appears. Select Add to open a popup menu where you can input Net User ID (Username), Net Password, Domain, Host Name, and Specific File Server IP of destination PC.
-
Page 30: A/V Streaming Via Upnp-Server
4.6 A/V Streaming via UPnP-server A built-in UPnP (Universal Plug and Play) client has been integrated on the system, which enables the player to auto-detect UPnP Media Servers on the network to browse and stream media files from them. 4.6.1 Installing UPnP Media Server on your PC There’re a lot of free and commercial UPnP Media Server software, such as Windows Media Connect, Windows Media Player 11, XBMC Media Center (Linux/Mac/Windows), MediaTomb (Linux), etc. -
Page 31: Renaming / Deleting Files
4.6.3 Streaming Media on your Player Connect your player to the home network (LAN or WLAN). Visit Browser - > UPnP menu on the player, select the UPnP-server, and press ENTER. Then you can browse the media library shared by Windows Media Player 11. Note: •... -
Page 32: Managing The Playlist
4.8 Managing the Playlist This player supports the playlist function, which allows you to add your favorite contents on local HDD to the playlists (All, Music, Photos, and Movies), and enjoy them at any time. 4.8.1 Adding files to the playlist Select the favorite file you wish to add, press the SELECT button, and the file will be marked. -
Page 33: File Copy Menu
5. File Copy Menu Select the File Copy icon from the home screen to enter the File Copy menu, which allows you to copy files between USB devices, Local HDD, and Network. The following buttons can be used under the file copy menu. Button Function UP / DOWN... -
Page 34: Media Library
6. Media Library This is a powerful search engine. The media library menu allows you to search and browse multimedia files stored on the internal HDD. To enter this menu, select the Media Library icon on the home screen. 6.1 Music Library Use the left / right button on the remote control to select the Music tab. - Page 35 Search Select to search for music files by their names. Use the navigational buttons to select, and press the enter button to confirm. Select OK and press the enter button, and then the files you desired will be displayed on the screen. Select to list all the music files in the library.
- Page 36 Genre Select to list all the music files by genre. Press the up / down button to select the genre, and press the enter button to confirm. Album Select to list all the music files by album. Press the up / down button to select the album, and press the enter button to confirm.
-
Page 37: Photo Library
6.2 Photo Library Use the left / right button on the remote control to select the Photos tab. Press the up / down button to select from Update, Search, All, and Date. And press the enter button to confirm. Select to update and synchronize all the photos stored on the internal Update HDD to the library. - Page 38 Select to list all the photos in the library. Date Select to list all the photos by date. Press the up / down button to select the date, and press the enter button to confirm. Quick-Search You can also press the right button to turn on a Quick-Search bar while previewing photos in the library.
-
Page 39: Movie Library
6.3 Movie Library Use the left / right button on the remote control to select the Movies tab. Press the up / down button to select from Update, Search, All, Actor, Genre, and Year. And press the enter button to confirm. Select to update and synchronize all the movies stored on the internal Update HDD to the library. - Page 40 Select to list all the movies in the library. Actor Select to list all the movies by actor. Press the up / down button to select the actor, and press the enter button to confirm. Genre Select to list all the movies by genre. Press the up / down button to select the genre, and press the enter button to confirm.
- Page 41 Year Select to list all the movies by year. Press the up / down button to select the year, and press the enter button to confirm. Quick-Search You can also press the right button to turn on a Quick-Search bar while previewing movies in the library.
-
Page 42: Internet Radio
7. Internet Radio This player integrates the SHOUTcast free Internet radio function. Select the Internet Radio icon on the main interface to enter this menu. Note: • Make sure the player is connected properly to a LAN or WLAN with Internet access, please refer to ‘3.3 Changing Network Settings’... -
Page 43: Downloads
8. Downloads Select the P2P Share icon on the main menu. You can see the status of torrents download progress and configure the BT download settings in this menu. Press LEFT/RIGHT button to enter into download menu and BT setup menu. Add a new torrent Locate your torrent file in Browser menu,then press MENU button to add the torrent to start downloading. - Page 44 PAUSE Press to pause the download. PLAY Press to start download. STOP Press to stop the download. Return to the previous menu. RETURN BT setup Menu In the BT Setup menu, you can configure the following settings. Use UP/DOWN and ENTER to change the settings.
-
Page 45: Nas Function (Samba)
9. NAS Function (samba) This player can be used as a NAS (Network-Attached Storage) device. It can be attached to the home network via either Ethernet or WLAN. This feature allows storing and retrieving large amounts of data more affordably than ever before. When the network connection is done correctly, please enable BitTorrent and SAMBA in the setup menu to use the NAS function (refer to 3.4 Changing System Settings for more details), and then type: \\IP Address in the Run window (click Run in the start menu) or the address bar... -
Page 46: Ftp Server
11. FTP Server This product can also be used as a FTP Server as far as it is attached to your home network. FTP Server Configuration to access via the Internet Configure the username and password of the FTP Server. Setting up your device: Assign a manual Fixed IP address for the product, for example 192.168.0.9 Assign the same subnet mask as your router (usually 255.255.255.0) - Page 47 FTP Address: Your router’s WAN IP address User ID: The User Name which was set under FTP, ’ Network setup’ Password: The Password which was set under FTP, ’ Network setup’ FTP Address: Your DDNS host name User ID: The User Name which was set under FTP, ’ Network setup’ Password: The Password which was set under FTP, ’...
-
Page 48: Virtual Remote Control
12. Virtual Remote Control This product is equipped with a virtual network remote control. This feature allows you to remote your player from wherever you are. To access the unit you can use your mobile phone or computer as far as they are in the same local network. Network Remote control To open the network remote control, please enter the IP address of the unit into your web-browser. - Page 49 • BitTorrent management View and manage your BitTorrent tasks remotely over the network/ internet. HTTP Server Configuration to access via the Internet Setting up your device: Assign a manual Fixed IP address for the product, for example 192.168.0.9 Assign the same subnet mask as your router (usually 255.255.255.0) Assign the gateway of your router (router’s local IP address, usually 192.168.xxx.xxx)..
-
Page 50: Upgrading The Firmware
To access via HTTP server from out of your local network, launch a web browser such as Microsoft® Internet Explorer and enter following data into the address bar: http://123.456.789.000:1024 where 123.456.789.000 is the WAN IP address of your router. Please refer to your router documentation on getting this information from your router. -
Page 51: Appendixes
14. Appendixes 14.1 Specifications I/O INTERFACES SUPORTED: 3.5’’ SATA HDD USB 2.0 HOST port x 2 (compatible to USB 1.1) USB 2.0 DEVICE port (connecting to PC) Composite (CVBS) A/V jack Component Y/Pb/Pr jack EURO Scart HDMI V1.3 interface S/PDIF coaxial & optical jack DC-IN 12V FILE SYSTEM SURPORTED: FAT/FAT32/NTFS/EXT3... -
Page 52: Frequently Asked Questions
14.2 Frequently Asked Questions Question 1. When I try to disconnect the USB device, I keep on getting “The device ‘Generic volume’ cannot be stopped right now. Try stopping the device again later.” message, what should I do? Answer: Close any program that might be accessing data on the player, including Windows® Explorer. If it does not work, close all programs and wait for another 20 seconds, then try the green arrow icon again. - Page 53 on the remote control, then switch the TV’s video input to NTSC or PAL. Question 7. Why is there no sound on movie or music playback when using Y/Pb/Pr component output? Answer: Y/Pb/Pr output is a video output only, and does not include sound signals. When using Y/Pb/Pr output, please plug the A/V OUT or the S/PDIF jack to output sound.
-
Page 54: Copyrights And Trademarks
14.3 Copyrights and Trademarks Copyrights All rights reserved. No part of this manual may be reproduced, or transmitted in any form or by any means, whether by electronically or mechanically, without the express written permission from the copyright holder. Copyrighted materials, such as software, music files, or movies, are protected by local law, and may not be illegally copied or used without permission from the copyright owner. - Page 55 TECHNICAL INFORMATION License information for the software used in the unit. This product contains Free Software which is licensed under the GNU General Public License. After you purchase this product, you may procure, modify or distribute the source code of the GPL/LGPL software that is used in this product.
- Page 56 For example, if you distribute copies of such a program, whether gratis or for a fee, you must give the recipients all the rights that you have. You must make sure that they, too, receive or can get the source code. And you must show them these terms so they know their rights. We protect your rights with two steps: (1) copyright the software, and (2) offer you this license which gives you legal permission to copy, distribute and/or modify the software.
- Page 57 based on the Program, and copy and distribute such modifications or work under the terms of Section 1 above, provided that you also meet all of these conditions: a) You must cause the modified files to carry prominent notices stating that you changed the files and the date of any change.
- Page 58 source code. (This alternative is allowed only for noncommercial distribution and only if you received the program in object code or executable form with such an offer, in accord with Subsection b above.) The source code for a work means the preferred form of the work for making modifications to it. For an executable work, complete source code means all the source code for all modules it contains, plus any associated interface definition files, plus the scripts used to control compilation and installation of the executable.
- Page 59 If any portion of this section is held invalid or unenforceable under any particular circumstance, the balance of the section is intended to apply and the section as a whole is intended to apply in other circumstances. It is not the purpose of this section to induce you to infringe any patents or other property right claims or to contest validity of any such claims;...
- Page 60 NO WARRANTY 11. BECAUSE THE PROGRAM IS LICENSED FREE OF CHARGE, THERE IS NO WARRANTY FOR THE PROGRAM, TO THE EXTENT PERMITTED BY APPLICABLE LAW. EXCEPT WHEN OTHERWISE STATED IN WRITING THE COPYRIGHT HOLDERS AND/OR OTHER PARTIES PROVIDE THE PROGRAM "AS IS" WITHOUT WARRANTY OF ANY KIND, EITHER EXPRESSED OR IMPLIED, INCLUDING, BUT NOT LIMITED TO, THE IMPLIED WARRANTIES OF MERCHANTABILITY AND FITNESS FOR A PARTICULAR PURPOSE.
Need help?
Do you have a question about the FHDL and is the answer not in the manual?
Questions and answers