
Summary of Contents for COMFORTPOOL G7
- Page 1 OPLAADBARE ZWEMBADSTOFZUIGER GEBRUIKERSHANDLEIDING RECHARGEABLE CORDLESS CLEANER USER MANUAL...
-
Page 2: Table Of Contents
NL - Inhoud Veiligheidsvoorschriften ..........................3 Onderdelen ..............................5 Aan de slag ..............................6 De accu opladen ..............................6 Montage voor gebruik ............................8 Montage van handgreep ................................8 Montage van de zuigmond ............................... 8 Montage van de telescoopsteel (niet inbegrepen) ........................9 Gebruik ............................... -
Page 3: Veiligheidsvoorschriften
Veiligheidsvoorschriften Lees en volg alle instructies in deze handleiding en op het apparaat. Het niet in acht nemen van deze instructies kan leiden tot schade aan het product en ernstige of dodelijke verwondingen bij u of anderen. Waarschuwing! Dit is geen SPEELGOED. Houd de stofzuiger en accessoires buiten bereik van kinderen. Kinderen mogen dit apparaat nooit bedienen. - Page 4 Adapter en lader • Alleen voor gebruik binnenshuis. • Gebruik de adapter en lader nooit voor andere doeleinden dan het opladen van de accu van de meegeleverde zwembadstofzuiger. • De adapter en lader mogen niet buitenshuis gebruikt worden of bloot worden gesteld aan regen, vocht, vloeistoffen of hitte.
-
Page 5: Onderdelen
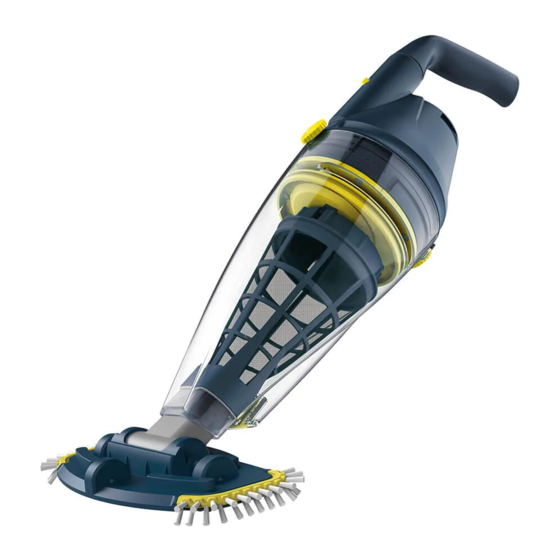
Onderdelen EV50ASM03/17/MUN EV30-ASM07/CP Achterstuk Wieltjes x 3 K62900321 K629ASM13/YEL Transparante koker Telescoopsteel connector K629ASM02/CP K629ASM14/YEL Filterkegel Handgreep Sluitknop (aan elke kant Vergrendeling voor één) handgreep Zuigmond klep AAN/UIT-knop Waterafvoer ventiel Contactplaat voor lader EV30-11/YEL Zwenkbare zuigmond Waterafvoer gaten (in de handgreep) EV30-ASM04/CP K629ASM11/CP... -
Page 6: Aan De Slag
Aan de slag Belangrijk! Laad de stofzuiger volledig op vóór het eerste gebruik. De accu opladen Waarschuwing! Laad de stofzuiger binnenshuis op, in een droge, goed geventileerde ruimte, uit de buurt van zonlicht, hitte en ontstekingsbronnen, en buiten bereik van kinderen, in een omgevingstemperatuur tussen de 5˚C en 35˚C. - Page 7 Gebruik GEEN verlengsnoeren. Laad de accu volledig op voor het eerste gebruik. Laad de stofzuiger binnenshuis op, in een droge, goed geventileerde ruimte, uit de buurt van zonlicht, hitte en ontstekingsbronnen, en buiten bereik van kinderen, in een omgevingstemperatuur tussen de 5˚C en 35˚C.
-
Page 8: Montage Voor Gebruik
Belangrijk! De herlaadbare lithium-ion batterij wordt beschouwd als een verbruiksgoed. De batterij heeft een beperkte levensduur en zal geleidelijk zijn oplaadcapaciteit verliezen. Door het herhaaldelijk opladen en gebruiken van de batterij zal de werkingstijd van de zwembadstofzuiger ook geleidelijk afnemen. Laat de stofzuiger 30 à... -
Page 9: Montage Van De Telescoopsteel (Niet Inbegrepen)
Om de borstels van de zuigmond te vervangen tilt u één uiteinde op en trekt u de borstel eruit, zodat er een nieuwe inpast. Waarschuwing! Voor zwembaden vinyl- of glasvezelbekleding is het raadzaam om de zuigmond niet zonder borstels te gebruiken, dit kan het zwembad beschadigen. 3. - Page 10 Gebruikt u de stofzuiger wanneer deze niet volledig onder water staat, dan kan dit schade aan het apparaat veroorzaken, en vervalt de garantie. De maximale waterdiepte waar het apparaat gebruikt kan worden is 3 meter. De maximale watertemperatuur is tussen de 5˚C en 35˚C. Gebruik de stofzuiger NOOIT zonder een intacte filterzak in het apparaat, de garantie zal in dat geval vervallen.
-
Page 11: Filter Legen
3. Spoel de zwembadstofzuiger na elk gebruik met schoon water. Gebruik GEEN schoonmaakmiddel. Filter legen Waarschuwing! Gebruikt u de zwembadstofzuiger zonder filterkegel, dan vervalt de garantie. Voor een maximaal schoonmaakresultaat dient u de filter voor en na elk gebruik te reinigen. Let op! Als de stofzuiger aan het opladen is dient u eerst de adapter uit het stopcontact te halen en de stofzuiger van de lader te halen. -
Page 12: Onderhoud En Opslag
5. Om het deksel terug op de filterkegel te bevestigen, plaatst u de sleuf van de rand van het deksel op het lipje van het onderste deel van de kegel. Druk het deksel op de kegel en draai het deksel tegen de klok in tot deze niet meer verder kan. - Page 13 4. Laat het water weglopen uit de handgreep, via het gat aan het uiteinde van de handgreep. 5. Gebruik een vochtige doek om de zuiger en accessoires schoon en droog te maken. 6. Berg alles op in een goed geventileerde ruimte, uit de buurt van zonlicht, hitte, ontstekingsbronnen en zwembad chemicaliën, en buiten bereik van kinderen.
-
Page 14: Verwijderen Van De Accu
Verwijderen van de accu De zwembadstofzuiger is uitgerust met een onderhoudsvrije, oplaadbare, lithium-ion batterij die u correct moet afvoeren. Recycling is verplicht; neem voor meer informatie contact op met de lokale overheid. Waarschuwing! Probeer nooit de accu te demonteren. Verwijder alle persoonlijke voorwerpen, zoals ringen, armbanden, kettingen en horloges wanneer de accu losgekoppeld is van de zwembadstofzuiger. - Page 15 3. Maak de 6 schroeven los en verwijder het deksel om bij de printplaat, motor en accu te komen. 4. Druk op de clip van de connector en trek de connector weg om de voedingskabel van de accu los te koppelen.
-
Page 16: Probleemoplossing
Werp het niet weg bij ongesorteerd afval. Haal eventuele verwijderbare batterijen uit de afgedankte apparatuur. © 2018 Comfortpool. Alle rechten voorbehouden. Niets van dit document mag worden vermenigvuldigd of doorgegeven in welke vorm of op welke wijze dan ook, zij het elektronisch, mechanisch, op fotokopie, openomen... -
Page 17: Safety Warnings & Instructions
Safety warnings & instructions Read and follow all instructions in this manual and on the equipment. Failure to do so could result in severe or fatal injuries. Waarschuwing! This is not a TOY. Children should be kept out of reach from this pool vacuum and its accessories. Never allow children to operate this product. - Page 18 External adaptor and charging base: • For indoor use only. • Never use the external adaptor and charging base for anything other than charging the battery of the pool vacuum that is supplied in the same pack. • The external adaptor and charging base should not be used outdoors, nor exposed to rain, humidity, any liquid or heat.
-
Page 19: Parts
Parts EV50ASM03/17/MUN EV30-ASM07/CP Rear body Wheels x 3 K62900321 K629ASM13/YEL Transparent canister Telescopic pole connector K629ASM02/CP K629ASM14/YEL Filter cone Handle ---------- ---------- Locking knob (on both Handle locking hole sides) ---------- ---------- Suction nozzle flap Power ON/OFF button ---------- ---------- Water draining valve Charging contact plate EV30-11/YEL... -
Page 20: Getting Started
Getting started Important! Fully charge the pool vacuum before using it for the first time. Charging the battery Warning! Charging must be done indoors, in a well-ventilated area away from sunlight, children, heat, ignition sources, and with an ambient temperature between 5˚C (41˚F) and 35˚C (95˚F). Never use the external adaptor and charging base if any damage is detected. - Page 21 Fully charge the battery before first use. Charging must be done indoors, in a dry & well-ventilated area away from sunlight, children, heat, ignition sources, and with an ambient temperature between 5˚C (41˚F) and 35˚C (95˚F). Always disconnect the external adaptor from the power source when charging is complete. Do not leave the pool vacuum in charge for over 20 hours.
-
Page 22: Set-Up Before Use
Important! The rechargeable lithium-Ion battery is classified as a consumable item. It has a limited life and will gradually lose its capacity to hold a charge. Therefore, running time of the pool vacuum will gradually reduce through repeated charging and discharging in operation. Let the pool vacuum rest for 30 to 40 minutes before charging it again. -
Page 23: Telescopic Pole (Not Included) Assembly
To replace the brushes on the suction head, lift one end and pull the brush out to make space for a new one. Warning! For vinyl liner and fiberglass pools, it is recommended to keep the brushes on the suction head to avoid damaging the pool. - Page 24 in a vertical position. Operating the pool vacuum when not immersed in the water correctly can damage the unit and the warranty will be voided as a result. Maximum operating depth in water is 3 meters (10ft). Maximum water temperature: 5˚C (41˚F) – 35˚C (95˚F) DO NOT use the pool vacuum without an intact filter bag in place.
-
Page 25: Emptying The Filter
Emptying the filter Warning! Using the pool vacuum without a filter cone in place will void your warranty. In order to maximize the cleaning efficiency, be sure to clean the filter cone before and after each use. Caution! If the pool vacuum is charging, disconnect the external adaptor from the power source and detach the pool vacuum from the charger base. -
Page 26: Maintenance & Storage
5. To lock the lid onto the filter cone, align the slot of the lid’s edge to the tab of the bottom part of the cone. Push the lid on the cone and turn the lid anticlockwise until it stops. Attach the filter cone to the transparent case. -
Page 27: Battery Disposal
4. Make sure to drain the water from the handle through its hole on the bottom end. 5. Use a damp cloth to clean and dry the pool vacuum and its accessories 6. Store them in a well-ventilated area away from the sunlight, children, heat, ignition sources, and pool chemicals. - Page 28 Warning! Never attempt to disassemble a battery pack. Remove all personal items such as rings, bracelets, necklaces and watches when the battery pack is unwired from the pool vacuum. A battery can produce a short circuit current high enough to weld a ring (or similar item) to metal, causing a severe burn in the process.
- Page 29 3. Unfasten 6 screws and detach the cover to expose the PCBA, motor assembly, and battery pack. 4. To detach the battery connection wire, press the clip on the connector and then pull it out. Important! Wrap the connector immediately with insulating tape in order to avoid short circuit caused by contact of both wire terminals.
-
Page 30: Troubleshooting
Do not dispose them in unsorted waste bins. For items containing removable batteries, remove batteries before disposing of the product © 2018 Comfortpool. All rights reserved. No part of this document may be reproduced or transmitted in any form or by any means, electronic, mechanical, photocopying, recording, or otherwise, without prior written permission...
Need help?
Do you have a question about the G7 and is the answer not in the manual?
Questions and answers