Table of Contents
Advertisement
Available languages
Available languages
Advertisement
Table of Contents

Related Manuals for Punktal MFA 604


Summary of Contents for Punktal MFA 604
- Page 1 BUILT -IN OVEN HORNO EMPOTRADO...
- Page 3 Please read t t h h is user manual f f i i rst t ! ! Dear Customer, Thank you for purchasing this product. We hope that you get the best results from your product which has been manufactured with high quality and state-of-the-art technology. Therefore, please read this entire user manual and all other accompanying documents carefully before using the product and keep it as a reference for future use.
-
Page 4: Table Of Contents
TABLE OF CONTENTS Time setting ..........15 First cleaning of the appliance ....16 Important instructions and warnings Initial heating .......... 16 for safety and environment General safety ..........4 How to operate the oven Electrical safety ..........4 General information on baking, roasting and Product safety .......... -
Page 5: Important Instructions And Warnings For Safety And Environment
Important instructions and warnings for safety and environment This section contains safety • Control that the product function instructions that will help protect from knobs are switched off after every risk of personal injury or property use. damage. Failure to follow these Electrical safety instructions shall void any warranty. -
Page 6: Product Safety
its service agent or similary Care should be taken to avoid qualified persons in order to avoid touching heating elements. a hazard. Children less than 8 years of age • The appliance must be installed shall be kept away unless so that it can be completely continuously supervised. -
Page 7: Intended Use
to clean the oven door glass since Intended use they can scratch the surface, • This product is designed for which may result in shattering of domestic use. Commercial use the glass. will void the guarantee. • Do not use steam cleaners to •... -
Page 8: Compliance With Aeee Regulation And Disposal Of Waste Products
• Electrical products are dangerous reused and are suitable for to children. Keep children away recycling. Therefore, do not from the product when it is dispose the product with normal operating and do not allow them domestic waste at the end of its to play with the product. -
Page 9: General Information
General information Overview 6 Lamp Control panel 7 Top heating element Wire shelf 8 Shelf positions Tray Handle Door Package contents Accessories supplied can vary depending on Used for pastries such as cookies and the product model. Not every accessory biscuits. -
Page 10: Technical Specifications
Used for roasting and for placing the food to be baked, roasted or cooked in casserole dishes to the desired rack. Technical specifications Voltage / frequency 220-240 V ~ 50 Hz Total power consumption 2.2kW Fuse min. 16 A H05VV-FG Cable type / section 3 x 1,5 mm Cable length... -
Page 11: Installation
Installation Refer to the nearest Authorised Service Agent for Before installation installation of the product. Make sure that the The appliance is intended for installation in electric and gas installations are in place before commercially available kitchen cabinets. A safety calling the Authorised Service Agent to have the distance must be left between the appliance and product ready for operation. -
Page 13: Installation And Connection
Installation and connection DANGER: Before starting any work on the • Product can only be installed and connected electrical installation, disconnect the in accordance with the statutory installation product from the mains supply. rules. There is the risk of electric shock! Electrical connection Connect the product to a grounded outlet/line protected by a fuse of suitable capacity as stated... -
Page 14: Future Transportation
Final check bubble wrap or thick cardboard and tape it 1. Plug in the power cable and switch on the securely. product's fuse. • To prevent the wire grill and tray inside the 2. Check the functions. oven from damaging the oven door, place a strip of cardboard onto the inside of the Future Transportation oven door that lines up with the position of... -
Page 15: Initial Heating
Preparation Tips for saving energy Electric oven The following information will help you to use 1. Take all baking trays and the wire grill out of your appliance in an ecological way, and to save the oven. energy: 2. Close the oven door. •... -
Page 16: How To Operate The Oven
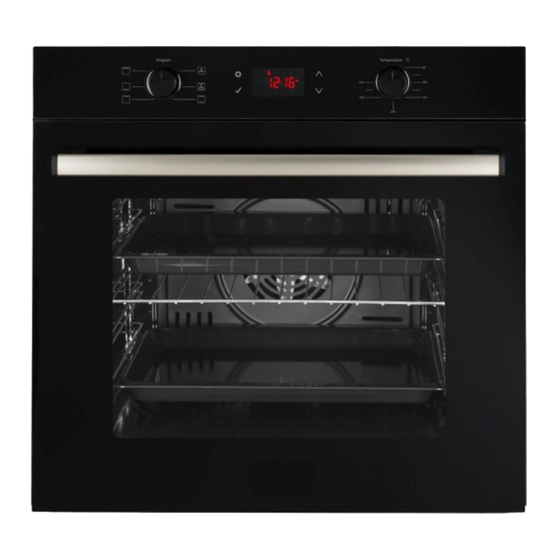
How to operate the oven roast and does not run out when the meat is General information on baking, cut. roasting and grilling • Fish should be placed on the middle or lower rack in a heat-resistant plate. WARNING Hot surfaces cause burns! How to operate the electric oven Product may be hot when it is in use. - Page 17 MODELS MFA 627 MFA 604 MFA 614 A – FRONT PANEL B – WALL SHELFS C – MIDDLE SHELF D – TRAY...
- Page 18 ELECTRIC BUILT-IN OVEN CONTROL PANEL F – PROGRAMS G– TIMER MECHANIC H– THERMOSTAT...
- Page 19 To turn off the oven, you need to move the control knobs to their original position (off). The oven turns off. Mechanical timer The mechanical timer of the oven (Fig. 1) has a sound signal setting time from 1 to 90 minutes.
- Page 20 Turning the “MODES” and “THERMOSTAT” knobs, select the required cooking mode and temperature. Turn the “MECHANICAL TIMER” knob clockwise, setting the required time to turn off the oven and give an audible signal. After the time has passed, the handle of the MECHANICAL TIMER will return to its original position (off).
- Page 21 1-) Active switch 2-) CHILD LOCK 3-) CLOCK 5-) DISPLAY BRIGHTNESS 6-) AM or PM 7-) THERMOSTAT ACTIVE 8-) ALARM When the first energy is supplied to the oven, “OFF” appears on the display, and the clock icon on the display starts flashing.
- Page 22 2) Tone range After setting the clock, the screen that appears after double-clicking the ⚙ button is displayed. At this point, a warning sounds and button sounds. The Yazılım Tone 0 ”stage is selected as the beginning of the software. When this level is reached, no sound is heard. As soon as you press “↑” or “↓”, “tone 0”, “tone 1”, “tone 2”...
- Page 23 - the mains voltage is as indicated on the nameplate; Replacing the oven lamp - the earth connection is in good working order. If the appliance power lead is not fitted with a plug, use an ap- DANGER: proved standard type, remembering that: Before replacing the oven lamp, make - the green-yellow wire must be used for the earth connection;...
-
Page 24: Cooking Times Table
Cooking times table Baking and roasting 1st rack of the oven is the bottom rack. The timings in this chart are meant as a guide. Timings may vary due to temperature of food, thickness, type and your own preference of cooking. Dish Cooking level number Rack position... -
Page 25: Maintenance And Care
Maintenance and care General information Do not use steam cleaners to clean the appliance as this may cause an electric Service life of the product will extend and the shock. possibility of problems will decrease if the product is cleaned at regular intervals. Cleaning the control panel DANGER: Clean the control panel and knobs with a damp... -
Page 26: Removing The Door Inner Glass
Front door Hinge Oven 3. Move the front door to half-way. 4. Remove the front door by pulling it upwards to release it from the right and left hinges. Steps carried out during removing process should be performed in reverse order to install the door. -
Page 27: Troubleshooting
Troubleshooting Oven emits steam when it is in use. • It is normal that steam escapes during operation. >>> This is not a fault. Product emits metal noises while heating and cooling. • When the metal parts are heated, they may expand and cause noise. >>> This is not a fault. Product does not operate. - Page 28 Introducciòn Características técnicas Nuestra empresa, además de felicitarle por la elección de uno Dimensiones ùtiles Horno de sus productos cualificados, desea que obtenga las mejores Anchura cm. 41,00 prestaciones del mismo, tal como Ud. esperaba en el momento Profundidad cm. 39,40 de la compra.
- Page 29 Instalaciòn Para el usuario INSTALACIÓN USO DEL HORNO La instalación deberá asignarse al personal experto que deberá respetar las normas de instalación vigentes. El aparato está HORNO ELÉCTRICO ESTÁTICO realizado de acuerdo con las normas EN 60 335-1 y EN 60 El encendido del horno y del grill se realiza con un solo mando.
- Page 30 Para el usuario NOTA: el piloto amarillo se enciende dependiendo del termosta- - símbolo :encendido del grill (en el techo del horno), el man- to.Antes de introducir los alimentos que se van a cocinar, hay do del termostato deberá estar en la posición de temperatura que dejar el horno calentándose unos 10 minutos como mínimo.
- Page 31 Para el usuario PARA COCINAS CON CUENTAMINUTOS MECÁNICO la cocción; para pararla, basta con apretar cualquier botón. (FIG. 6 ) - Colocar los mandos del termostato del horno y del selector en El cuentaminutos puede programarse por un período máximo la posición de apagados.
- Page 32 Para el usuario mando del termostato horno en la temperatura requerida y el nando el mando, siempre que se hayan programado al menos selector en el tipo de cocción elegido: los testigos y la bombilla dos minutos de cocción. Al confirmar el programa comienza del horno se encienden y el horno entra en funcionamiento.
- Page 33 Para el usuario LIMPIEZA DEL HORNO FUNCIONES DEL PROGRAMADOR ELECTRÓNICO DE 3 - Aconsejamos limpiar el horno después de cada uso, cuando BOTONES (Fig. 13 esté tibio pero no caliente, ya que esta operación simplifica la Signi icado de los símbolos en pantalla: eliminación de las grasas antes de que se sequen.
- Page 34 Para el usuario El programador procesará automáticamente el tiempo progra- Para cancelar un programa de cocción semiautomática o au- mado tras algunos segundos: también puede pulsar repetidas tomática (símbolo A encendido), pulse simultáneamente los veces el botón M hasta volver a la visualización de la hora botones - y + durante al menos 2 segs.
- Page 35 Para el usuario En caso de anomalías y, sobre todo, si se advirtieran fugas salud y favorece el reciclado de los materiales que componen de gas o de aire, llame al técnico inmediatamente. el producto. Para más información acerca de los sistemas de recogida dis- USO DE LOS MANDOS “PUSH PULL”...
Need help?
Do you have a question about the MFA 604 and is the answer not in the manual?
Questions and answers