Table of Contents
Advertisement
Available languages
Available languages
DEA
V
i
Kit videocitofono con schermo piatto 7" a colori
Istruzioni d'uso ed avvertenze
Video intercom kit with 7" colour flat screen display
Operating instructions and warnings
Interphone vidéo couleur à écran plat 7"
Notice d'emploi et avertissements
Kit de videoportero con pantalla plana de 7" en color
Instrucciones de uso y advertencias
Kit intercomunicador de vídeo com ecrã plano 7" a cores
Instruções para utilização e advertências
Wideodomofon w zestawie z kolorowym, płaskim wyświetlaczem 7"
Instrukcja montażu i użytkowania
Комплект видеодомофона с 7" дюймовым цветным дисплеем
Инструкция по эксплуатации и меры предосторожности
Advertisement
Table of Contents

Summary of Contents for Dea ViDEA
- Page 1 Kit videocitofono con schermo piatto 7” a colori Istruzioni d’uso ed avvertenze Video intercom kit with 7” colour flat screen display Operating instructions and warnings Interphone vidéo couleur à écran plat 7” Notice d’emploi et avertissements Kit de videoportero con pantalla plana de 7” en color Instrucciones de uso y advertencias Kit intercomunicador de vídeo com ecrã...
- Page 2 Nome ed i nd iri zz o d ella per s on a autor izzat a a co s t ituir e l a D oc um enta zi on e Tec ni c a p er ti n en te: DEA SYSTEM S.p.A. Via Della Tecnica, 6...
-
Page 3: Dati Tecnici
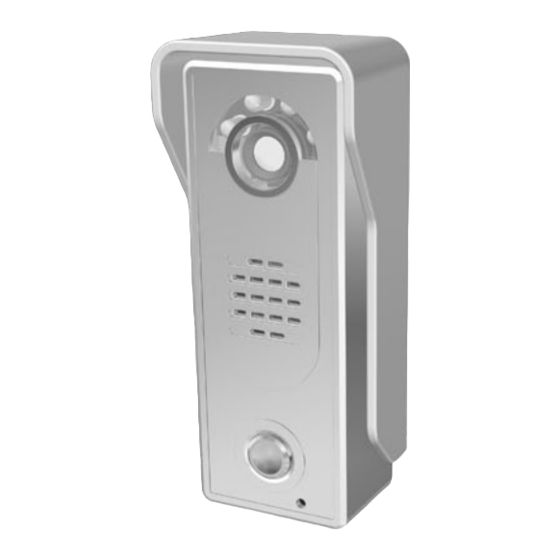
- Angolo di visione: 72° Spia luminosa - Temperatura di utilizzo: -20°C ÷ 55°C - Grado di protezione: IP55 Tastiera numerica - Materiale del box: Alluminio anodizzato - Dimensioni: ViDEA-D=75 x 190 x 45 mm ViDEA-P=58 x 135 x 39 mm... - Page 4 Art. ViDEA-M N° Descrizione Dati tecnici Schermo Unità interna - Monitor (ViDEA-M) - Alimentazione: 17V-18V dc Altoparlante - Assorbimento in standby: ≤200 mA Led di stato e conversazione - Assorbimento a carico: ≤550 mA - Risoluzione: 1440 x 234 pixels Microfono - Temperatura di utilizzo: 0°C ÷...
-
Page 5: Funzionamento
1 INSTALLAZIONE (pag. 57) 1.1 Installazione del monitor interno Utilizzare la staffa e le viti/tasselli forniti per fissare a muro il vostro monitor. Prima di fissare la staffa di supporto, assicuratevi che la superficie del muro sia planare e fissatela saldamente a circa 1,45 mt. - Page 6 2.4 Cancellazione di codici utente • Entrare in modalità programmazione. La spia luminosa lampeggia; • Digitare il numero della posizione da cancellare da 01 a 40, verranno emessi 2 bip; • Premere il tasto per cancellare il codice della posizione, verranno emessi 3 bip a conferma; •...
- Page 7 3 UTILIZZO DEL MONITOR INTERNO • Quando un visitatore preme il campanello del citofono, viene emesso un avviso sonoro all’interno e l’immagine del visitatore appare sullo schermo del monitor. In questo passaggio, l’immagine è visibile ma il visitatore non sente. Si può scegliere allora tra conversare con lui premendo il tasto “conversazione”, aprire l’elettroserratura premendo il tasto di “sblocco”...
-
Page 8: Regole Per La Sicurezza
Collegare i cavi rispettando lo schema elettrico. Il collegamento tra il monitor e la videocamera verrà effettuato tramite 2 cavi (per l’art. ViDEA-P) oppure 4 cavi (per l’art. ViDEA-D). Utilizzare un cavo con sezione 2x0.5 mm² (2x1,5 mm² consigliato) per distanze (videocitofono -->... - Page 9 SCHEMA PER ARTICOLO ViDEA-D * 2nd Monitor OPTIONAL Trasformatore - Transformer - Transformateur - Transformador - Transformador - Transformator - Трансформатор Videocitofono - Video intercom - Interphone vidéo - Videoportero - Intercomunicador de Vídeo- Wideodomofon - Видеодомофон Monitor interno - Internal monitor -...
- Page 10 SCHEMA PER ART. ViDEA-P * 2nd Monitor OPTIONAL Trasformatore - Transformer - Transformateur - Transformador - Transformador - Transformator - Трансформатор Videocitofono - Video intercom - Interphone vidéo - Videoportero - Intercomunicador de Vídeo- Wideodomofon - Видеодомофон Monitor interno - Internal monitor -...
-
Page 11: Technical Data
- Resolution: 420 TVL Light sensor - Viewing angle: 72° Indicator light - Operating temperature: -20°C ÷ 55°C - Protection rating: IP55 Numeric keypad - Box material: Anodized aluminium - Dimensions: ViDEA-D=75 x 190 x 45 mm ViDEA-P=58 x 135 x 39 mm... - Page 12 Art. ViDEA-M N° Description Technical data Screen Indoor Unit - Monitor (ViDEA-M) - Power supply: 17V-18V dc Speaker - Standby power consumption: ≤200 mA Status and talk LED - Operating power consumption: ≤550 mA - Resolution: 1440 x 234 pixels Microphone - Operating temperature: 0°C ÷...
- Page 13 1 INSTALLATION (pag. 57) 1.1 Installing the internal monitor Use the bracket and the supplied screws and anchors to secure the monitor to the wall. Prior to applying the mounting bracket, make sure that the wall’s surface is flat, and fasten it securely at about 1.45 m from the floor.
- Page 14 2.4 Deleting user codes • Access the device’s programming mode. The indicator light will begin flashing; • Enter the number of the position to be deleted from 01 to 40. The device will emit 2 beeps; • Press the button to delete the code saved in that position. The device will emit 3 beeps to con- firm the operation;...
- Page 15 3 USING THE INTERNAL MONITOR • When a visitor presses the intercom’s doorbell, an acoustic signal will sound inside and the visi- tor’s image will appear on the monitor’s screen. At this point, the image is visible, but the visitor hears nothing.
-
Page 16: Safety Regulations
Connect the wires according to the wiring diagram. The connection between the monitor and the video camera is carried out using either 2 cables (for the ViDEA-P version) or 4 cables (for the ViDEA-D version). Use a cable with a cross section of 2x0.5 mm² (2x1,5 mm² suggested) for distances of up to 40 metres between the video intercom unit and the monitor. - Page 17 DIAGRAM FOR THE ViDEA-D VERSION * 2nd Monitor OPTIONAL Trasformatore - Transformer - Transformateur - Transformador - Transformador - Transformator - Трансформатор Videocitofono - Video intercom - Interphone vidéo - Videoportero - Intercomunicador de Vídeo- Wideodomofon - Видеодомофон Monitor interno - Internal monitor -...
- Page 18 DIAGRAM FOR THE ViDEA-P VERSION * 2nd Monitor OPTIONAL Trasformatore - Transformer - Transformateur - Transformador - Transformador - Transformator - Трансформатор Videocitofono - Video intercom - Interphone vidéo - Videoportero - Intercomunicador de Vídeo- Wideodomofon - Видеодомофон Monitor interno - Internal monitor -...
-
Page 19: Données Techniques
- Champ de vision: 72° Voyant lumineux - Température de fonctionnement: -20°C ÷ 55°C - Degré de protection: IP55 Clavier numérique - Matériel contenu dans l’emballage: Aluminium anodisé - Dimensions: ViDEA-D=75 x 190 x 45 mm ViDEA-P=58 x 135 x 39 mm... - Page 20 Art. ViDEA-M N° Description Données techniques Ecran Unité interne - Moniteur (ViDEA-M) - Alimentation: 17V-18V dc Haut-parleur - Absorption en stand-by: ≤200 mA LED d'état et conversation - Absorption en charge: ≤550 mA - Résolution: 1440 x 234 pixels Microphone - Température de fonctionnement: 0°C ÷...
- Page 21 1 INSTALLATION (pag. 57) 1.1 Installation du moniteur interne Utilisez le support et les vis/chevilles fournis pour fixer votre moniteur au mur. Avant de fixer le support, assurez-vous que la surface du mur est bien plane puis fixez-le solidement à environ 1,45m de hauteur. 1.2 Installation de l’interphone Fixez d’abord la casquette de protection de la caméra vidéo à...
- Page 22 2.4 Suppression de codes utilisateurs • Entrez dans le mode programmation. Le voyant lumineux clignote; • Composez le chiffre correspondant à la position à effacer, de 01 à 40 puis vous entendrez 2 bips; • Appuyez sur la touche pour effacer le code de la position, 3 bips le confirmeront; •...
- Page 23 3 UTILISATION DU MONITEUR INTERNE • Lorsqu’un visiteur appuie sur le bouton d’appel de l’interphone, un avertissement sonore se déclenche à l’intérieur et l’image du visiteur apparaît sur l’écran du moniteur. L’image est alors visible mais le visiteur n’entend pas. On peut choisir de parler avec celui-ci en appuyant sur la touche “conversation”, d’ouvrir la serrure électronique en appuyant sur la touche “déverrouillage”...
-
Page 24: Branchements Electriques
Connectez les câbles en suivant le schéma électrique. Le branchement entre le moniteur et la caméra vidéo doit être effectué à l’aide de deux câbles (pour l’art. ViDEA-P) ou 4 câbles (pour l’art. ViDEA-D). Utilisez un câble avec une section 2x0,5 mm² (2x1,5 mm² suggéré) pour des distances (interphone vidéo -->... - Page 25 SCHEMA POUR ARTICLE ViDEA-D * 2nd Monitor OPTIONAL Trasformatore - Transformer - Transformateur - Transformador - Transformador - Transformator - Трансформатор Videocitofono - Video intercom - Interphone vidéo - Videoportero - Intercomunicador de Vídeo- Wideodomofon - Видеодомофон Monitor interno - Internal monitor -...
- Page 26 SCHEMA POUR ART. ViDEA-P * 2nd Monitor OPTIONAL Trasformatore - Transformer - Transformateur - Transformador - Transformador - Transformator - Трансформатор Videocitofono - Video intercom - Interphone vidéo - Videoportero - Intercomunicador de Vídeo- Wideodomofon - Видеодомофон Monitor interno - Internal monitor -...
-
Page 27: Datos Técnicos
- Ángulo de visión: 72° Testigo luminoso - Temperatura de funcionamiento: -20°C ÷ 55°C - Grado de protección: IP55 Teclado numérico - Material de la caja: Aluminio anodizado - Dimensiones: ViDEA-D=75 x 190 x 45 mm ViDEA-P=58 x 135 x 39 mm... - Page 28 Art. ViDEA-M N° Descripción Datos técnicos Pantalla Unidad interna - Monitor (ViDEA-M) - Alimentación: 17V-18V dc Altavoz - Consumo en standby: ≤200 mA Led de estado y conversación - Consumo en funcionamiento: ≤550 mA - Resolución: 1440 x 234 píxeles Micrófono...
- Page 29 1 INSTALACIÓN (pág. 57) 1.1 Instalación del monitor interno Utilice la placa de soporte y los tornillos/tacos suministrados para fijar el monitor a la pared. Antes de fijar la placa de soporte, asegúrese de que la superficie de la pared sea lisa y fíjela firmemen- te, a aproximadamente 1,45 metros de altura.
- Page 30 2.4 Borrado de códigos de usuario • Acceda al modo de programación. El testigo luminoso parpadea; • Marque el número de la posición que desea borrar, de 01 a 40; se emitirán 2 pitidos; • Pulse la tecla para borrar el código de la posición; se emitirán 3 pitidos de confirmación; •...
- Page 31 3 USO DEL MONITOR INTERNO • Cuando un visitante pulsa el timbre del interfono, se emite un aviso sonoro en el interior y la ima- gen del visitante aparece en la pantalla del monitor. Durante esta fase, la imagen es visible pero el visitante no oye nada.
-
Page 32: Reglas De Seguridad
Conecte los cables respetando el esquema eléctrico. La conexión entre el monitor y la cámara de vídeo se efectuará mediante 2 cables (para el art. ViDEA-P) o 4 cables (para el art. ViDEA-D). Utilice un cable con una sección de 2x0,5 mm² (2x1,5 mm² aconsejado) para distancias (videopor- tero -->... - Page 33 ESQUEMA PARA ARTÍCULO ViDEA-D * 2nd Monitor OPTIONAL Trasformatore - Transformer - Transformateur - Transformador - Transformador - Transformator - Трансформатор Videocitofono - Video intercom - Interphone vidéo - Videoportero - Intercomunicador de Vídeo- Wideodomofon - Видеодомофон Monitor interno - Internal monitor -...
- Page 34 ESQUEMA PARA ART. ViDEA-P * 2nd Monitor OPTIONAL Trasformatore - Transformer - Transformateur - Transformador - Transformador - Transformator - Трансформатор Videocitofono - Video intercom - Interphone vidéo - Videoportero - Intercomunicador de Vídeo- Wideodomofon - Видеодомофон Monitor interno - Internal monitor -...
-
Page 35: Dados Técnicos
- Ângulo de visão: 72° Indicador luminoso - Temperatura de utilização: -20°C ÷ 55°C - Grau de proteção: IP55 Teclado numérico - Material da caixa: Alumínio anodizado - Dimensões: ViDEA-D=75 x 190 x 45 mm ViDEA-P=58 x 135 x 39 mm... - Page 36 Art. ViDEA-M N° Descrição Dados técnicos Ecrã Unidade interna - Monitor (ViDEA-M) - Alimentação: 17V-18V dc Altifalante - Absorção em standby: ≤200 mA Led de estado e conversação - Absorção em carga: ≤550 mA - Resolução: 1440 x 234 pixels Microfone - Temperatura de utilização: 0°C ÷...
- Page 37 1 INSTALAÇÃO (pág. 57) 1.1 Instalação do monitor interno Use o suporte e os parafusos/buchas fornecidos para fixar o seu monitor à parede. Antes de fixar o suporte, certifique-se que a superfície da parede é plana e fixe-o firmemente a cerca de 1,45 metros de altura.
- Page 38 2.4 Cancelação dos códigos utilizador • Entre na modalidade programação. O indicador luminoso começa a piscar; • Digite o número da posição a ser cancelada de 01 a 40, serão emitidos 2 bips; • Prima o botão para cancelar o código da posição, serão emitidos 3 bips de confirmação; •...
- Page 39 3 UTILIZAÇÃO DO MONITOR INTERNO • Quando um visitante prime a campainha do intercomunicador, emite-se um aviso sonoro e a imagem do visitante aparece no ecrã do monitor. Neste momento, a imagem é visível, mas o visitante não consegue ouvir. Pode-se então escolher entre conversar com o mesmo, premindo o botão “conversação”, abrir a fechadura com sistema de fecho de segurança elétrico premindo “desbloqueio”...
-
Page 40: Ligações Elétricas
Ligue os cabos conforme o esquema elétrico. A ligação entre o monitor e a câmera efetua-se atravês de 2 cabos (para o art. ViDEA-P) ou de 4 cabos (para o art. ViDEA-D). Utilize um cabo com seção 2x0.5 mm² (2x1,5 mm² aconselhado) para distâncias (intercomunicador -->... - Page 41 ESQUEMA PARA ARTIGO ViDEA-D * 2nd Monitor OPTIONAL Trasformatore - Transformer - Transformateur - Transformador - Transformador - Transformator - Трансформатор Videocitofono - Video intercom - Interphone vidéo - Videoportero - Intercomunicador de Vídeo- Wideodomofon - Видеодомофон Monitor interno - Internal monitor -...
- Page 42 ESQUEMA PARA ART. ViDEA-P * 2nd Monitor OPTIONAL Trasformatore - Transformer - Transformateur - Transformador - Transformador - Transformator - Трансформатор Videocitofono - Video intercom - Interphone vidéo - Videoportero - Intercomunicador de Vídeo- Wideodomofon - Видеодомофон Monitor interno - Internal monitor -...
-
Page 43: Dane Techniczne
- Rozdzielczość: 420 TVL Podświetlenie - Kąt widzenia: 72° Czujnik swietlny - Temperatura pracy: -20°C ÷ 55°C - Stopień ochrony: IP55 Klawiatura numeryczna - Materiał obudowy: Aluminium anodowane - Wymiary: ViDEA-D=75 x 190 x 45 mm ViDEA-P=58 x 135 x 39 mm... - Page 44 Art. ViDEA-M N° Opis Dane techniczne Monitor Jednostka wewnętrzna – Monitor (ViDEA-M) - Zasilanie: 17V-18V dc Głośnik - Pobór mocy w trybie czuwania: ≤200 mA Dioda stanu i rozmowy - Pobór prądu: ≤550 mA - Rozdzielczość: 1440 x 234 pixels Mikrofon - Temperatura pracy: 0°C ÷...
- Page 45 1 MONTAŻ (str. 57) 1.1 Montaż monitora Przy użyciu uchwytu, śrub/kołków zamocuj na ścianie monitor. Przed zamocowaniem uchwytu, należy się upewnić czy powierzchnia ściany/muru jest płaska a następnie przymocuj go na wysokości 1,45 m. 1.2 Montaż domofonu Jako pierwszą należy zamontować osłonę zabezpieczającą wideokamerę do powierzchni ściany, wykorzystując załączone śruby oraz kołki.
- Page 46 2.4 Anulowanie kodów użytkownika • Wejść w tryb programowania, czujnik świetlny będzie migał; • Wybrać numer pozycji do skasowania od 01 do 40, następnie będzie słychać 2 razy sygnał bip; • Nacisnąć przycisk aby skasować kod pozycji, będzie słychać sygnał potwierdzający 3 razy bip; •...
- Page 47 3 UŻYCIE MONITORU WEWNĘTRZNEGO • W przypadku gdy jeden z odwiedzających gości naciśnie dzwonek domofonu, rozlegnie się sygnał dźwiękowy wewnątrz a obraz gościa pojawi się na ekranie monitora. Na tym etapie obraz jest wi- doczny ale gość nic nie słyszy. Można wybrać pomiędzy: konwersacją z gościem, przez naciśniecie przycisku “rozmowa”...
-
Page 48: Zasady Bezpieczeństwa
5.1 Podłączenie monitora Podłączyć przewody zgodnie ze schematem elektrycznym. Podłączenie monitora i wideodomofonu należy wykonać przy pomocy 2 przewodów (dla art. ViDEA-P), lub 4 przewodów (dla art. ViDEA-D). Wykorzystać przewód o przekroju 2x0.5 mm² (2x1,5 mm² rada) dla odległości (wideodomofon --> monitor) do 40m., powyżej 40m. - Page 49 SCHEMAT DLA ARTYKUŁÓW ViDEA-D * 2nd Monitor OPTIONAL Trasformatore - Transformer - Transformateur - Transformador - Transformador - Transformator - Трансформатор Videocitofono - Video intercom - Interphone vidéo - Videoportero - Intercomunicador de Vídeo- Wideodomofon - Видеодомофон Monitor interno - Internal monitor -...
- Page 50 SCHEMAT DLA ViDEA-P * 2nd Monitor OPTIONAL Trasformatore - Transformer - Transformateur - Transformador - Transformador - Transformator - Трансформатор Videocitofono - Video intercom - Interphone vidéo - Videoportero - Intercomunicador de Vídeo- Wideodomofon - Видеодомофон Monitor interno - Internal monitor -...
-
Page 51: Технические Данные
- Разрешение: 420 TVL Датчик света - Угол обзора: 72° Световой индикатор - Рабочие температуры: -20°C ÷ 55°C - Защита: IP55 Цифровая панель - Материал корпуса: Анодированный аллюминий - Размеры: ViDEA-D=75 x 190 x 45 mm ViDEA-P=58 x 135 x 39 mm... - Page 52 Art. ViDEA-M N° Наименование Технические данные Экран Модуль, устанавливаемый в доме - Монитор (ViDEA-M) - Питание: 17V-18V dc Динамик - Потребление тока в режиме ожидания: ≤200 mA Световой сигнализатор состояния - Потребление тока в активном режиме: ≤550 mA и разговора...
- Page 53 1 УСТАНОВКА (страница 57) 1.1 Установка внутреннего монитора Используйте кронштейны, винты и крепёж, которые идут в комплекте. Перед креплением монтажного кронштейна убедитесь, что поверхность стены ровная, затем закрепите кронштейн на высоте 1,45 метра от пола. 1.2 Установка переговорного устройства Во-первых, закрепите защитную крышку видеокамеры к поверхности стены с помощью прилагаемых винтов...
- Page 54 2.4 Удаление пользовательских кодов • Войдите в режим программирования устройства. Индикаторная лампочка начнет мигать; • Введите номер позиции, которая будет удалена от 01 до 40. Устройство издаст 2 звуковых сигнала; • Нажмите кнопку , чтобы удалить код, сохраненный в этой позиции. Устройство издаст 3 звуковых...
- Page 55 3 ИСПОЛЬЗОВАНИЕ ВНУТРЕННЕГО МОНИТОРА • Когда гость нажимает звонок на домофоне, зазвучит акустический сигнал внутри помещения и изображение посетителя появится на экране монитора. В этот момент изображение является видимым, но посетитель ничего не слышит. Человек внутри имеет выбор: вести разговор с посетителем, нажав...
-
Page 56: Правила Безопасности
5.1 Подключение монитора Подключите провода в соответствии с электрической схемой. Связь между монитором и видеокамерой осуществляется с использованием либо 2-жильного кабеля (для версии ViDEA-P) или 4-жильного кабеля (для версии ViDEA-D). Используйте кабель с сечением 2x0.5 мм² (2x1,5 мм² рекомендуемый) при расстоянии до 40 метров... - Page 57 Схема для версии ViDEA-D * 2nd Monitor OPTIONAL Trasformatore - Transformer - Transformateur - Transformador - Transformador - Transformator - Трансформатор Videocitofono - Video intercom - Interphone vidéo - Videoportero - Intercomunicador de Vídeo- Wideodomofon - Видеодомофон Monitor interno - Internal monitor -...
- Page 58 Схема для версии ViDEA-P * 2nd Monitor OPTIONAL Trasformatore - Transformer - Transformateur - Transformador - Transformador - Transformator - Трансформатор Videocitofono - Video intercom - Interphone vidéo - Videoportero - Intercomunicador de Vídeo- Wideodomofon - Видеодомофон Monitor interno - Internal monitor -...
- Page 59 Art. ViDEA-M Art. ViDEA-P / ViDEA-D Per una maggior tenuta si rac- comanda di siliconare attorno alla calotta di protezione. - For a better sealing is recommen- ded to apply silicone around the protective cover. - Pour une meilleure étanchéité est recommandé...
- Page 60 Ecolabel. Данное руководство было напечатано с использованием переработанной бумаги сертифицированной Ecolabel, чтобы помочь сохранить окружающую среду. DEA SYSTEM S.p.A. - Via Della Tecnica, 6 ITALY - 36013 PIOVENE ROCCHETTE (VI) tel. +39 0445 550789 - fax +39 0445 550265...
Need help?
Do you have a question about the ViDEA and is the answer not in the manual?
Questions and answers