Table of Contents
Advertisement
Quick Links
QDA-700 User's Guide
1.
QDA-700 OVERVIEW ......................................................................................................3
1.1
1.2
1.3
1.4
....................................................................................................................9
1.5
1.6
1.7
2.
INPUT METHOD ............................................................................................................19
2.1
2.2
2.3
3.
PHONE APPLICATION OVERVIEW ...........................................................................37
3.1
3.2
3.3
3.4
..................................................................................................................46
3.5
3.6
3.7
V
4.
MESSAGES.....................................................................................................................57
4.1
SMS................................................................................................................58
4.2
MMS ..............................................................................................................67
4.3
5.
PREFERENCES..............................................................................................................80
5.1
5.2
5.3
6.
MULTIMEDIA .............................................................................................................. 125
6.1
6.2
V
6.3
6.4
V
6.5
6.6
7.
CONNECTION.............................................................................................................. 166
7.1
7.2
7.3
7.4
7.5
8.
ORGANIZER ................................................................................................................229
8.1
.....................................................................................4
..............................................................................................7
............................................................................................8
QDA-700 .......................................................................................17
2
........................................................................................22
.......................................................................................39
..........................................................................................................42
......................................................................................................45
...........................................................................................................52
................................................................................................................54
..............................................................................................................56
.........................................................................................72
.................................................................................................81
.............................................................................................96
..............................................................................................126
.......................................................................................... 133
........................................................................................................ 138
V
.............................................................................................146
..............................................................................................162
............................................................................................... 167
......................................................................................................171
............................................................................................................180
.............................................................................................185
............................................................................................ 230
..............................................................................15
.............................................................................16
..............................................................................20
..........................................................................123
......................................................................... 141
..............................................................181
- 1 -
.................................28
Advertisement
Table of Contents

Summary of Contents for QOOL QDA-700
-
Page 1: Table Of Contents
QDA-700 User’s Guide QDA-700 OVERVIEW ......................3 QDA-700 ..................4 HANDSET FEATURES ....................7 HARGING THE BATTERY ....................8 NSERTING THE CARD ........................9 IRST ................15 URNING THE RADIO N AND ................16 AKING YOUR IRST HONE QDA-700 ..................17 ESETTING YOUR INPUT METHOD ......................19 ................20 SING THE ONSCREEN KEYBOARD ..................22... - Page 2 QDA-700 User’s Guide ....................244 SING ....................246 SING ....................250 SING ALCULATOR DOCUMENTS VIEWER ....................252 ................. 253 SING OCUMENTS TO IEWER ....................265 SING EADER UTILITIES.........................276 10.1 CLOCK....................... 277 SING 10.2 ......................279 OVER 10.3 ....................... 286 SING ACKUP MISCELLANEOUS....................300 11.1...
-
Page 3: Overview
QDA-700 User’s Guide 1. QDA-700 overview Congratulation on purchase QDA-700. This is a GSM dual-band smartphone which powered by Palm OS. With QDA-700, you can: • Communicate with your friends, relatives, partners, etc. by voice calls and electronic mails. •... -
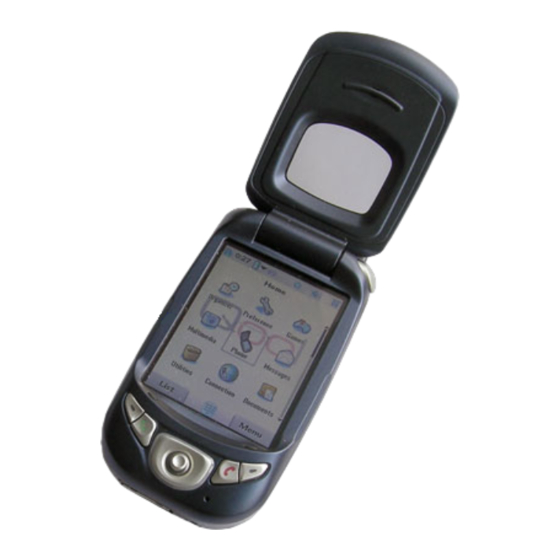
Page 4: Handset Features
QDA-700 User’s Guide 1.1 QDA-700 handset features The following illustrations show the locations and names of the physical features of the QDA-700. Refer back to these illustrations while following the instructions in this guide. Front View Flip opener Home Button... - Page 5 QDA-700 User’s Guide Side View Antenna Volume buttons SD/MMC memory card slot Camera button / shutter Reset button Infrared (IR) port Stylus slot Power button Headset jack HotSync & power supply connector LED (wireless mode and power indicator) - 5 -...
- Page 6 QDA-700 User’s Guide Back Side Speaker Camera lens Power lock Battery lock Rechargeable Battery SIM slot - 6 -...
-
Page 7: Charging The Battery
1. Plug the AC charger into a wall outlet. If necessary, connect an adapter. 2. With a triangle facing the same way as your QDA-700 screen, connect the charger cable to the power supply connector at the bottom of the QDA-700. -
Page 8: Inserting The Sim Card
MMS. For details, please check with your mobile phone service provider. Both 3-volt and 5-volt SIM cards can be used with your QDA-700. Please check with your mobile phone service provider if you have any SIM-related queries. -
Page 9: First Run
QDA-700 User’s Guide 1.4 First Run Before you can use your QDA-700 for phone calls or general organizer features, the QDA-700 battery must be fully charged and the QDA-700 must be setup properly during the first run. To setup your QDA-700 during the first run: 1. - Page 10 QDA-700 User’s Guide 4. Tap the center of target shown at the upper-left, bottom-right and the center of the screen. 5. Tap the arrow and boxes to change the following settings and tap Next to continue. • Country • Time Zone •...
- Page 11 CHOS (Chinese Operating System) allows you to view and enter traditional Chinese characters in most Palm applications (include SMS, MMS, and email) in your QDA-700. You must install CHOS if you want to read and write Chinese SMS, MMS and email.
- Page 12 QDA-700 User’s Guide Launcher II Launcher II is the starting point (also known as Home) of all applications in your QDA-700. You can find and launch most applications by tapping the appropriate icons here. At the top of Launcher II is the Status Bar which shows the status of time, battery level, radio signal, etc.
- Page 13 QDA-700 User’s Guide Status Bar Status bar is a convenient area to access many functions and shows essential information. It is accessible in most applications. (from left to right) Home (i.e., Launc her II) Time and Battery Input method Input enabler...
- Page 14 Ring & Vibration – Both ring and vibration Ring after Vibration : When there is an incoming call, your QDA-700 will vibrate for 6 seconds and then ring. Tap OK when completed. Input Area Tap to toggle between showing and hiding the input area.
-
Page 15: Turning The Radio On And Off
- When the flip is opened: press the Power button slightly to toggle the on/off of the screen. Turning Wireless Mode On Wireless mode allows your QDA-700 to connect to a mobile network so that you can make and receive phone calls and use other wireless services (e.g., email, web browsing, etc.). -
Page 16: Making Your First Phone Call
SIM card to be inserted before making an emergency call. Please check with your mobile phone service provider for details.) Adjusting call volume While a call is in progress, press the volume buttons on the side of your QDA-700 to adjust call volume. - 16 -... -
Page 17: Resetting Your Qda-700
Your QDA-700 is built to provide stable and reliable organizer and mobile phone functions. In general, you do not have to use the reset button. Nevertheless, your QDA-700 may fail to respond to an input on some occasions (e.g., poor program design of 3rd party software). - Page 18 QDA-700 User’s Guide 5. Click Change and select Desktop overwrites the handheld. 6. Changing the HotSync setting from the default only affects the next HotSync operation. Thereafter, HotSync Actions revert to their default settings. To use a new setting on an ongoing basis select the Set As Default box. Thereafter, whatever you selected as the default setting is used when you click the Default button in the Custom dialog box.
-
Page 19: Input Method
QDA-700 User’s Guide 2. Input Method The chapter illustrates several ways to input data (e.g. memo, address, etc) on your QDA-700. Available input methods include: Onscreen keyboard Graffiti 2 Handwriting PenPower Handwriting - 19 -... -
Page 20: Using The Onscreen Keyboard
QDA-700 User’s Guide 2.1 Using the onscreen keyboard You can open the onscreen keyboard anytime you need to enter text or numbers on your handheld. To access the onscreen keyboard, open any application such as Memo and do one of the... - Page 21 QDA-700 User’s Guide To use the onscreen keyboard: Tap the characters to enter text and numbers. When a keyboard is open, you can tap the abc, 123, or Int’l boxes to open any of the other keyboards, including the international keyboard.
-
Page 22: Using Graffiti 2 Writing
The Graffiti 2 demo shows how to use the handwriting software. The first time you turn on your QDA-700, or perform a hard reset, the Welcome application will automatically guide you through the setup process. When you complete the setup, you will be invited to learn how to use your handwriting software. - Page 23 You can write outside the Graffiti 2 input area only when Graffiti 2 input method has been selected and enabled (i.e., the input enabler icon is not dimmed); otherwise, you must write character strokes in the Graffiti 2 input area for your QDA-700 to recognize them. Functions of different screen areas:...
- Page 24 QDA-700 User’s Guide After writing a character, a quick tap on the screen is interpreted as a period character for a brief period of time. This makes it easier to tap buttons and place the cursor witho ut having the action interpreted as a period character.
- Page 25 QDA-700 User’s Guide Graffiti 2 Punctuation Marks and Other Special Characters Period and comma punctuation marks can be written on either side of the text input area (the letter or number side). Other common punctuation marks can be written on one side of the text input area (in general, the more frequently used punctuation is on the left side).
- Page 26 ShortCut for your name or for the header of a memo. All ShortCuts you create appear on the list in the ShortCut Preferences screen and are available in any of your QDA-700 applications. ShortCuts are backed up on your computer when you perform a HotSync® operation.
- Page 27 QDA-700 User’s Guide Tap new To edit a ShortCut 1. In the ShortCut Preferences screen, tap the ShortCut you want to edit. 2. Tap Edit. 3. Make the changes you want, then tap OK. To delete a shortCut Select the ShortCut you want to delete in the ShortCut Preferences screen.
-
Page 28: Using Chinese Os & Penpower Handwriting Application
To read and input Chinese characters, the Chinese OS application must be enabled. Once the Chinese OS has been enabled, it will remain in the memory of your QDA-700. Therefore, you are not required to open the Chinese OS main screen to enable it. - Page 29 QDA-700 User’s Guide General Options Chinese OS allows you to customize the settings in General Options. Chinese OS must be enabled first. To set General Options On the Chinese OS main screen, tap General Options In General Options, the following settings are available:...
- Page 30 QDA-700 User’s Guide Keyboard Options Chinese OS allows you to customize keyboard settings in Keyboard Options. Chinese OS must be enabled first. To set Keyboard Options On Chinese OS main screen, tap Keyboard Options In Keyboard Options, the following settings are available: Enable Chinese Keyboard Toggle the Chinese keyboard for input.
- Page 31 List, etc.) will be changed to Chinese display. Input Chinese The easiest method to input Chinese in your QDA-700 is via the onscreen Chinese keyboard. To use the Chinese keyboard, at least one Chinese input method must be installed. By default, your QDA-700 has the following input methods installed:...
- Page 32 QDA-700 User’s Guide Tab the appropriate input code corresponding to the selected input method. Select the desired Chinese character and output it to the editable field of the application. Inline Chinese Input Inline Chinese input allows inputting Chinese without popping up the Chinese keyboard.
- Page 33 “Setting up Penpower” Enable Penpower Chinese OS must be enabled prior to Penpower. Both software programs are already included in your QDA-700. To enable Penpower Tap All folder in Launcher II and select Penp icon . The main Penpower screen displays.
- Page 34 Smaller value means a shorter waiting time. If you write slowly, you should consider selecting a larger value in this setting. Acceleration Not applicable in QDA-700. Colour of writing stroke You can select a color writing stroke. Graffiti calibration...
- Page 35 QDA-700 User’s Guide Writing Characters You can use Penpower for handwriting input only if you are in any editable field of an application. Input Mode Penpower allows writing in full screen, Graffiti area and Input tool: Full Screen It is a flexible method as you can write anywhere on the screen.
- Page 36 QDA-700 User’s Guide Toggle between Input Mode With Penpower, you can input characters in 3 modes as discussed in earlier section. To toggle between these input modes, you can use the dynamic toggle method as set in the Penpower’s main screen.
-
Page 37: Phone Application Overview
Pulse el botón Marcar y podrá ver la pantalla del teléfono con el teclado numérico. At the top of the dial pad is Status Bar where you can check the status of your QDA-700. It is accessible in all applications. - Page 38 QDA-700 User’s Guide 14. Message alert 15. Network status 16. Volume control 17. Input area 18. Menu For details and usage of various items in the status bar, please refer to Chapter 1.4 First Run. - 38 -...
-
Page 39: On-Screen Soft Buttons
QDA-700 User’s Guide 3.1 On-Screen Soft Buttons Three on-screen soft buttons Home , Today View and Menu are located (from left to right) at the bottom of dial pad. Tap the on-screen buttons to access their respective functions. In dial pad, you can also use the 5-way navigator to access the soft buttons with additional functions: •... - Page 40 Please refer to Chapter 3.5 Call History for more details. • Push Up Speed Dial Your QDA-700 allows you to store up to 45 frequently used phone numbers with Speed Dial application. Please refer to Chapter 3.6 Speed Dial for more details.
- Page 41 QDA-700 User’s Guide • Push to the Bottom Contacts Contacts is where you store names, addresses, phone numbers, and other information about your contacts. Please refer to Chapter 3.4 Contacts for more details. • Press 5-way navigator Most Recently C alls Most Recently Calls is the list of recently 10 outgoing calls. You may push the 5-way navigator up &...
-
Page 42: Dialing Calls
QDA-700 User’s Guide 3.2 Dialing calls Your QDA-700 offers several options for making phone calls. As you get familiar with your QDA-700, you’ll discover which method you prefer. Dialing with Dial Pad 1. Press Dial Button. 2. Tap on the dial pad for the desired phone number. - Page 43 Prior to dialing a call by contact name, you must create some contacts, or import them from your computer with a HotSync operation or from your SIM card. The first time you display Contacts, QDA-700 will ask if you would like to import any numbers from your SIM card into your Contacts list.
- Page 44 QDA-700 User’s Guide Redialing the last number you called Do either of the following in dial pad to redial the last number you called; Press Dial Button to display the last called number, then press Dial Button again to dial the number.
-
Page 45: Receiving Calls
QDA-700 User’s Guide 3.3 Receiving calls Incoming calls can be received only when the wireless mode is ON and the QDA-700 is in a GSM coverage area. For details about the GSM coverage area, please contact your mobile phone service provider. -
Page 46: Contacts
If it is your first time to open Contacts, QDA-700 will prompt you to import the contacts from your SIM card to QDA-700. If you chose to do so, please insert your SIM card and switch on the wireless mode. - Page 47 QDA-700 User’s Guide Viewing Details of a Contacts Entry Tap the entry in Contacts List view. The entry appears in Contacts view. Tap Done when you have finished viewing the entry. Duplicating an Entry You can make a copy of an existing entry, which can be helpful when you want to enter multiple names from a single organization.
- Page 48 QDA-700 User’s Guide Selecting Different Types of Phone Numbers and Addresses You can select the types of phone numbers or e-mail addresses that a contact entry displays. Any changes you make apply only to the current entry. Tap the entry that you want to change in the Contacts list.
- Page 49 QDA-700 User’s Guide Using Contacts SIM You can this handy Contacts tool to access the names and numbers stored in your SIM card and also transfer them to Contacts. You can use Contacts SIM to view, copy, edit and export the contact information in your SIM card.
- Page 50 QDA-700 User’s Guide Rename Custom Fields These custom fields appear at the end of the Contacts Edit screen. Rename them to identify the kind of information you enter in them. The names you give the custom fields appear in all contacts.
- Page 51 You can use the entries in your Contacts to launch applications that perform tasks such as dialing a phone number or creating an e-mail or SMS message. Some of the applications you can launch are included in your QDA-700, and others may be available from third-party developers and are sold separately.
-
Page 52: Call History
QDA-700 User’s Guide 3.5 Call History Call History consists of different views showing calls dialed, received, rejected, or missed and keeps track of the date and time of each call. To view the Call History: Press Dial Button. Push the 5-way navigator to the right to pop up the Call History screen. - Page 53 QDA-700 User’s Guide Delete this entry. Confirm and return to Call History. Transfer the details of this entry to Contacts. To clear the Call History: Tap the Menu soft-button. Select Clear All in the Options menu. Please be aware that this Clear All action will erase all the entries in the Call History. You cannot delete a specific list (e.g.
-
Page 54: Speed Dial
QDA-700 User’s Guide 3.6 Speed Dial 45 contacts can be assigned to the Speed Dial. Each speed dial entry consists of a picture or an icon and a name or a number. The names, numbers and pictures shown in the Speed dial view are derived from the Contacts. If the contact has a picture stored then this picture is used. - Page 55 Tap and hold the numeric key 1 to 9 for 2 seconds to dial the phone number stored in respective speed dial entries. Your QDA-700 will dial the number accordingly. Note: Phone number must be stored in corresponding speed dial entry in advance.
-
Page 56: Today View
QDA-700 User’s Guide 3.7 Today View Today View provides you with a summary of the following: No. of appointments today. No. of tasks due today. No. of missed calls. No. of new SMS. No. of new MMS. To access Today View Press Dial Button to open Dial Pad. -
Page 57: Messages
QDA-700 User’s Guide 4. Messages The chapter illustrates several ways to send or receive messages on your QDA-700. Messages can be send or receive via: PalmSource Mail - 57 -... -
Page 58: Using Sms
QDA-700 User’s Guide 4.1 Using SMS The Short Message Servicing (SMS) application allows you to send and retrieve messages via a connected GSM wireless device, such as a mobile phone. This gives you a two -way paging functionality and an easy way to read and respond to messages that have arrived on your wireless device. - Page 59 QDA-700 User’s Guide Sending and Receiving SMS Messages You can send messages stored in the Outbox and receive new SMS messages manually. To send and receive SMS messages simultaneously: Tap Send and Check in the SMS application. After transmission, you will be prompted regarding the number of new SMS messages received.
- Page 60 QDA-700 User’s Guide Using the Inbox If the first column is blank, the message has not been sent or it has only been read. A dot indicates that the message in the Inbox has not been read. A check mark indicates that the message in the Outbox has been sent.
- Page 61 QDA-700 User’s Guide 11. Font: Changes the font used to display the list. It does not affect the font used in the View or New message screen. - 61 -...
- Page 62 QDA-700 User’s Guide Viewing incom ing SMS messages To view a text message (Text messages do not have any icon in the last column of the Inbox) Select Inbox from the category pick list in the upper-right corner. Tap the message.
- Page 63 QDA-700 User’s Guide To view messages in Trash Select Trash from the category pick list in the upper-right corner. Tap the message you want to view. Tap one of the following: Done Does nothing and returns to the list view.
- Page 64 QDA-700 User’s Guide Working with draft messages You can save your message as a draft message whenever you want. Draft messages will not be sent until you edit and store in Outbox. To store a message in the Draft category: Create or open the message you want to store in the Draft category.
- Page 65 QDA-700 User’s Guide Confirm Deleted Message Check this box to receive a confirmation dialog box each time you delete a message. Delete After Transfer When you select an SMS message with an attachment, the attachment is transferred to the corresponding application, then deleted.
- Page 66 QDA-700 User’s Guide Expires Indicates how long the server keeps attempting delivery of a message. Tap the pick list to select from the following options: 4 Hours, 1 Day, 1 Week, 2 Weeks, 1 Month and Max. Time. Message Center Indicates whether your handheld can obtain your mobile phone service provider’s Message Center number directly...
-
Page 67: Using Mms
MMS refers to Multimedia Message Service. Your QDA-700 is capable of both sending and receiving MMS. An MMS application called MMS is included in your QDA-700 as an MMS composer. The MMS application fully supports MMS SMIL and additional features such as transition effects. - Page 68 Tap Capture when you want to take the picture (Do not press the Camera button at the left side of yo ur QDA-700 in this situation). Tap Done if you are satisfied with the picture or tap Capture Again to capture another picture.
- Page 69 Tap the Insert Audio area under the Insert Text area. 10. Select your audio source between Album and Record: Album: Select audio file from your QDA-700. You can tap the location pick list at the top-right corner of the screen to choose between SD/MMC memory card and the QDA-700 expanded memory.
- Page 70 QDA-700 User’s Guide Manage Slide in MMS You can add more slides to your MMS so that it resembles a mini-movie. To add slides Open your MMS message. Tab menu and select Add in Slide menu. The number of total slides at top-right corner of the screen increases by 1, i.e.
- Page 71 Tap Done when finished. To View an MMS message Whenever you have received a new MMS message, QDA-700 will notify you and allow you to view it immediately, or view it later if you are occupied by something else or dismiss the dialog.
-
Page 72: Using Palmsource Mail
To, Cc, From, Subject, Date information or message size. * In addition to PalmSource Mail in your QDA-700, you may need an activated e -mail account with a GSM/GPRS data service. - Page 73 Remove deleted mail from server: Check this box to remove messages that you have deleted from QDA-700 also from the server the next time you check mail from this account. Max. message size: Enter the maximum amount of data to be downloaded per message in this account.
- Page 74 Please refer to previous session for the settings. Delete a mail account Note: Removing a mail account also deletes all mails (stored in your QDA-700) associated with that account. The account stills exists on the mail server. You must have at least one account before you can delete the mail account.
- Page 75 If you are using your QDA-700 when a Scheduled Sync is set to begin, you will be given a choice to go ahead and sync, cancel the sync, or postpone the sync until later.
- Page 76 QDA-700 User’s Guide Preferences Account Preferences Confirm Deletions: PalmSource Mail will prompt you for confirmation before deleting a message. Include Binary Attachment: Allows the retrieval of non-text message attachments. iii. Mail to sync: Unread syncs mail that you have not read. All syncs all messages.
- Page 77 You can add your signature in your mail. Please refer to Preferences for setting. Tap Send if you want to send your message immediately, your QDA-700 will go online and send your message to your recipient at once. Or you can tap Send Later if you do not want to send immediately and store the mail in Outbox.
- Page 78 Tap Yes to accept and install the file to your QDA-700, or No to cancel this operation. This returns you to the message screen. Only .prc and .pdb files can be stored in your QDA-700. You will get error messages if files of other formats are attempted.
- Page 79 Trash folder until you empty the trash. If you want to set “delete messages on the server when you empty the trash on your QDA-700” as a default setting, you can select the Remove deleted mail from server setting in the Manage Account Options menu.
-
Page 80: Preferences
QDA-700 User’s Guide 5. Preferences The chapter illustrates ways to customize your QDA-700 preferences in the following category: Phone Preferences General Preferences Application Launcher Settings - 80 -... -
Page 81: Phone Preferences
If you cannot answer incoming voice, data or fax calls, you can divert them to another number such as your voice mail service. Whenever you open Call Divert, your QDA-700 will connect with your mobile network and check the current settings for voice call. If the wireless mode is not ON, your QDA-700 will prompt you to turn it on. - Page 82 QDA-700 User’s Guide To enable a call divert Select a call type from the pick list Once the call type has been selected, QDA-700 will check the latest divert status with your mobile phone service provider. Choose a divert alternative.
- Page 83 QDA-700 User’s Guide 5.1.2 Call Settings In call settings, you can set the call waiting setting and whether to display your caller ID to call recipients. Enable call waiting If this setting is ON, you will hear an audible alert signal for a new incoming call while you are already engaged in a conversation.
- Page 84 QDA-700 User’s Guide your mobile phone service provider for information. Hidden Call ID when making a call For certain reasons, you may not want to let your recipient know your caller ID (i.e., your mobile phone number) To hide your caller ID: Select On in the pick list.
- Page 85 Tap the desired ringtone from the list of available ringtones. Tap Back to confirm the selection. Before you can use a newly installed music file as your QDA-700 ringtone, you must use the Ringtone Manager to Copy the selected music file to the default ringtone folder, or...
- Page 86 QDA-700 User’s Guide ( Note: Removing the SD/MMC expansion card which stores the linked music file will break the link, please use Copy to copy the music file to the QDA-700 internal memory if there is available storage space.) Tap Back to exit Ringtone Manager.
- Page 87 QDA-700 User’s Guide 5.1.4 Display You can customize the screen of your QDA-700 in Display Settings. To change theme setting: Tap the pick list and select the desired theme. Select other to view more themes visually. To change Wallpaper setting: Tap the pick list and select pre-installed wallpaper.
- Page 88 This is a shortcut of Volume Control. Please refer to Chapter 1.4 First Run for details. Pickup by flip open If this function is enabled, you may pick up the phone call by open the flip of QDA-700. Network LED If this function is enabled, the green LED for Network status will operate.
- Page 89 QDA-700 User’s Guide 5.1.6 Security Use this Mobile Security feature to prevent others from using your QDA-700 and to control incoming and outgoing calls. PIN Protect Mobile If you want to be prompted to enter your PIN to turn on the mobile, choose On.
- Page 90 QDA-700 User’s Guide Fixed Number Dialing Lets you limit outgoing calls to the numbers in your fixed number dialing list (with some modifications allowed). If you want to enable this feature, choose On, other wise Off. If you want to edit your fixed number dialing list, choose Edit.
- Page 91 Network Settings displays the name of the network carrier which your QDA-700 is connected to and allows you to change the network searching mode. The Search mode setting allows you to specify how QDA-700 will register with a network carrier during mobile radio power-on. The following two options are available:...
- Page 92 QDA-700 User’s Guide To set your preferred network Networks are listed in order of priority, with the highest preference at the top. Tap Preferred. Select the preferred network, and tab (put icons here) to arrange the sequence for network search.
- Page 93 QDA-700 User’s Guide 5.1.8 Information In phone preferences, you can check the following information: Phone and SIM You can make use of this Phone setting screen to check phone related information of your QDA-700. To view phone and SIM information Tap Phone in Phone Preference screen.
- Page 94 QDA-700 User’s Guide Firmware ver Version of the mobile phone software in your QDA-700. SMS Centre Number of SMS centres usually saved on the SIM card. If there is no number in the list, select Edit and enter the number, and tap OK.
- Page 95 QDA-700 User’s Guide Please note you cannot reset the Lifetime call meter. GPRS Meter The GPRS meter lets you keep track of the amount of information sent and received on your QDA-700. To check the GPRS meter: Tap GPRS Meter.
-
Page 96: General Preferences
QDA-700 User’s Guide 5.2 General Preferences You can customize the general configuration of your QDA-700 as follows: Connection Configure communication settings. Date and Time Set the date, time, time zone, and Daylight Saving switch. Digitizer Calibrate the screen (i.e., digitized) of your QDA-700. - Page 97 Setting the date and time Date and Time Preferences enable you to set the time, date, time zone and daylight savings setting for your QDA-700. 1. Tap Preferences in Launcher II and select General Preferences. 2. Choose pick list in the upper-right corner, then select Date and Time.
- Page 98 The Connection Preferences screen enables you to define the settings used to connect your QDA-700 to other devices. The screen displays a list of available configurations that are ready to be further defined; the list varies depending on the kind of software you’ve added to your handheld.
- Page 99 QDA-700 User’s Guide To add or edit a GPRS connection 1. Do one of the following: To add: Tap New. To edit: Tap the GPRS connection and tap Edit. 2. Do one of the following: To add: Enter name and tap Details.
- Page 100 QDA-700 User’s Guide 3. Adjust settings. Access Point Name Opens a dialog box that allows you to change the address on the GPRS network in which data is routed through to outside networks–for example, a specific gateway to the Internet or a specific WAP gateway.
- Page 101 QDA-700 User’s Guide Tap the box under Quality of Service and adjust settings. Network Default Sets the quality to what the GPRS network is currently providing. Custom Allows you to adjust individual quality settings. Precedence Changes the requested priority that your data receives in times of network congestion.
- Page 102 QDA-700 User’s Guide Creating and editing GSM connections Important: Your wireless service provider may have set your GSM connection settings. Different settings may affect your service. Contact your wireless service provider before using different settings. To add or edit a GSM connection: 1.
- Page 103 QDA-700 User’s Guide Speed Sets the modem rate and protocol used for the connection. Autobauding automatically negotiates the best modem rate and protocol at the beginning of the connection. Connection Element Sets the connection as Transparent or Non-Transparent. Tap OK.
- Page 104 QDA-700 User’s Guide 5.2.3 Digitizer The Digitizer Preferences screen opens the digitizer calibration screen. This is the same screen that appears when you start your handheld for the first time. You can recalibrate your screen after a hard reset, or if your digitizer drifts.
- Page 105 Setting date and time formats Format Preferences enables you to choose a number conventions based on geographic regions. All the built-in applications on your QDA-700 use the Format Preferences settings. 1. Tap Preferences in Launcher II and select General Preferences.
- Page 106 2 minutes, or 3 minutes. Cradle settings You can choose to leave your QDA-700 on when it is in the cradle during a HotSync operation or when you are recharging the battery, so you can continue to view your data.
- Page 107 To change the Beam Receive setting: 1. Tap the Beam Receive pick list and select On or Off. Colors You can change the color theme of QDA-700 to select a different set of predefined colors for the screen. To change the Colors setting: Tap the Colors pick list and select.
- Page 108 QDA-700 User’s Guide 5.2.6 Graffiti 2 Tuner The Graffiti 2 Tuner enables you to select an alternate stroke shape for specific characters. To access Graffiti 2 Tuner: 1. Tap Preferences in Launcher II and select General Preferences. 2. Choose the pick list in the upper-right corner, then select Graffiti 2 Tuner.
- Page 109 5.2.7 Network Preferences You can use your QDA-700 and the software that is included in the handheld operating system to connect with Internet service providers (ISPs) or dial-in (remote access) servers. You need an ISP account or corporate remote access account and a mobile phone carrier account that supports dial-up connections or a mobile phone carrier account with high-speed wireless data network services.
- Page 110 QDA-700 User’s Guide Select the predefined service template you want to use. Entering a username The User Name setting identifies the name you use when you log in to y our wireless service provider or your dial-in server. Although this field can contain multiple lines of text, only two lines appear onscreen.
- Page 111 QDA-700 User’s Guide To enter a password: 1. Tap the Password box. 2. Enter the password you use to log in to your server. Tap here 3. Tap OK The Password field updates to display the word “Assigned.” Selecting a connection Use the Connection setting to select the method you want to use to connect to your wireless service provider or a dial-in server.
- Page 112 QDA-700 User’s Guide Adding telephone settings Some services require a telephone number. When you select the Phone field, a dialog box opens in which you define the telephone number you use to connect with your wireless service provider or dial-in server. In addition, you can define a prefix, disable call waiting and give special instructions for using a calling card.
- Page 113 QDA-700 User’s Guide Enter the prefix. Tap OK. Disabling call waiting Call waiting can cause your session to terminate if you receive a call while you are connected. If your telephone has call waiting, you need to disable this feature before logging in to your wireless service provider or dial-in server.
- Page 114 To see expanded Service Connection Progress messages, press the lower half of the Scroll button. To close a connection: - Tap Disconnect to terminate the connection between your QDA-700 and your service. Creating additional service templates You can create additional service templates from scratch or you can duplicate existing templates and editing information.
- Page 115 QDA-700 User’s Guide Idle timeout The Idle timeout setting defines how long your handheld waits before dropping the connection with your wireless service provider or dial-in server when you switch out of a TCP/IP application. To set the Idle timeout:...
- Page 116 QDA-700 User’s Guide Each IP address has four sections, separated by periods. In the Details dialog box, you enter each section separately. Each section of an IP address is made up of a number from 0 to 255; numbers are the only allowable characters in this field.
- Page 117 QDA-700 User’s Guide To identify dynamic IP addressing Tap the IP Address check box to select it. Tap to select automatic IP address To enter a permanent IP address: 1. Tap the IP Address check box to deselect it and display a permanent IP address field below the check box.
- Page 118 Note: You can also use non-ASCII and literal characters in your login script. Creating a login script on your QDA-700 You can create login scripts by selecting commands from the Command pick list in the Login Script dialog box. Some commands, such as Send, require you to supply additional information.
- Page 119 A plug-in application is a standard PRC application that you install on your QDA-700 just like any other application. After you install the plug-in application, you can use the new script commands in a login script.
- Page 120 QDA-700 User’s Guide For additional information on creating plug-in applications, send e-mail to Palm Developer Support at devsupp@palm.com. Deleting a service template There is only one way to delete a service template: use the Delete command from the Service menu.
- Page 121 QDA-700 User’s Guide 5.2.8 Owner preferences The Owner Preferences screen enables you to record a name, company name, phone number, or any other information that you want on your handheld. This information can be from the business card created during installation. If you use the Security Preferences screen to turn off and lock your handheld with a password, information that you put into Owner Preferences is displayed the next time you turn on your handheld.
- Page 122 QDA-700 User’s Guide 5.2.9 ShortCuts The ShortCuts Preferences screen enables you to define abbreviations for entering text. This section describes how to create, edit and delete a ShortCut. To access shortcuts preference: 1. Tap Preferences in Launcher II and select General Preferences.
-
Page 123: Application Launcher Settings
QDA-700 User’s Guide 5.3 Application Launcher settings To have better integration and look-and-feel for your QDA-700, Launcher II is used as the default application launcher instead of the original Palm OS launcher. Launcher II consists of 3 major components as follows:... - Page 124 (i.e., App. Browser) and Palm (i.e., standard Palm application launcher). Tap OK when finished. You can set the brightness of the QDA-700 screen in Application Launcher Settings: To adjust the brightness: Tap any category in the Launcher II. Tap Menu and select Brightness in Tools menu.
-
Page 125: Multimedia
QDA-700 User’s Guide 6. Multimedia This section introduce QDA-700 Multimedia applications: Audio Player Voice Recorder Camera Photo Viewer Photo Editor - 125 -... -
Page 126: Using Audio Player
QDA-700, or (2) the expanded memory of your QDA-700. To select the source of MP3 files Tap the 2 icons – QDA-700 expanded memory and SD/MMC card to select the source. The MP3 files available in that source will be displayed accordingly. - Page 127 QDA-700 User’s Guide MP3 Playback To playback MP3 files 1. Insert the SD/MMC card on which the MP3 files are stored. If the MP3 files are stored in the expanded memory, please skip to step 2 below. 2. Tap on the “Play/Pause” button to start the current track 3.
- Page 128 QDA-700 User’s Guide To control volume, do one of the following: • Tap the “Increase Volume” or “Decrease Volume” button to increase or decrease volume • Tap and slide the “Volume Bar” control to increase or decrease volume To toggle the sound output of the track, tap the “Mute” button.
- Page 129 QDA-700 User’s Guide Title view Song Info Button Title, Artist and Album Information Shown Spectrum In Title View, the track number and time of current track are shown. You can choose to display elapsed, remaining time of the current track or remaining time of all tracks by pressing the “Song Time”...
- Page 130 QDA-700 User’s Guide Play mode 1 Tab “Play Mode 1” button repeatedly to select “Continue”, “Shuffle” or “Program” mode. To continue to play tracks in sequential order, select “Continue” To play tracks in random sequence, select “Shuffle” To play tracks selected only, select “Program”...
- Page 131 QDA-700 User’s Guide Menu operation Options menu Preferences Enable or disable system sound and background play by toggle the checkbox of “Operation Beep” and “Background Play” respectively. About Audio Player Display the version of the application - 131 -...
- Page 132 QDA-700 User’s Guide Tools Menu Card Info Display the card volume, total memory and used memory. You can tap the Card Volume pick list in Card Info to select between expanded memory and SD/MMC card (if inserted). Album Info Display album information including format, total time and number of tracks.
-
Page 133: Using Voice Recorder
To record a voice memo 1. Select the appropriate storage location 2. Tap Rec to start the recording. 3. Point the microphone of your QDA-700 to the sound source. 4. Tap the Stop icon to stop the recording. To playback a voice memo 1. - Page 134 QDA-700 User’s Guide To select the desired voice memo Do one of the following: Tap the file directly. Tap the Forward/FF or Backward/REW button to select the desired voice memo by pressing the button once to go to next or previous track respectively.
- Page 135 QDA-700 User’s Guide List view View Button Memo Time Button In List View , a voice memo list with track number is in the first column, title in second column and information of the track in third column are shown. You can change the track information in the third column to Time, Type or Size by pressing the View button.
- Page 136 QDA-700 User’s Guide Menu operation Options menu Preferences Enable or disable the system sound by toggle the checkbox of Operation Beep, and selecting storage location between DOC (i.e., expanded memory) and Ext. Card (i.e., SD/MMC expansion card) About Voice Memo...
- Page 137 QDA-700 User’s Guide Tools Menu Card Info Display the card volume, total memory and used memory. You can tap the Card Volume pick list in Card Info to select between expanded memory and SD/MMC card (if inserted). Album Info Display album information including format, total time and number of tracks.
-
Page 138: Using Camera
QDA-700 User’s Guide 6.3 Using Camera Your QDA-700 is equipped with a digital camera that allows you take pictures, send them via email or MMS and use them as wallpaper, caller ID picture, etc. The pictures can be copied to your desktop computer by performing a Hotsync operation or via a card reader. - Page 139 • Night Using Digital Zoom The camera function of your QDA-700 is equipped with digital zoom (1X, 2X and 4X). When you are positioning the camera at the subject, you can zoom in the image and vice versa. To use digital zoom In camera screen, tap + and –...
- Page 140 QDA-700 User’s Guide Customizing your Camera settings To change camera settings: to pop up the Preference screen Tap Save to pick list to select the storage destination of the captured pictures. Pictures can only be saved in expanded memory or on the SD/MMC memory card...
-
Page 141: Using Video Recorder & Player
Small file size means you can store more video with your QDA-700 and send to your contacts easily. (Note: ASF video files can only be playback in Windows platform.) Recording a Video Recording a video is as easy as taking a still picture in your QDA-700. - Page 142 Return to PLAYBACK Screen Tool 4. Position your QDA-700 at the subject you want to take photo. Make sure you can see the object on the screen clearly. The camera is situated at the back of your QDA-700. 5. Tap Record icon to start capturing the video. You can pause the video capture by tapping the Pause icon and resume video capture by tapping the Record icon again.
- Page 143 File Format Available file formats of captured video: ASF, MP4, 3GP. All of them can be playback in both QDA-700 and computer (with Microsoft Window Media Player or Apple QuickTime Player installed) Video Codec Video compression &...
- Page 144 6. Tap OK when finished. View ing Video in Computer In addition to viewing your video in QDA-700, you can also view your video (saved in the SD/MMC card) in the Windows-based computer with Microsoft Window Media Player & QuickTime Player by Apple Computer.
- Page 145 Delete a Video You can delete the captured video whenever it is required. It can be done using the QDA-700’s built-in File Mover application. For details, please refer to Chapter 10.4 - File Mover. - 145 -...
-
Page 146: Using Photo Viewer
QDA-700 User’s Guide 6.5 Using Photo Viewer PHOTO Photo Viewer allows you to view and organize JPEG images in your QDA-700 or in an expansion card. The application allows you to do the following operations: • Locate images quickly with the Large, Small Thumbnail and List View •... - Page 147 To toggle the view location, tap on the “Media” icon. - Displays images stored in handheld’s internal memory - Displays images stored in the memory card of your QDA-700. When the application starts at first time, it will search for the images stored in the directory \DCIM.
- Page 148 Edit Album You can create, rename or delete an album located in your QDA-700 (i.e., RAM) and SD/MMC memory card (i.e., Card) by selecting “Edit Albums …”. Each directory has its own album, so we can categorize the images in the directory into different albums.
- Page 149 Views You can view your images stored in your QDA-700 or expansion card in a number of different ways. At the bottom the PHOTO window, there are 3 view buttons available: list view, small thumbnail view and large thumbnail view.
- Page 150 QDA-700 User’s Guide List View Toggle to view the Tap on the size and filename to dimension of the view the image image if “Show in fit screen dimensions” option mode is checked at the Advanced Preference. Otherwise only size of the image will be shown.
- Page 151 QDA-700 User’s Guide To view images in list view 1. Tap on the “List view” icon 2. Tap on the “Media” icon to select the view location 3. Tap on the “Select directory” icon to select the directory you want to view if the media chosen is expansion card 4.
- Page 152 QDA-700 User’s Guide Large Thumbnail View By viewing the images in large thumbnail view, large thumbnail and filename will be shown. Tap on the filename to view the details of the image To view images in large thumbnail view 1. Tap on the “Large thumbnail view” icon 2.
- Page 153 QDA-700 User’s Guide You can perform the following operations in the Image Details dialog: 1. Change the image location from location pick up list 2. Add or edit note 3. Beam the image 4. Delete the image In list view, you also can view the image details by tap on the icon.
- Page 154 QDA-700 User’s Guide Tap on the “Home” Tap to hide the panel button to return to the previous view Tap on the “1:1” button to view the image in its original size Tap on the “Previous” button to Toggle to select fill...
- Page 155 QDA-700 User’s Guide Zoom View In the zoom view, you can use the slide or -, + button to adjust the size of the image and pan the image by dragging the stylus on the image. Using PHOTO Menu You can tap the menu icon or the title area at the top of the screen to open the menu bar.
- Page 156 QDA-700 User’s Guide Change Album By default, all images are in “Unfiled” album. You can change the images to other album by selecting “Change Album” on the menu. To change album 1. Tap the menu icon 2. Select “Options” and then “Change Album” on the menu 3.
- Page 157 QDA-700 User’s Guide 4. Point the IR port on your QDA-700 at the IR port on the receiving device. Copy The copy command enables you to make a copy of an image on your handheld or an expansion card. If the image is on your handheld, it can be copied to an expansion card.
- Page 158 QDA-700 User’s Guide To move images 1. Tap the menu icon 2. Select “Options” and then “Move” on the menu 3. Tap to select images you want to move and tap “OK” 4. Select to move to handheld or to card 5.
- Page 159 QDA-700 User’s Guide Preferences Menu The Preferences menu is selected and contains the commands General, Advanced, Purge thumbnail cache, Purge thumbnail cache, Clean up card and Reset. General Tapping the General field brings up the following screen: Thumbnail Size: Determines the size of the thumbnail at large and small thumbnail view.
- Page 160 QDA-700 User’s Guide View Image Init display: Determines the display mode of the images at individual view. Choose “Fit screen to fit the full image to the screen. Choose “Fill screen” to crop the image to best fit to the screen. Choose “Original resolution” to display the image at its original size.
- Page 161 QDA-700 User’s Guide Purge album cache The information of album will be cached at a temporary file. You can purge this temporary file by using “Purge album cache” function. Clean up card All album cache, thumbnail cache and temporarily files created by this application at the external card, except for the current accessing directory, will be purged.
-
Page 162: Using Photo Editor
To create a new image 1. Tap New Image icon 2. Enter the dimension for the new image. The maximum dimension is equal to the screen resolution of your QDA-700 (i.e., 320 pixels (W) x 480 pixels (H)) 3. Tap “OK” - 162 -... - Page 163 QDA-700 User’s Guide Tap to create an image To edit an image 1. Tap New Image icon 2. Tap on the square with text “Select background image” 3. Select the image you want to edit and tap “OK” 4. Selected image and its dimension are shown and tap “OK”. If the original size of...
- Page 164 The capture will be saved in the default directory /Palm/PiDraw if you select to save the capture to card. The name of the captured image will start by “SC” and together wi th a sequential number generated by QDA-700. Disable screen capture You can disable screen capture feature by de-selecting the Enable box.
- Page 165 QDA-700 User’s Guide Drawing Tools Toolbar button layout (from left to right) Pencil Draws free lines on the image. Paint Brush Draws free lines of variable widths based on pen pressure. Airbrush Creates an airbrush effect. Eraser Erases parts of the image to the background color.
-
Page 166: Connection
To use these wireless activities, data service must be subscribed. Please check with your mobile phone service provider for details. Besides wireless connection, your QDA-700 can be connected to your computer via HotSync, Infra-red transmission (i.e., Beam), etc. - 166 -... -
Page 167: Browsing Internet
QDA-700 User’s Guide 7.1 Browsing Internet Your QDA-700 has a built-in web browser called Web Browser which allows you to view Internet web pages. Please note you must setup the internet connection before you can browse the web. To open Web Browser Tap Connection icon in Launcher II. - Page 168 QDA-700 User’s Guide In addition to the back and forward icons, you can open the History list to go to a page you recently visited. The recently visited web pages include cached pages or stored URLs. Cached pages are stored in cache memory and have a icon next to the name in the list.
- Page 169 QDA-700 User’s Guide Bookmarks allow you to save the URL of any web page. You can bookmark any web page visited. You can add, edit, delete, or categorize bookmarks. In addition, other applications can launch Web Browser to display bookmarks.
- Page 170 Automatically fills in any text you have previously entered in an edit field. Enable Cookies Select this if you want you QDA-700 to accept cookies from a website. Some web sites store information in a small text file, called a cookie. Cookies usually contain information about you and your preferences for that web site.
-
Page 171: Using Hotsync
HotSync technology lets you synchronize - exchange and update - data between one or more Palm OS device(s) like QDA-700 and Palm Desktop software or another PIM such as Microsoft Outlook. To synchronize data, you must connect your QDA-700 and Palm... - Page 172 Creating a user profile You can create a user profile to load data into a QDA-700 without associating that data with a user name. This feature lets System Administrators configure several QDA-700s with specific information (such as a company phone list) before distributing them to their actual users.
- Page 173 Manager from the Start menu If you’re not sure which option to use, keep the default setting, Always Available. As your QDA-700 use the USB cable, you do not need to use the settings on the Local tab for a direct HotSync operation.
- Page 174 QDA-700 User’s Guide To customize HotSync application settings 1. Click the HotSync icon in the Windows system tray (bottom right corner of the taskbar). Tips: You can also tap the HotSync command on the Palm Desktop software menu bar. 2. Choose Custom from the HotSync Manager menu.
- Page 175 IR port to perform HotSync operations. You don’t need a cable to do this. This is very useful if you travel with an infrared-enabled laptop. You simply enable infrared communication on your laptop and QDA-700 and follow the steps in “Performing an IR HotSync operation” later in this section.
- Page 176 2. Tap Local. 3. Tap the pick list below the HotSync icon and select IR to a PC/ Handheld. 4. Position the IR port of your QDA-700 within a couple of inches of the infrared port of your computer. 5. Tap the HotSync icon to start the IR HotSync operation.
- Page 177 5. Select the Disable call waiting check box to avoid an interruption during the modem HotSync operation if the phone line you’re using for the QDA-700 has Call Waiting. 6. Select the check box and enter the calling card number if you want to use a calling card to place the call.
- Page 178 1. Tap the Connection icon in Launcher II. 2. Tap the HotSync icon. 3. Tap the Modem icon to dial the QDA-700 modem and synchronize the applications. 4. Wait for the HotSync operation to complete. Conducting a HotSync Operation Via a Network When you use the Network HotSync software, you can take advantage of the LAN and WAN connectivity available in many office environments.
- Page 179 QDA-700 from a separate external file such as a company phone list. HotSync Manager stores the data in a separate category on your Palm Desktop software and your QDA-700. You can set the File Link feature to check for changes to the external file when you perform a HotSync operation.
-
Page 180: Using Beam
QDA-700 User’s Guide 7.3 Using Beam There is an infrared (IR) port located at the right side of your QDA-700. The IR port supports the IrCOMM implementation of the standards for infrared communication established by the Infrared Data Association (IrDA). You can beam data to another IR-enabled Palm OS devices that’s close by, but you can also beam data to a mobile... -
Page 181: Exchanging Information Via Beaming
Palm OS device that’s near by and also has an IR port. The IR port is located at the right side of the QDA-700, near the SD/MMC memory card slot. You can also beam over SMS with your QDA-700. This feature is discussed at the end of this chapter. - Page 182 Point the IR port directly at the IR port of the receiving Palm OS device when the Beam Status dialog appears. Resume working on your QDA-700 when the Beam Status dialog indicates that the transfer is complete. Receiving Beamed Information To receive beamed information Turn on your QDA-700.
- Page 183 QDA-700 User’s Guide Select SMS in the Send With dialog. Enter the SMS device number you want to send to. You can use the Lookup button to search for phone numbers in your address book that you have placed in the Mobile category (which appears in the Other pick list of your Phone Book while in edit mode).
- Page 184 QDA-700 User’s Guide Leave Messages on Phone: You can choose to delete messages from the phone when you retrieve the messages from the phone. Return Receipt: You can choose to receive confirmation that an SMS was delivered. Warn Over: You receive a Warning if a message is split in too many parts.
-
Page 185: Using Palm Desktop
Note that the new fields in the updated personal information management applications (Contacts, Calendar, Tasks and Memos) will only synchronize with corresponding fields on your handheld. The new fields will not synchronize to your QDA-700. To install Palm Desktop Note: You need administrator rights to install Palm Desktop software on some operating systems. - Page 186 QDA-700 User’s Guide Palm OS Desktop software gives you access to several applications. When you start Palm OS Desktop software, the Date Book application opens by default. Use the Options command on the Tools menu to select a different application to open by default.
- Page 187 QDA-700 User’s Guide Using the Desktop Toolbar Use the Desktop toolbar to quickly access the most used commands, check if private records are being hidden, or change the current user. Save All Save changes in all Palm OS Desktop software applications.
- Page 188 QDA-700 User’s Guide Saving Changes Palm OS Desktop software automatically saves your information when you: Exit the Palm OS Desktop software application. Change users. Perform a HotSync operation. Tip On the Tools tab in the Options dialog box, select the check box Auto -Save Every xx Minutes to have Palm OS Desktop software periodically save all changes to your records.
- Page 189 QDA-700 User’s Guide Date Book Today Prints the events for the currently selected day. Dates (list format) Prints the event(s) on the day or range of days that you specify in a list format. Tip: Click the Calendar icon to use the Select Date dialog box to select a date.
- Page 190 QDA-700 User’s Guide Viewed Category Prints all the memos in the category you are viewing. Choose All from the Category selector in the Memo Pad window to view all memos. Memos From/To Prints a range of memos. Enter numbers in the From and To boxes to specify the range.
- Page 191 QDA-700 User’s Guide Setting Preferences To set the preferences for a Palm OS Desktop software application Click the application's button on the Launch bar. From the Tools menu, choose Preferences. Select or enter the options you want. Click OK. - 191 -...
- Page 192 Select the Private check box to mark the record private. On the Note tab: Type any additional information. Notes can contain approximately 13,000 words. Please note the following fields in Palm Desktop are not supported in your QDA-700: Prefix English Name...
- Page 193 QDA-700 User’s Guide Editing Contacts Records To change or add information for a record: Double-click the record in the View pane or Record pane. Edit name, address, and contact information in the appropriate boxes. Click a label selector and select a label for each piece of information. Type the appropriate information in the box.
- Page 194 QDA-700 User’s Guide To specify custom field labels Each Contacts record contains four custom fields that you can rename. Any changes you make to the custom field labels will appear in all the Contacts records. From the Tools menu, choose Preferences.
- Page 195 QDA-700 User’s Guide Using Auto Dial If you have a modem configured on your computer, you can automatically dial the contact number that displays in the Primary Contact column of the Contacts List view. To use the auto dial feature Select an Contacts entry.
- Page 196 QDA-700 User’s Guide Date Book Overview Use Date Book to schedule and manage single or repeating events. Set untimed events to remember special days such as birthdays or anniversaries. Set an alarm to remind you of important events and use the Note tab to record information such as directions or background information regarding the event.
- Page 197 QDA-700 User’s Guide You can also: Change the event's duration by dragging the bottom of the event box to a new time. (The default duration is one hour.) Right-click the event to display a menu and select: Delete To delete the event.
- Page 198 QDA-700 User’s Guide Forward as vCal To open your desktop E-Mail application and send the event to someone in an e-mail message. Scheduling Repeating Events You can change an existing event to a repeating event, or select repeat options while you are creating an event.
- Page 199 QDA-700 User’s Guide Editing Events You can edit events in Day view or Week view. Note: If you are in Month or Year view, double-click the event to display Day view where you can edit the event. To edit an event Drag the event to a new time or date to quickly reschedule an event.
- Page 200 QDA-700 User’s Guide Type of edit Result Change one occurrence of a repeating Changes that occurrence to a single event event. Does not change any other occurrences. Change the repeat interval to None Changes that occurrence to a single event. Removes all instances of the event that occur after the event date on which the setting is changed.
- Page 201 QDA-700 User’s Guide Setting Date Book Options You can choose options that configure the Date Book in the Date Book tab of the Preferences dialog box. To set Date Book options From the Tools menu, choose Preferences. In the Preferences dialog box, perform one or more of the following actions: To change the displayed time in Day view, click the Workday Begins selector and select a time from the list.
- Page 202 QDA-700 User’s Guide Editing Alarms To reset an existing alarm Click the event's Alarm icon. Click the time interval selector and select Minutes, Hours, or Days. Type a number between 0 and 99 in the Time Measurement box. Click OK.
- Page 203 QDA-700 User’s Guide Using Day View Use Day view to see the most detail about a day’s events, and to see a list of To Do List items or Contacts records. To display the Day view, click the Day tab on the bottom edge of the Date Book window.
- Page 204 QDA-700 User’s Guide Memo Pad Overview Use Memo Pad to create and store notes and information that are not associated with other Palm OS Desktop software applications. You can create memos that contain as many as approximately 13,000 words, or import files that are even larger. View memos by alphabetical order or the order in which they display on your handheld.
- Page 205 QDA-700 User’s Guide Deleting Memos Memos that you delete in Palm OS Desktop software are deleted from your handheld the next time you perform a HotSync operation. If you choose to archive deleted memos, the memos are added to an archive file the next time you perform a HotSync operation.
- Page 206 QDA-700 User’s Guide To Do List Overview Use To Do List to manage tasks. Set priorities for each To Do item, associate items with categories, and mark confidential items private and mask or hide them. View your tasks by due date, priority, or category. To Do items also display in the Date Book's Day view To Do List.
- Page 207 QDA-700 User’s Guide Deleting To Do Items To Do Items that you delete in Palm OS Desktop software are deleted from your handheld the next time you perform a HotSync operation. If you choose to archive deleted To Do items, the items are added to an archive file the next time you perform a HotSync operation.
- Page 208 QDA-700 User’s Guide Working with Records Using Notes You can add notes to records in most Palm OS Desktop software applications. When you add a note to a record, a Note icon displays in the Note column. To add a note to a record...
- Page 209 QDA-700 User’s Guide To mask private records From the View menu, choose Mask Private Records. If a confirmation box appears, click OK. To hide private records From the View menu, choose Hide Private Records. If a confirmation box appears, click OK.
- Page 210 QDA-700 User’s Guide Archiving and Deleting Using Archives You can archive records that you delete or purge from your handheld or Palm OS Desktop software. Archiving records allows you to conserve space on your handheld, while ensuring information is available if you need it in the future. When you perform a HotSync operation, archived records from the handheld and Palm OS Desktop software are added to the archive files.
- Page 211 QDA-700 User’s Guide To purge an event or To Do List item From To Do List, choose Purge Completed To Do’s from the Tools menu. From Date Book, choose Purge Events from the Tools menu. For events, you can click the Delete Events Older Than selector and select a time. The default is one week.
- Page 212 QDA-700 User’s Guide Categories Using Categories You can use categories in all Palm OS Desktop applications to group records for easy, collective management and review. You can create as many as 254 unique categories for each application. Use categories to sort, review, and print elements in groups.
- Page 213 QDA-700 User’s Guide Renaming Categories When you rename a category, all records in the category update to the new category name. To rename a category From the Tools menu, choose Categories. Click a category title. Click Rename. Type a category name.
- Page 214 QDA-700 User’s Guide To Do List To Do Archive (*.tda) Memo Pad Memo Pad Archive (*.mpa) Comma Separated (*.csv, *.txt) Tab Separated Values (*.tab, *.tsv, *.txt) Text (*.txt) Importing Information from Archive Files To import information from an archive file Open the Palm OS Desktop software application.
- Page 215 QDA-700 User’s Guide Importing Information You can import information from any of the supported file formats. Only Memo Pad can import records larger than 64KB (approximately 13,000 words). Memos up to 64KB can be imported, and are split into 4KB segments when the exceed 64KB. For example, if you import a memo that is 68KB, you would get a 64KB memo and a 4KB memo.
- Page 216 QDA-700 User’s Guide Importing Memo Text To import a file as a single memo, select the text (*.txt) option in the Import dialog box. Selecting comma delimited or tab delimited file formats breaks the text file into a separate memo at each comma or tab character.
- Page 217 QDA-700 User’s Guide Exporting Information You can export information to various supported file formats. When you export records from Contacts, To Do List, or Memo Pad, you can specify whether to export all the records or only selected records. Important Hidden private records are not exported.
- Page 218 QDA-700 User’s Guide Customizing Palm OS Desktop Software Setting Options Setting General Options You can choose options that configure Palm OS Desktop software as a whole in the General tab of the Options dialog box. To set General options From the Tools menu, choose Options.
- Page 219 Though HotSync Manager allows you to create a user account for a given handheld at the start of the QDA-700’s first HotSync operation, you can use Palm OS Desktop to create user accounts without performing a HotSync operation.
- Page 220 QDA-700 User’s Guide Selecting User Accounts Separate data files are maintained for each user account you create. Only the information for the currently selected user displays. To select a user Click the User selector on the Desktop toolbar and select a user account from the list.
- Page 221 QDA-700 User’s Guide User Profiles Creating a User Profile User profiles enable you to download data from the Palm OS Desktop application to a handheld during the first HotSync operation, and not have it associated with a specific user account name. This makes it possible to preconfigure a number of handhelds with specific information (such as a company calendar) before you distribute them to users.
- Page 222 HotSync Manager HotSync Operation Overview A HotSync operation is a two-way synchronization of records between your QDA-700 and your computer. Changes that you make on your handheld or your computer are updated on both platforms after a HotSync operation. A HotSync operation backs up all your data and synchronizes only the changed portions of data, reducing the time it takes to complete a HotSync operation.
- Page 223 You can use a local connection for the first HotSync operation. Modem Uses two modems: one built-in in your QDA-700, the other to your computer. HotSync Manager supports this type of connection only with Palm OS Garnet or earlier handhelds.
- Page 224 HotSync log on your desktop computer. On your QDA-700, Install Tool can install only certain standard Palm OS file types. You can install these same standard file types on a card; you can install additional...
- Page 225 QDA-700 User’s Guide Applications or files that you install on your handheld are different from the applications that come pre-installed on your handheld. Applications, files, and information you store on your handheld reside in RAM (random access memory). If you hard-reset your handheld, the applications you have installed will be deleted.
- Page 226 To remove an application that you installed on your handheld or on an expansion card Turn on your QDA-700 and go to the Launcher II. Tap the category icon which the application belongs to. Tap and hold on the application icon for 2 seconds to pop-up the mini menu. Choose Delete.
- Page 227 SCP - network scripts PNC - network configuration Install Tool does not allow you to install files of other types on your QDA-700. However, you can install files of these and other types on an expansion card in such a handheld, but only if an application on the handheld can read them.
- Page 228 QDA-700 User’s Guide Checking Which Addins Are Running To check which Addins are running From the Help menu, choose About Palm OS Desktop. Click the Version button. Click the Other tab. See About Palm Desktop Dialog Box for more information.
-
Page 229: Organizer
QDA-700 User’s Guide 8. Organizer This section introduces some applications, which allow you schedule your daily tasks and appointment Date Book Memo Pad To Do List Calculator - 229 -... -
Page 230: Using The Date Book
QDA-700 User’s Guide 8.1 Using the Date Book The Date Book lets you quickly and easily schedule appointments or any activity associated with a date or date and time. When you open the Date Book, the current date and a list of times for a standard business day are displayed. - Page 231 QDA-700 User’s Guide Set the event’s duration: - If the event is 1-hour long, skip to the end of this procedure. - If the event is longer or shorter than an hour, tap directly on the time to open the Set Time dialog.
- Page 232 QDA-700 User’s Guide Scheduling a Timed Event for Another Date To schedule a timed event, do one of the following ways Tap the desired day of the week in the date bar at the top of the screen. If necessary, tap the Previous week or Next week scroll arrows to move to another week.
- Page 233 QDA-700 User’s Guide New untimed event Tap a blank area on the screen to deselect the untimed event. If you create a timed event and later want to make it an untimed event, tap directly on the event time on the Date Book screen; then tap No Time and tap OK.
- Page 234 QDA-700 User’s Guide Tap Day, Week, Month, or Year to set how often the event repeats. For a continuous event, tap Day. Enter a number that corresponds to how often you want the event to repeat on the Every line.
- Page 235 For example, you set a 5-minute alarm for an untimed event that occurs on February 4. The reminder message will appear at 11:55 p.m. on the night of February 3. The r eminder remains onscreen until you turn on your QDA-700 and tap OK to turn off the reminder. - 235 -...
- Page 236 QDA-700 User’s Guide Tap the event to which you want to assign an alarm. Tap Details. Tap the Alarm check box to select it. The default setting, 5 Minutes, appears. Set the alarm time: Select the 5 next to the Alarm check box and enter any number from 0 to 99 (inclusive) as the number of time units.
- Page 237 QDA-700 User’s Guide Setting Alarm Options You can set the alarm to go off automatically for each new event using preferences. You can also set a tone for the alarm and the number of times the alarm sounds. To set alarm options Tap the Menu icon in the Date Book to open the Preferences dialog: Tap Preferences in the Options menu.
- Page 238 QDA-700 User’s Guide Changing the Date Book View The Date Book includes four views for displaying your appointments: day view, week view, month view and agenda view. To display the Date Book views Tap a view icon in the lower-left area of the Date Book screen.
- Page 239 QDA-700 User’s Guide Previous Next week Dot indictedes Bar indicates earlier untimed event Bar indicates later event Tap an event to display a description of the event at the top of the screen. Event Tap to show event Tips for Using Week View...
- Page 240 QDA-700 User’s Guide Spotting event conflicts With the ability to define specific start and end times for any event, it is possible to schedule events that overlap (an event that starts before a previous event finishes). An event conflict (time overlap) appears in the Week view as overlapping time bars and in the Day view as overlapping brackets to the left of the conflicting times.
- Page 241 Tap Go To in order to open the date selector and select a different month. Use the scroll buttons on the front panel of your QDA-700 to move between months. Press the top button to display the previous month, the bottom button to display the next month.
- Page 242 QDA-700 User’s Guide Changing the Date Book Display In Day or Month view, you can change which events appear in the Date Book. In Day view, you can display time bars that highlight event conflicts. To change the Date Book display of events 1.
- Page 243 QDA-700 User’s Guide Changing the Displayed Start and End Times You can change the preferences used for new entries. Preferences include the display starting time, display ending time and alarm characteristics. See the section “Setting Alarm Options” earlier in this chapter for more information on alarm preferences.
-
Page 244: Using Memo Pad
QDA-700 User’s Guide 8.2 Using Memo Pad The Memo Pad provides a place to take notes that are not associated with records in the Date Book, Address Book, or To Do List. Opening the Memo Pad Tap the Organizer category in Launcher II and choose Memo Pad icon. The Memo Pad opens to display the last Memo Pad screen that you viewed. - Page 245 QDA-700 User’s Guide Reviewing Memos The Memo List displays the first line of a memo. This makes it easy to locate and review your memos. You can easily sort memos in the Memo List or move through memos using Memo options.
-
Page 246: Using To Do List
QDA-700 User’s Guide 8.3 Using To Do List The To Do List is a convenient place to create reminders and prioritize the things that you have to do. Opening the To Do List Tab the Organizer category in Launcher II and select To Do List icon. To Do List opens to display the category of items you last viewed. - Page 247 QDA-700 User’s Guide Setting To Do List Priorities You can set priorities for tasks in your To Do List according to their importance or urgency. Items appear by priority and due date at the top of the To Do List by default, with 1 the highest priority.
- Page 248 QDA-700 User’s Guide Changing Priorities and Due Dates You can change the To Do List to display the due date assigned to an item, change its priority, and assign a category to the task with the To Do Item Details dialog.
- Page 249 Tap Show Completed Items to display your completed items in the To Do List. If this setting is turned off, completed To Do items disappear from the list, but are kept in the memory of your QDA-700. You must purge completed items to remove them from memory.
-
Page 250: Using Calculator
QDA-700 User’s Guide 8.4 Using Calculator Calculator enables you to perform basic calculations. Use Calculator to do the following: Perform addition, subtraction, multiplication, division, and square root operations. Store and retrieve values. Display the last series of calculations, which is useful for confirming a series of “chain”... - Page 251 QDA-700 User’s Guide pressing the number buttons. Pressing this button has no effect on the current calculation (or series of calculations); it merely places the value into memory until it is recalled. Recalls the stored value from memory and inserts it in the current calculation.
-
Page 252: Documents Viewer
QDA-700 User’s Guide 9. Documents Viewer QDA-700 allows you to read Word and Excel files, as well as eBooks with Documents to Go PalmReader - 252 -... -
Page 253: Using Documents To Go Viewer
Documents to Go Viewer cannot be used unless it is selected for installation during the first run of your QDA-700 (see 1.4 First Run for details), or it is installed in a later time. To install Documents to Go Viewer after the first run: Tap Documents category in Launcher II Select DocsToGo icon to install the application. - Page 254 QDA-700 User’s Guide The Documents to Go Viewer searches your QDA-700 for any Word or Excel files automatically. If the files are found, it will be displayed in the file list. You may disable this automatic search in Preference afterwards.
- Page 255 Card Indicate whether the file is located on an expansion card. If the card icon is not displayed, the file is located on the QDA-700’s internal memory. Tapping on each column heading will sort the list of files. Tapping again will reverse the sort order.
- Page 256 QDA-700 User’s Guide List View Menu In List View, the following menu options are available: In File Menu Search for Files Whenever you launch Documents to Go Viewer, it will search for any Word or Excel files stored in the memory card and shows in the List View.
- Page 257 Global Find by tapping the Find soft button on the screen, it is search all applications on your QDA-700 for the specific string. Nevertheless, it takes longer time to search through all of the documents for each of the document types. If this is unnecessary, uncheck this box.
- Page 258 QDA-700 User’s Guide Word View Word view is the screen view when a Microsoft Word file is opened. The document is displayed at the middle of the screen and available options are displayed at the top and at the bottom of the screen.
- Page 259 Include in Global Find – Check to search all Word to Go documents when using the Global Find feature on your QDA-700. Uncheck to skip Word to Go documents and speed up searches. Enable Font Viewing – Checking this option will allow the text in the document to be displayed using the installed Word to Go fonts.
- Page 260 QDA-700 User’s Guide In Insert Menu: Page Break* Insert a page break at the insertion point Table* Insert a table at the insertion point Bookmark* Insert a bookmark at the insertion point Hyperlink* Insert a hyperlink at the insertion point.
- Page 261 QDA-700 User’s Guide Sheet View Sheet view is the screen view when a Microsoft Excel file is opened. The spreadsheet is displayed at the middle of the screen and available options are displayed at the bottom of the screen. Insert a function...
- Page 262 QDA-700 User’s Guide (next to text entry area) Displays and edits* the Cell Content Detail. * - not applicable in Documents to Go Viewer Edition. See the on-screen message for more details. Tapping on the pick list on the top-right corner of the screen toggle the selection of different worksheets in the workbook.
- Page 263 Include SheetToGo in Global Find – Check to search all Sheet to Go documents when using the Global Find feature on your QDA-700. Uncheck to skip Sheet to Go documents and speed up searches. Automatically Recalculate – Check to automatically recalculate spreadsheets when changing a cell value that is included in a formula.
- Page 264 QDA-700 User’s Guide In Insert Menu: Function* Insert a function for calculation. Row * Insert a row on top of the current row Column* Insert a column in front of the current column Sheet* Insert a new worksheet in the current file.
-
Page 265: Using Palmreader
QDA-700 User’s Guide 9.2 Using PalmReader PalmReader is an intuitive and powerful program for viewing electronic books (eBooks). Unlike other eBook readers, the PalmReader shows text one page at a time as paper books do. This provides for a much richer reading experience than with the typical "giant scrolling document"... - Page 266 Click "Done." Then click OK. HotSync your QDA-700 as you normally do. View eBook(s) in QDA-700 After the eBook is installed to your QDA-700, you can use the PalmReader to open and view your favourite eBook. To view eBook Tap Documents category in the Launcher II and select PalmReader icon. It will prompt you to open a book.
- Page 267 QDA-700 User’s Guide Turn pages in PalmReader There are several ways to turn pages in the PalmReader: Method Details Tap the screen Tapping the bottom half of the screen will display the next page; tapping the top half of the screen displays the previous page.
- Page 268 QDA-700 User’s Guide PalmReader Menu There are 3 menus: Book, Go and Options in PalmReader. The Book Menu The Book menu contains seven items: Open Display a list of books on your handheld. Double-tap one of the books or tap one to select it and tap the Open button.
- Page 269 QDA-700 User’s Guide The Go Menu The Go menu contains many items which are useful for navigating books. Searching for Text The first group of items in the Go menu are "Find" and "Find Again.": Find A dialog appears which allows you to enter the text for which you are searching.
- Page 270 QDA-700 User’s Guide Going back after following a link The last item in the Go menu is "Back." This item is only useful when reading books that contain links. After tapping a link, choose "Back" from the Go menu to go back to the page you were on before you tapped the link.
- Page 271 QDA-700 User’s Guide Info and Help The last two items in the Options menu are "Help," and "About PalmReader" which offer help and display information about PalmReader. Help Display some basic information on how to use the reader. About PalmReader Display the About dialog, which displays information about the PalmReader application.
- Page 272 QDA-700 User’s Guide Bookmarks Bookmarks are a method of marking pages in your book in order to quickly find those pages. To bookmark a page, do either of the following Tap the upper right-hand corner of the page to "dog-ear" it. A quick-bookmark is created and given a default name and a dog-ear is shown in the corner of the page to indicate that it has been bookmarked.
- Page 273 QDA-700 User’s Guide Notes (Annotations) Notes are similar to bookmarks in that they are attached to specific pages. Notes, however, permit you to attach notes of over one thousand characters. This is useful to add "margin notes" to eBooks. To attach a note to a page, do either of the following Tap the note toolbar icon Choose "Add Note..."...
- Page 274 QDA-700 User’s Guide Options and Preferences PalmReader contains many ways of customizing the user interface to better fit you, the user. These options include increasing the font size for easier reading, turning off the tapping sounds and inverting the screen for quiet night-time reading and many others.
- Page 275 QDA-700 User’s Guide Toolbar Preferences The next item in the Options menu controls the appearance of the toolbar. The toolbar is a line of small icons at the bottom of the book page display. Most of the toolbar icons perform the same functions as selecting a menu item. The Toolbar preferences dialog contains checkboxes for hiding these icons on the book display page.
-
Page 276: Utilities
QDA-700 User’s Guide 10. Utilities This section introduces some utility applications; CLOCK let you to view the current date and time in multiple locations and you can set alarms. You can perform file management with File Mover and backup/restore data with Backup. -
Page 277: Using Clock
Tap one of time bars on the upper screen to pop up the Set Time Zone screen. The Current Time refers to the current system time in your QDA-700. Select the desired country by scrolling through the list. The local time of the... - Page 278 QDA-700 User’s Guide Setting Alarm You can set up to 3 alarms in CLOCK applications. To set an alarm Tap either one alarm entry to open the Alarm Setting Tap the MIDI pick list to choose the desired alarm sound. The choices are Alarm, Alert, Bird, Concerto, Phone, Sci-fi and Wake up.
-
Page 279: File Mover
ANY files or other directories to it.) If a SD/MMC memory card is inserted into the QDA-700, the Card View will show its content; otherwise the content in the expanded memory will be shown instead. - Page 280 Note: QDA-700 is equipped with expanded memory and SD/MMC memory card (optional), both cards will be listed as separate "tabs" at the bottom of the File Mover screen.
- Page 281 The Creating File List message will flash before the view is switched. The operation in RAM view is similar to that in Card View, except there is no directory in QDA-700 internal memory. Therefore, no directory path will be shown at the bottom part on the screen.
- Page 282 QDA-700 User’s Guide Detail File Operations between Cards and RAM After selecting files in either RAM or Card View, you have 3 file operation options as stated at the bottom the screen: Copy File(s) To copy file(s), do the following: Tap at least one checkbox in front of the file name to select the file(s) Tap Copy.
- Page 283 Enable low battery warning Instruct File Move to check the battery level of your QDA-700 before performing a file operation such as moving or copying a file. Such file operations will not be performed if the battery level is too low, until the battery is recharged.
- Page 284 Any items listed with a small circle with a slash through it are files or Applications that are stored in Flash ROM or cannot be deleted from your QDA-700. In App View mode you will not have a Move/Copy/Delete menu when you tap the name of a file.
- Page 285 QDA-700 User’s Guide Tools in File Mover File Mover has a number of tools available to work with RAM and Memory Card information. The options available are different in both App View mode and File View mode: Select All / Unselect All Toggle the selection of all available files and directories.
-
Page 286: Using Backup
10.3 Using Backup Backup is a safety solution to backup all data of your QDA-700 to expanded memory or SD/MMC memory card. Backup provides a user friendly interface to manage your personal and professional information. Every bit of your data will be safely archived on your memory card. - Page 287 Caution: NEVER try to interrupt this backup process or data corruption will result. Upon completion, you will be presented with a Backup complete screen. All files have now been successfully backed up and stored on the QDA-700 expanded memory.. The default location for your stored data is \Palm\PIBACKUP\HotSync Username\, where the "HotSync Username"...
- Page 288 Restore is to copy all your data & applications from the expanded memory to your QDA-700. It can only be done if a backup procedure is already done. You will find a Last Backup: date and time at the top of the screen in such case.
- Page 289 The procedure will be discussed later. What’s in Advanced Mode In Advanced Mode, you can see the HotSync name of your QDA-700 and information about your last backup(s), if you have already used the software. There are 5 icons at the bottom of the screen. From left to right: Scheduled backup Schedule an automatic backup on your QDA-700.
- Page 290 The default backup destination folder is \Palm\PIBACKUP\HotSync Username\ in QDA-700 expanded memory, where the "HotSync Username" is replaced with the Username of your device. If you want to set a new backup destination folder:...
- Page 291 Upon completion, you will be presented with a Backup complete screen. All files that were stored on internal memory have now been successfully backed up and stored on QDA-700 expanded memory. The default location for your stored data is \Palm\PIBACKUP\HotSync Username\, where the "HotSync Username" is replaced with the Username of your device.
- Page 292 QDA-700 User’s Guide Perform a scheduled backup With scheduled backup, you can assign your QDA-700 to perform a backup procedure on a specified date and time. To set a Scheduled Backup Switch to Advanced Mode Tap Schedule backup icon Tap Enable at the top of the screen Set the options of the scheduled backup You can choose to repeat the backup by day or week in the first option.
- Page 293 Then tap the Disable button and finally tap the Cancel button to actually disable your scheduled backup. Set a New Backup Folder The default backup destination folder is \Palm\PIBACKUP\HotSync Username\ in QDA-700 expanded memory, where the "HotSync Username" is replaced with the Username of your device. - 293 -...
- Page 294 QDA-700 User’s Guide To set a new backup folder Select the desired memory card (either expanded memory or SD/MMC card (if inserted)), Tap menu and choose New backup folder in Tools menu, tap New backup destination icon at the bottom of the screen.
- Page 295 QDA-700 User’s Guide Exception List You can exclude some specific files from the backup procedure by adding to an Exception List. Any files found in the exception list will be ignored during a backup and will not be included in the backup process.
- Page 296 Restore is to copy all your data & applications from the expanded memory to your QDA-700. It can only be done if a backup procedure is already done. You will find a Last Backup date and time at the top of the screen in such cases.
- Page 297 QDA-700 User’s Guide To restore files in advanced mode, do the following 1. Tap Advanced to enter Advanced mode. 2. Tap to choose the folder which stored your backup files (if more than one backup folder is used before) 3. Tap Restore icon to proceed. The Advanced Restore screen will appear next, with the name of the directory listed at the very top of the screen 4.
- Page 298 QDA-700 User’s Guide 7. Upon completion of the Restore, you will be asked to Reset your handheld. Tap OK to reset and finish your restoration. Your PDA will now be restored to the same settings as when your backup was created.
- Page 299 QDA-700 User’s Guide Archive the unused files Archives any unused files during a backup if checked. Enable Backup/Restore Alarm Enables an audible alarm before a restore or backup, useful with scheduled backups. Overwrite ALL files without asking This will overwrite all files stored on RAM during a restore without warning given during the Restore process.
-
Page 300: Miscellaneous
QDA-700 User’s Guide 11. Miscellaneous This section introduces some miscellaneous applications: Card Info Security Welcome - 300 -... - Page 301 QDA-700 User’s Guide 11.1 Using Card Info Card Info enables you to review general information about an expansion card. Use Card Info to do the following: Review card contents. Rename a card. Format a card. Reviewing Card Information You can view the card name, type, available storage space, and a summary of its contents.
- Page 302 QDA-700 User’s Guide Formatting a card Formatting a card destroys all its data and prepares it to accept new applications and data. To format a card: 1. Tap System category in Launcher II and select Card Info icon. 2. Tap the Menu icon .
-
Page 303: Using Security
Using Security To protect your personal information, you can lock the system so that you need to enter your password to access any of your data or use other features of your QDA-700. To access Security 1. Tap System category in Launcher II 2. - Page 304 QDA-700 User’s Guide Private records You can mark entries as private in most applications. All private entries remain visible and accessible until you select the Security setting to hide or mask them. When you hide entries, they do not appear anywhere in the application. When you mask entries, a visual placeholder appears where the entry would normally appear.
-
Page 305: Welcome
QDA-700 User’s Guide 11.3 Welcome When you first run your QDA-700 after charging battery, you should see a setup screen and guide you to configure your QDA-700 step-by-step. You can run this procedure again by selecting the Welcome icon again. - Page 306 QDA-700 User’s Guide Date Time Tap Next to continue Tab Done to exit the setup and Installer screen displays. The Launcher II runs and the Home screen displays. - 306 -...
-
Page 307: Games
QDA-700 User’s Guide 12. Games In addition to an organizer and mobile phone, your QDA-700 is also your game centre. Five interesting games are included: Bejeweled Fruit Frolic (trial version) Ricochet (trial version) SpyChase 3D - 307 -... -
Page 308: Bejeweled
QDA-700 User’s Guide 12.1 Bejeweled Amazingly simple to play - Unbelievably hard to put down! One of the rare games that you can play all day 'just one more go' at a time. Choose from a relaxing and absorbing easy game, or a frantic timed game, as you tap adjacent pairs of gems to swap them and make matching horizontal and vertical lines of three or more. -
Page 309: Fruit Frolic
QDA-700 User’s Guide 12.2 Fruit Frolic Fruity fun for everyone! Use your fruit shooter to make combinations of 3 or more fruit! Three great ways to play Fruit Falls - clear the board before the fruit fall down! Harvest Time - see if you can beat your time! - Page 310 Tap menu button and select Instructions in Options menu. Note: The Fruit Frolic in your QDA-700 is a trial version. Y ou can play 5 games of Fruit Frolic for Palm for free, as you decide whether you like it or not. After these games are up,...
-
Page 311: Ricochet
QDA-700 User’s Guide 12.3 Ricochet Brick bashing for a new generation! Remember the classic brick-busting game Breakout? Ricochet takes the same concept into the 21st century and up to a whole new level. Based on the classic PC game, Ricochet brings together problem solving and fast action as you frantically bounce your Ion Sphere off your ships shield and try to get it to destroy all of the blocks on screen. - Page 312 Tap menu button and select Instructions in Options menu. Note: The Ricochet in your QDA-700 is a trial version. You can play the first 10 levels of Ricochet for Palm 5 times for free, as you decide whether you like it or not. After these...
-
Page 313: Spychase 3D
QDA-700 User’s Guide 12.4 SpyChase 3D In this game you act as a secret agent chasing the enemy spies on your hi-tech motorcycle. SpyChase 3D differs from the common racing games as the action takes place in the forest, with full freedom of movement. Your bike is equipped with a powerful gun and you can pick up bonuses to gain special abilities like jumping or cruise missile rocket. -
Page 314: Doc Overview
QDA-700 User’s Guide 13. DOC Overview There are 2 memory storage spaces in your QDA-700, namely RAM (i.e., internal memory) and expanded memory. The expanded memory is denoted by DOC in the Launcher II of your QDA-700. All applications and data stored in RAM will be erased after a hard reset or a complete power drainage, while the data and applications stored in expanded memory still exist after a hard reset or a complete power drainage. -
Page 315: Card Overview
In addition to the RAM and expanded memory, SD/MMC expansion card can be inserted into your QDA-700 as memory expansion. When one card becomes full, you can easily replace it with another card. In addition, you can enjoy MP3 listening and video capturing while storing the files in the expansion card. -
Page 316: Troubleshooting
Check the power socket to ensure it is in service Make sure the battery is installed in the QDA-700 and that the battery is locked. The QDA-700 does not start up when you open the flip or press any button Check the battery is locked. - Page 317 HotSync operation to recover the memory. QDA-700 turns itself off automatically Your QDA-700 is designed to turns itself off automatically when it has been idle for a certain period of time. This time duration can be set in General Preferences.
- Page 318 Manual. This also applies to Memo Pad Beaming and Sending Problems Data cannot be beamed to another QDA-700 or Palm OS handheld with an IR port. Position your QDA-700 to the receiving device at a straight-line distance between 10 cm to 1m, and make sure the path between the 2 devices is clear of obstacles.
- Page 319 Leave underground location and move to somewhere above ground If your location is surrounded by many tall buildings, move to a less crowd area. Keep your QDA-700 with the windshield if you are in a vehicle. The metal frame of the vehicle shields the radio signals.
-
Page 320: Notice
0.563W/kg over 10g of tissue based on EN50360 & EN50361 Standard. Limited Warranty Qool Labs warrants to the original end user “ Consumer “ that the new QDA700 will be free from defects in workmanship and materials, under normal use, for twelve (12) - Page 321 The Consumer shall be responsible for expenses related to reinstallation of the product. (d) If the product is returned to Qool Labs after the expiration of the warranty period, Qool Labs shall rightfully apply all services policies, to the Consumer accordingly.
Need help?
Do you have a question about the QDA-700 and is the answer not in the manual?
Questions and answers