Table of Contents
Advertisement
Quick Links
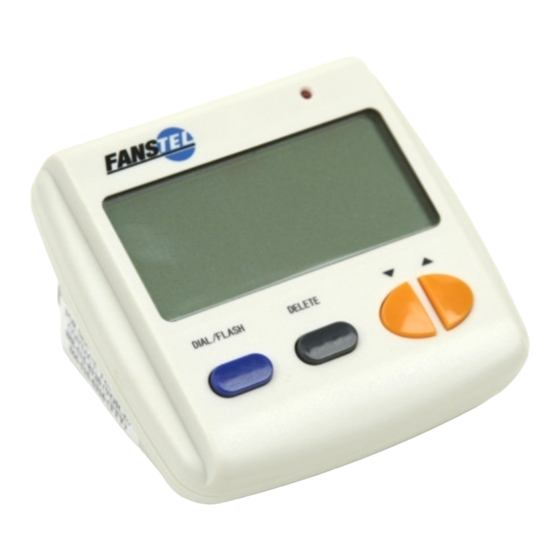
CALLER ID Model G99M
OWNER'S MANUAL
Caller ID Parts Check List
1.
CALLER ID UNIT
2.
SEVEN FOOT LINE CORD
3.
AC/DC ADAPTER WITH FIVE FOOT CORD
First Time Installation
1. Before you connect the Caller ID unit to your telephone locate
the DC plug on the rear of the unit and the AC/DC adapter that
came with your unit. The length of the cord on the AC/DC
adapter is approximately five feet. You must place your unit
within five feet of an AC outlet.
2. Plug the AC adapter into an AC outlet near your phone jack.
3. Attach the DC adapter plug into the back of the Caller ID unit.
(As a backup power source, you may also install 3 AA batteries
(not included) into the Caller ID unit.
make sure to follow the diagram printed on the inside of the
battery compartment.
memorized calls if a loss of AC power to the unit should occur
but batteries should not be used as the primary power
source. A battery symbol will appear on the LCD Display when
the batteries are low and need to be changed.)
4. Plug one end of the cord into the unit where it is labeled "TO
LINE."
5. Unplug the cord from the wall jack that currently goes to your
telephone. Plug this cord into the unit where it is labeled "TO
PHONE."
6. Next, take the line cord from the Caller ID unit that is plugged
into the "TO LINE" jack on the unit and plug this into the wall
jack.
7. Check for a dial tone to ensure proper connection. If there is no
dial tone, see the "TROUBLESHOOTING" section of this owner's
manual.
Selecting Language
After powering up the unit, LCD displays the following:
FRA ENG ESP
• For ENGLISH, press the DELETE button.
For SPANISH, press one of the REVIEW (! or " " " " ) button.
•
• For FRENCH, press the DIAL/FLASH button.
The unit will default to English after a few seconds if no choice is
made.
Programming Your Area Code
To dial or call back a number in the Caller ID memory, you must
enter your local area code(s). You can enter area code(s) after
powering up or by press and hold the DIAL/FLASH button for about
5 seconds to begin entering of area codes.
You can enter up to 4 area codes:
•
If area code of a number is the same as the first area code, 7
digits are dialed (area
code is not dialed).
•
If area code of a number
is the same as the 2
rd
th
the 3
, or the 4
area
code, 10 digits are dialed.
•
If area code of a number
is different from any area code entered, 1 + 10 digits are
dialed.
260H006
If you install batteries,
Batteries will prevent the loss of
#
-
-
_ _ _
_ _ _
_ _ _
nd
,
ENTER AREA CODE
1.
If you don't have an area code for 7 digits dialing, presses
DELETE button 3 times to skip the 1
Press " " " " REVIEW / ! REVIEW buttons to adjust to the correct
2.
digit.
3.
When the desired number is reached, press DELETE button
to move to the next digit.
Press DIAL/FLASH button to accept area codes on LCD
4.
display.
If at any time the unit loses power or if the user enters the area
code(s) incorrectly, the unit must be re-set and the local area
code(s) must be re-entered. Refer to the beginning of this section
for instructions on how to enter local area code(s).
Adjusting LCD Contrast
To adjust LCD contrast (to make it lighter or darker):
Press and hold down the " " " " REVIEW button for about 5
1.
seconds. "LCD CONTRAST" prompt appears.
Press " " " " REVIEW button to decrease brightness.
2.
Or, press !REVIEW button to increase brightness.
3.
4.
Press DELETE button to accept the contrast level.
Setting up Clock and Calendar
Setting up the clock and calendar on your Caller ID unit requires no
user intervention. When your Caller ID service is activated by the
Telephone Company and the first call is received, the clock and
calendar are automatically set to the Telephone Company's time
and date.
Connection to an Answering Machine
1. Take the seven foot line cord that came with your Caller ID unit
and plug one end of this cord into the unit where it is labeled "TO
LINE."
2. Unplug the cord from the wall jack that goes to your answering
machine. Plug this cord into the Caller ID unit where it is labeled
"TO PHONE."
3. Take the seven foot cord that is plugged into the "TO LINE" jack
on the Caller ID unit and plug the other end of this line cord into
the wall jack.
4. Check for a dial tone to ensure proper connection. If there is no
dial tone, see the "TROUBLESHOOTING" section of this guide.
IMPORTANT NOTE: The answering machine must be set to
answer after 3 or more rings for the Caller ID unit to receive
Displaying Incoming Calls
Once your Caller ID unit has been powered up and attached
correctly (see above), your unit is ready to receive and display
incoming calls. *Note: You must also contact your local
telephone company to subscribe to and activate your Caller ID
service. The Caller ID unit stores the calling numbers and calling
times in the call memory. The Caller ID unit also displays and
stores the caller's name if the caller's name is transmitted. For
each call, the screen will display the following information:
The time and date of the call.
The caller's area code and telephone number.
00
WAITING
The caller's name (if the caller's name is transmitted).
The numerical sequence of the call
memory
The "WAITING" message indicating when there is another call
and the battery symbol
batteries.
data.
12:00
AM
1/01
01
WAITING
#
480-948-4928
SMITH JOHN
indicating it is time to replace the
st
area code.
+
,
# as it is stored in
Advertisement
Table of Contents

Summary of Contents for Fanstel G99M
- Page 1 DELETE button 3 times to skip the 1 area code. Press " " " " REVIEW / ! REVIEW buttons to adjust to the correct digit. CALLER ID Model G99M When the desired number is reached, press DELETE button OWNER’S MANUAL to move to the next digit.
- Page 2 The Voice Mail Waiting symbol when you have new Calling Back a Number from the Caller ID List voice mail. You must have Visual Message Waiting Indication from you local Telephone Company for the Voice Mail Waiting Symbol to When the number you wish to call back is displayed on the LCD, lift work the handset of telephone connected to this unit, then press the IMPORTANT NOTE: You must wait for at least 2 full rings...
- Page 3 FOR HOW LONG? For one year from the date of purchase. UNAVAILABLE the Caller ID service. WHAT WE WILL DO: If we repair your FANSTEL product, we may use new or reconditioned replacement parts. If we choose to What If the Message “PRIVATE CALL” Is Displayed? replace your FANSTEL product, we may replace it with a new or reconditioned one of the same or similar design.
- Page 4 Your FANSTEL product has been tested and found to meet the standards for a Class B digital device, as specified in Part 15 of the FCC Rules.
Need help?
Do you have a question about the G99M and is the answer not in the manual?
Questions and answers