
Subscribe to Our Youtube Channel
Summary of Contents for CUES CURRAHEE
- Page 1 CUES CURRAHEE CUTTER Lateral Reinstatement Cutter OPERATION & MAINTENANCE MANUAL P/N CK902, Revision: Original...
-
Page 2: Table Of Contents
Air/Water Power Control Unit (PCU) ......4,16 Air/Water Supply System ..........5,9 Interchangeable Air Motors..........5 Additional Required Equipment ........5 CHAPTER 4 - System Setup & Installation Electrical & Physical Connections ........18 Functional Checkout.............24 www.cuesinc.com, | salesinfo@cuesinc.com CUES Inc., Currahee Cutter User Manual | CK902... - Page 3 TABLE OF CONTENTS CHAPTER 5 - Currahee Cutter Operation & Maintenance Cutter Operation ..............25 Inserting the Cutter ...............25 Cutting ..................25 Cutting Tips ................25 Retrieving the Currahee Cutter..........25 Equipment Maintenance ............26 CHAPTER 6 - Service Servicing the Currahee Cutter ..........27 Miscellaneous Warranty Information ............28...
- Page 4 CUES equipment is designed to be easy to use during day to day operation. However, it is powered electrically and thus must be operated with care and safety. PLEASE READ THE INFORMATION ON SAFETY AND MAINTENANCE EVEN IF THE SYSTEM IS SET UP BY SOMEONE ELSE.
- Page 5 INTRODUCTION This manual contains operation and maintenance instructions for the CUES Currahee Cutter. Please make sure that you read and understand all instructions before operating the system. Proper maintenance of your Currahee Cutter will ensure its continued performance and productivity.
-
Page 6: Chapter 2 - System Description
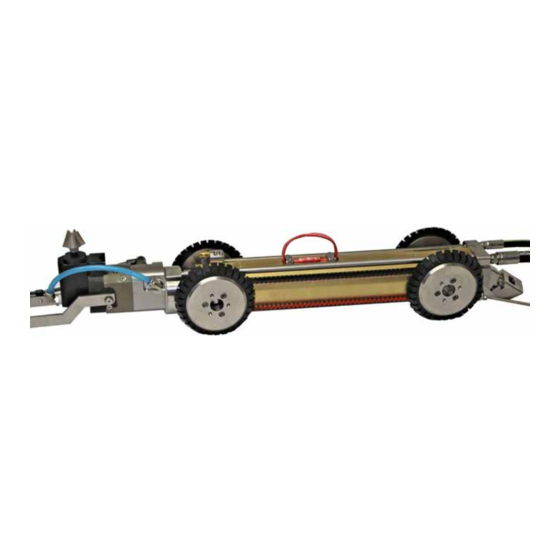
However, it can also be used to trim protruding laterals and other defects utilizing a wide variety of cutting heads and bits. The Currahee Cutter system is made up of a mobile cutter assembly, which consists of multiple cameras and an air motor attached to a mobile cutter body, a gamepad controller, the K2 Power Control Unit (PCU), the Air/Water PCU, and individual air and water supply systems. - Page 7 SYSTEM DESCRIPTION www.cuesinc.com, | salesinfo@cuesinc.com CUES Inc., Currahee Cutter User Manual | CK902...
-
Page 8: Chapter 3 - Equipment Overview, Controls & Settings
K2 Power Control Unit (PCU) The K2 PCU interprets the user’s inputs via the gamepad and provides power and control signals to the Currahee Cutter’s three motors and two cameras. Gamepad inputs for the air/water supply system are also read by the K2 PCU, which then transmits them to the Air/Water PCU. -
Page 9: Air/Water Supply System
Quick disconnect fittings on the ends of the hoses allow quick attachment to the cutter. Interchangeable Air Motors The Currahee Cutter is provided with multiple sizes of air motors with a standard 3/8-24 thread (Contact CUES Sales for additional optional cutting heads). -
Page 10: Gamepad
For additional information about other gamepad functions within the K2 system, please refer to the K2 User Manual on the CUES website. NOTE: Once familiar with the system, a standard K2 wireless gamepad can be used. - Page 11 Move the right joystick left and right to rotate the cutting head counter-clockwise (CCW) and clockwise (CW). Move the left joystick forward and backward to adjust the cutting head upward (UP) and downward (DN). www.cuesinc.com, | salesinfo@cuesinc.com CUES Inc., Currahee Cutter User Manual | CK902...
- Page 12 CCW/CW motor speed. Hold down [FWD/REV] and press either [+] or [–] on the directional pad to increase or decrease the FWD/REV motor speed. www.cuesinc.com, | salesinfo@cuesinc.com CUES Inc., Currahee Cutter User Manual | CK902...
- Page 13 [A] on the directional pad to toggle the air supply on and off. Hold down both [AIR/WATER] and [A/W], and press [W] on the directional pad to toggle the water supply on and off. www.cuesinc.com, | salesinfo@cuesinc.com CUES Inc., Currahee Cutter User Manual | CK902...
- Page 14 Hold down [PAN] and press either [+] or [–] on the directional pad to pan the cutting camera head up or down. Press down on the right joystick to send the cutting camera head to the ‘home’ position. www.cuesinc.com, | salesinfo@cuesinc.com CUES Inc., Currahee Cutter User Manual | CK902...
- Page 15 Hold down [LIGHTS] and press either [0] or [1] on the directional pad to raise or lower the spot light intensity in the cutting camera forks. www.cuesinc.com, | salesinfo@cuesinc.com CUES Inc., Currahee Cutter User Manual | CK902...
-
Page 16: K2 Power Control Unit (Pcu)
K2 menu system. This section focuses on those that are related to the Currahee Cutter. For additional information about other K2 settings and functions, please refer to the K2 User Manual on the CUES website. - Page 17 ARROW UP/DOWN to view transporter list TRANSPORTER Currahee Std. Cutter Select this option when using the Currahee Cutter with the Standard Camera Assembly. This front section contains two cameras – one adjustable, aimed backward toward the cutting head, and one fixed, aimed forward down the pipe.
- Page 18 K2 POWER CONTROL UNIT (PCU) - continued CONTROL SETTINGS The K2 Customizable Parameters Screen contains assorted system settings (image below is for reference only). The following are the settings that pertain to the CK600 Currahee Cutter. ===== CUES CUSTOMIZABLE PARAMETERS ===== LONG PAUSE TIME(msec):...
- Page 19 MISCELLANEOUS • While in Driving Mode, the Currahee Cutter can be driven at a constant speed forward using the K2 “DUC Cruise” function, if desired. NOTE: Extra care must be taken to prevent damage to pipes, liners, or other down-hole equipment when using cruise.
-
Page 20: Air/Water Power Control Unit (Pcu)
Should the need arise, it can be used as an ‘Emergency Stop’ switch, since it physically disconnects the power upstream from the electronic air and water power switches inside the Air/Water PCU. www.cuesinc.com, | salesinfo@cuesinc.com CUES Inc., Currahee Cutter User Manual | CK902... - Page 21 When ‘Currahee Mode’ is OFF, the air supply remains controllable via external controls (such as from the Air Motor switch on the Kangaroo Cutter controller), but the K2 gamepad will be ignored. • If the air and/or water supplies are ON when the K2 PCU deactivates ‘Currahee Mode’, they will automatically be turned OFF. www.cuesinc.com, | salesinfo@cuesinc.com...
-
Page 22: Chapter 4 - System Setup & Installation
Attach the air hose from the cutter to the air motor housing. NOTE: The air hose can be detached from the air motor housing when rotating camera assembly up to prevent pinching. The suggested housing sizes are as shown on the Currahee Cutter Quick Card, P/N CK901. Install the chosen air motor style into air motor housing. - Page 23 Attach the wheels as required for the size of pipe to be reinstated. b. Suggested wheel sizes are as shown on the Currahee Cutter Quick Card, P/N CK901. c. Use anti-seize thread lubricant and torque screws to 7 ft-lbs.
- Page 24 Connect camera cable to cutter connector, making sure to align orientation features. e. Suggested orientations of cutting camera for different pipe sizes are shown on the Currahee Cutter Quick Card, P/N CK901. STEP 2b. Install rectangular spacer as shown.
- Page 25 Attach air hose from Cutter to air motor housing. NOTE: Air hose can be detached from air motor housing when rotating camera assembly up to prevent pinching. e. Suggested housing sizes are as shown on the Currahee Cutter Quick Card, P/N CK901. STEP 3c.
- Page 26 Install the chosen cutting bit onto the air motor. b. Threaded bits should be lightly snugged down onto the shaft. c. Collet style bits should be tightened firmly. www.cuesinc.com, | salesinfo@cuesinc.com CUES Inc., Currahee Cutter User Manual | CK902...
- Page 27 Cutter to the clam shell on the multi-conductor cable. NOTE: Adjust the clam shell on the multi- conductor cable until there is slack in the cable. www.cuesinc.com, | salesinfo@cuesinc.com CUES Inc., Currahee Cutter User Manual | CK902...
-
Page 28: Functional Checkout
FUNCTIONAL CHECKOUT It is important to perform this checkout prior to placing the Currahee Cutter in the pipe. The checkout is designed to uncover possible functional problems while the cutter is still on the surface. Check to make sure that all the equipment is connected as described in the Electrical & Physical Connections section. -
Page 29: Cutter Operation
The cutter can be retrieved in the same manner as it was inserted using lifting poles hooked to the lifting strap. Never lift or carry the cutter using the cable or air hose. www.cuesinc.com, | salesinfo@cuesinc.com CUES CUES Inc., Inc., Currahee Cutter User Manual | CK902 Currahee Cutter User Manual | CK902... -
Page 30: Equipment Maintenance
IMPORTANT - If moisture is left in the cutter’s air motor, it will rust and quickly damage the bearings, resulting in air motor failure! www.cuesinc.com, | salesinfo@cuesinc.com CUES CUES Inc., Inc., Currahee Cutter User Manual | CK902 Currahee Cutter User Manual | CK902... -
Page 31: Chapter 6 - Service
See the Currahee Parts & Accessories Guide on the CUES website for more information. Air Motors: An instruction sheet is included with each air motor rebuild kit. Contact CUES Customer Service for any questions regarding a rebuild. Cutter Drive Belt: Remove the wheels and place one side of the cutter on a raised surface so that the belt sprockets are not contacting any surfaces. -
Page 32: Warranty Information
Expendable parts, such as light bulbs, fuses, connectors, etc., are excluded from this warranty. Purchaser must notify CUES of a breach of warranty not later than the last day of the warranty period; otherwise, such claims shall be deemed waived. -
Page 33: Safety Precautions & Equipment
CUES Customer Service at 1-800-327-7791. PERSONAL SAFETY EQUIPMENT & TRAINING CUES stresses the use of appropriate safety equipment while working in and around manholes and during system operation. Safety should constantly remain the utmost priority. NOTE: The user of CUES products is responsible for all training and operation under federal, state and local guidelines and regulations for both confined space entry and traffic control. -
Page 34: Cues Material Return Policy
CUES, at its’ option, may credit freight charges both ways. 10. The parts must be returned to CUES within 5 days of receipt of the MRA for credit to be granted. Under normal circumstances, a warranty determination can be made within 30 days, and if under warranty, the part will be replaced at no charge. - Page 35 PARTS WILL BE RETURNED TO CUSTOMER AT CUSTOMER EXPENSE WITHOUT AN MRA NUMBER DOCUMENTED ON BOX. CUES IS NOT RESPONSIBLE FOR SHIPMENT FROM CUSTOMER TO CUES. Use this section as a Packing Slip.
-
Page 36: Cues Parts & Service
CUES PARTS & SERVICE At CUES, we realize your return on investment is directly related to daily production in the field. By stocking the largest inventory of OEM equipment in our industry, CUES strives to ship all parts orders on the same day or within 24 hours after receipt of the order. -
Page 37: Record Of Revisions
As engineering changes to this hardware are made at CUES, necessary information in the manual will be revised to reflect those changes. The latest change level and the rationale for any change(s) will be explained in tabular format on this page to allow the manual user to be better equipped should the need arise to call CUES regarding technical information. - Page 38 Pipe profiling is accomplished via Laser for Sonar based systems. CUES has the most locations and dealers available to serve you! To find a local CUES facility, find the operating hours for a particular location, or to contact us at your most convenient stocking location, please log onto our website at www.cuesinc.com...
Need help?
Do you have a question about the CURRAHEE and is the answer not in the manual?
Questions and answers