Singular Sound BEATBUDDY Manual
Hide thumbs
Also See for BEATBUDDY:
- User manual (44 pages) ,
- Quick start manual (20 pages) ,
- Instruction manual (20 pages)
Table of Contents
Advertisement
Advertisement
Table of Contents

Subscribe to Our Youtube Channel
Related Manuals for Singular Sound BEATBUDDY


Summary of Contents for Singular Sound BEATBUDDY
- Page 1 BEATBUDDY Manual Firmware 3.9.9...
- Page 2 In order to benefit from all the latest features, it is necessary to have the most recent firmware version installed. To check the firmware version on your BeatBuddy, press the Drum Set and Tempo knobs down at the same time and select ‘About BeatBuddy’. The firmware version appears on the second line, and as of the writing of this manual, it is ...
-
Page 3: Table Of Contents
5. BeatBuddy Manager Software.............16 6. Settings....................17 Sleep Mode................17 Footswitch................17 III. Main Pedal................19 Audio Settings..............20 Font Size................21 Sobriety................21 VII. About BeatBuddy..............21 VIII. Restore Default Settings.............21 7. MIDI and the BeatBuddy..............22 8. Technical Support................39 9. Technical Specifications..............40 10. Warranty....................41 11. Changelog..................42 BeatBuddy Manual... -
Page 4: Introduction
- which are recordings of the actual drum sounds. The MIDI files trigger the WAV files in the drum sets. That is how the BeatBuddy is able to play any beat, any time signature, using any drum set at different tempo settings to get a completely different sound. - Page 5 Unlike other effects pedals, the BeatBuddy is not intended to modify your instrument’s sound. It has input jacks only in case you want to put both the BeatBuddy and your instrument into the same sound system without the need for a mixer. The beats are not changed by your instrument’s sound.
-
Page 6: How To Plug In
Amps than your power supply can produce (for example, the total of all of your pedals plus the BeatBuddy is 2.5 Amps but your power supply can only produce 2.0 Amps), then the BeatBuddy won’t turn on (neither will any of your other pedals), because there isn’t enough power available. - Page 7 How to plug in The BeatBuddy SD card comes loaded with 10 drum sets and 200+ songs in many different styles. If you lose your SD card, you can download the default BeatBuddy content to put on a new SD card at ...
- Page 8 BeatBuddy will sound. The BeatBuddy sounds best when played through a high- quality full-range stereo sound system. A PA system or a home stereo system is ideal (you can plug the BeatBuddy’s headphones port into the AUX input on your home stereo or guitar amplifier, if it has one).
- Page 9 How to plug in If you have the BeatBuddy plugged into an amp, a ny effects on the amp will affect the sound of your BeatBuddy (unless the BeatBuddy is plugged into your amp’s AUX jack, then it is fine). So if your amp’s distortion is on, the beats will sound distorted.
- Page 10 How to plug in A typical configuration using both the IN and the OUT ports on the MIDI Sync Breakout cable at once. (Beatbuddy set to MIDI Merge see Section 8 MIDI and the BeatBuddy) BeatBuddy Manual...
- Page 11 These images are for all you tech nerds, all the normal people can skip this schematics page. A breakdown of the MIDI Sync Breakout Cable’s routing of MIDI data from the PS/2 connector to both the IN and Out Port. A graphical representation of the PS/2 connector circuit. BeatBuddy Manual...
-
Page 12: How To Use
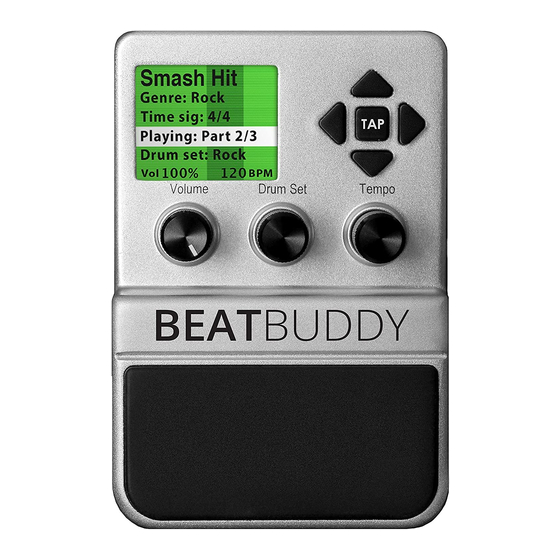
How to use the BeatBuddy Visual Display: The BeatBuddy uses a first of its kind visual display to show you what is going on with the beat. The screen changes color depending on what the BeatBuddy is doing. The V isual Metronome h as two main functions. The long vertical bar shows where the beat is within the measure. - Page 13 Sound Footswitch+ (sold separately), since we designed our Footswitch+ to withstand the heavy use of a BeatBuddy performance. If you are not using a Footswitch+, make sure that the third party footswitch is compatible with the BeatBuddy, and that the BeatBuddy is configured to the type of footswitch you are using.
- Page 14 How to use the BeatBuddy To configure the BeatBuddy to your footswitch, press the Drum Set and Tempo knobs down at the same time to enter the Settings menu. Select ‘Footswitch’ and then ‘Footswitch Detector’ and follow instructions. The BeatBuddy will save your settings, so you only have to use the ‘Footswitch Detector’...
-
Page 15: Tips And Tricks
● You can find out what any setting in the BeatBuddy does by highlighting the little (?) symbol next to it by using the right direction arrow and pressing the tap button to display the help text next to that setting. - Page 16 ● You can add a WAV file of any sound to the EFFECTS folder in your BeatBuddy SD card and select that file as a Global Accent Hit. Then, it will play that sound in any song when you trigger an accent hit with the footswitch (Settings >...
-
Page 17: Beatbuddy Manager Software
BeatBuddy to your computer with the included USB cable (make sure the SD card is properly inserted in the BeatBuddy), or put the BeatBuddy’s SD card in your computer’s SD card reader. Then, when you are finished, insert the SD card back in the BeatBuddy. -
Page 18: Settings
Settings I. Sleep Mode • This puts the BeatBuddy in a low power state and turns off the screen -- wake it up any time by pressing any knob, button or the main pedal. As of version 3.9.9 the BeatBuddy can be awoken from Sleep Mode by sending the BeatBuddy MIDI commands. - Page 19 .wav files into the effects folder to have additional options, no need to use the BeatBuddy Manager necessary to add these to your SD. o Volume - The volume of the accent hit sound. 0dB is default.
-
Page 20: Main Pedal
None: Immediately starts the first song part beat. • Outro - Enables or disables the Outro on the BeatBuddy. If disabled, instead of playing the outro, it will just stop the beat at the end of the measure. - Page 21 Main Pedal Unpause - Sets what happens if the Main Pedal is pressed while the BeatBuddy is paused. Note: If Start Beat is set to Press, the unpause behavior will only be allowed to be set on the Tap. This is to avoid unwanted actions occurring on the tap while paused.
-
Page 22: Audio Settings
• Drum Output - The BeatBuddy produces stereo audio. If you want the BeatBuddy to play back in true stereo, set this to stereo. If you would like the signal to summate into mono, and for both inputs to be sent to both outputs, set this to mono. -
Page 23: Midi And The Beatbuddy
How do I connect my BeatBuddy with MIDI?? • There are 2 cables required to connect your BeatBuddy to another device: A MIDI Sync Breakout cable... - Page 24 What can I use MIDI for? BeatBuddy is Transmitter (“Master”) (MIDI OUT): • Sync your looper to the BeatBuddy: MIDI Sync is a powerful tool to integrate the BeatBuddy with your other MIDI enabled devices, such as MIDI Sync enabled loopers and effects, to create a powerful performance or recording system.
- Page 25 This is also useful when you’re composing beats in your DAW and want to test how they will sound on the BeatBuddy -- no need to load the MIDI files into the BeatBuddy -- just stream the MIDI notes!
- Page 26 I. MIDI Settings For your convenience, all default settings will be marked with an asterisk (*) MIDI-IN - T hese settings control what the BeatBuddy does when it receives MIDI commands from an external device. • System Real Time o Sync...
- Page 27 Tempo Control • Enable*/Disable o Accent-Hit (CC:110, any value) - W hen enabled, the BeatBuddy will play the current song part accent hit each time it receives the Accent-Hit MIDI message. You can control the volume of the accent hit by changing the value of the message ranging from 0 to 127.
- Page 28 MIDI and the BeatBuddy o Pause/Unpause (CC:111, any value) - W hen enabled, the BeatBuddy will pause the current song when a Pause/Unpause message is received. The second time this message is received, the BeatBuddy will unpause the current song.
- Page 29 MIDI and the BeatBuddy o Intro (CC:114, value 1-127) - When enabled, the BeatBuddy will trigger the Intro of the song when an Intro message is received. If disabled, the BeatBuddy ignores all Intro messages it receives. If the non-MIDI Intro setting in the Main Pedal settings is disabled, the BeatBuddy starts without playing the intro.
- Page 30 MIDI and the BeatBuddy MIDI OUT - T hese settings control when the BeatBuddy sends MIDI commands to an external device. • Output Type o MIDI-OUT: The BeatBuddy only sends out the MIDI commands it generates and does not send any MIDI commands it has received in the BeatBuddy's MIDI In port.
- Page 31 Disable: B eatBuddy never sends out the MIDI Stop command. • Notes o When enabled, the BeatBuddy sends out the MIDI notes that it is currently playing. This can trigger sounds in another device such as your computer or another synthesizer.
- Page 32 • Time Signature o When enabled, BeatBuddy sends out Time Signature information when the BeatBuddy song loads and at every 1 of the measure after opening the song. This is useful for the Aeros Loop Studio so that it can sync the internal time signature with the BeatBuddy's even as the time signature changes.
- Page 33 This gives a potential of 128 MSB x 128 LSB = 16,384 different folders with 128 songs each (selected by the Program Change [PC] command). o The order of the folders / songs are sorted by the BeatBuddy Manager. The order of the folders / songs corresponds to the number used by the MIDI messages +1.
- Page 34 INC/DEC (see https://www.midi.org/specifications) Here are the common steps to do to control the BeatBuddy’s tempo: It follows the Data INC/DEC specification of the MIDI protocol: Steps to Increment Tempo Steps...
- Page 35 MIDI and the BeatBuddy III. Tempo Control • Since the BeatBuddy’s tempo ranges from 40BPM - 300BPM, we can’t use just one CC command to cover the whole range because a CC command can only have 128 values. • There are two ways of changing the tempo.
- Page 36 MIDI and the BeatBuddy INC/DEC (see https://www.midi.org/specifications) Here are the common steps to do to control the BeatBuddy’s tempo: It follows the Data INC/DEC specification of the MIDI protocol: Steps to Increment Tempo Steps Message Details CC:99/106 Set the NRPN register to Tempo MSB Set...
- Page 37 2. Tempo MSB & Tempo LSB o In order to directly set the tempo to a specific BPM, you need to use the Tempo MSB and Tempo LSB. The Beatbuddy will update its current tempo only when receiving the LSB message.
- Page 38 MIDI and the BeatBuddy MIDI IN Commands List CC:0 [0-127] Bank (Song folder) Select MSB CC:32 [0-127] Bank (Song folder) Select LSB CC:80 [1-127] Tempo Increment (New Tempo = Tempo + value) CC:81 [1-127] Tempo Decrement (New Tempo = Tempo - value)
- Page 39 Sent when BB outro ends and when paused (can be modified in Real Time) BB settings) Time Time Signature is sent by BeatBuddy whenever a song is Signature: loaded and at the 1 of every measure as a Sysex midi message. (All values in hex)
-
Page 40: Technical Support
SD card and reload your saved Project with the BeatBuddy Manager or the SD Card backup files which have the Default Content that came with your BeatBuddy. -
Page 41: Technical Specifications
Frequency Response: 20Hz to 20 kHz Inputs: 2 x 1/4" Outputs: 2 x 1/4" (L/mono, R), 1 x 1/8" (headphones) MIDI I/O: PS/2 MIDI Sync Port (breakout cable required) USB: 1 x Type Mini-B Other I/O: 1 x 1/4" TRS (external footswitch) BeatBuddy Manual... -
Page 42: Warranty
Most issues can be solved by writing to us at s upport@singularsound.com If we cannot help you fix the problem, we may have you send the BeatBuddy in for servicing. The warranty remains valid only if the serial number on the unit is not defaced or removed. -
Page 43: Changelog
114 (intro), 115 (outro) while BeatBuddy is paused, the BeatBuddy will now behave as expected. o The BeatBuddy continues to play the outro fill if it is paused and unpaused during the outro. o Disable hold commands while paused if Start Beat is set to Press If BeatBuddy Main Pedal is held down while paused and tap has ... - Page 44 • Added MIDI CC Inc / Dec for Headphones (CC:109) and Mix (CC:108) main volume • Display volume changes (Headphones and Mix) when changing them with MIDI • Fixed bug where Next Part CC:102 command did not follow the BeatBuddy's set MIDI Out channel • Set MIDI merge as default MIDI Out value •...
- Page 45 • Allow users to see help text even if option is disabled • Empty inactive folder names will now scroll if too long for the screen o Used for promotional messages from BBM / Download more songs, etc.. BeatBuddy Manual...
- Page 46 Resets on stop o Waits for the End Of Measure to change while Mute Pause is activated – this keeps the BeatBuddy in time with other devices • Displays Half / Double time on screen when activated • Made next part midi message (CC:112) enabled by default (this is crucial for the BeatBuddy to work properly with the Aeros).
- Page 47 We really wanted to increase the pedal’s visual feedback during a live performance. With this in mind, we performed a complete visual overhaul of the BeatBuddy’s graphical interface. Here’s what’s changed: 1. Added measure marker: Useful for knowing when a fill or transition is more than one measure long, as well as seeing where you are in long song parts.
- Page 48 Changelogs More MIDI Commands We’re continuing to implement more functionality into the BeatBuddy in preparation for our upcoming pedals. These changes include: 1. Separate Pause / Unpause message 2. CC:111 data == 0 : pause 3. CC:111 data == 1 : unpause 4.
- Page 49 Sobriety Option) • Use the Footswitch as the Main Pedal: Many of you would like to have the BeatBuddy up at table top (or keyboard) height so you can choose songs without bending down. You can now set one of the footswitches to act like the Main Pedal! (Settings >...
- Page 50 • Fixed midi merge sync bug. • Fixed Incorrect Drum set loading bug • Fixed not looping transition bug. (On the last part of the song) • Removed Stop commands when changing songs if player is not playing BeatBuddy Manual...
- Page 51 • Added 10% and 90% Cue Fill Period • Set default Cue Fill Period to 90% • Added quick release to reduce “clicking” sound when removing sounds (when max polyphony is reached) • Increased the Polyphony from 24 to 64 simultaneous instruments. BeatBuddy Manual...
- Page 52 • Fixed Update bug 1.7.8 • MIDI CC: Trigger Intro Command (CC:114) • MIDI CC: Drum set Selection MIDI Command (CC:116) • Can now selects next part with transition command. • Song can now be started with a transition command BeatBuddy Manual...
- Page 53 • Fixed Tap tempo glitch that could happen if someone presses the two footswitches (in tap tempo mode) at the same time or sends two tap tempo command to fast. The BeatBuddy now rejects any tap tempo request if the delay between the previous one is less than 120ms. This will fix the glitches that forced the BPM to 300 instantly.
- Page 54 / corrupted • Fixed Headphone Volume flickering bug. (Window is not shown if volume is under 20) • Fixed no special effect bug that caused a reboot of the BeatBuddy. • MIDI CC: External Tap Tempo (CC:117) 1.7.3 •...
- Page 55 • Fixed Random Reboot bug (Critical) • Improved stability and memory usage. • MIDI-MERGE feature. o The BeatBuddy now supports the Midi Merge Feature. o Merge algorithm minimizes the latency. It can also tolerate some badly formed MIDI-message. o GLOBAL drum set volume: The drum set now has a customisable volume (via BB Manager).
- Page 56 Added 0% and 100% in the cue fill period • o At 0%, when the pedal is press the drum fill & transition always trigger immediately o At 100% the player always wait until the next bar before launching the drum fill & transition. BeatBuddy Manual...
Need help?
Do you have a question about the BEATBUDDY and is the answer not in the manual?
Questions and answers