Table of Contents
Advertisement
Quick Links
Advertisement
Table of Contents

Related Manuals for TrickleStar TS1921


Summary of Contents for TrickleStar TS1921
- Page 1 TS1921 Occupancy Sensor Installation Guide...
-
Page 2: Table Of Contents
Table of Contents What is in the box? Sensor Overview Pairing the Sensor Mounting the Sensor on the wall Placing the Sensor on a flat surface Ready for use Changing Occupancy Detection settings on the Portal Occupancy Detection Connectivity Specifications Enviromental-Friendly Features Replacing the battery Troubleshooting... - Page 3 This Installation Guide describes how to install the Sensor and pair it to a TrickleStar Wi-Fi Smart Thermostat. If you have any inquiries about TrickleStar products or need technical support, visit our website for tutorials, videos and Frequently Asked Questions (FAQ).
-
Page 4: What Is In The Box
Preparation What is in the box? Occupancy Stand Double-sided Sensor adhesive QR code sheet Lithium cell battery (CR2477X x 1) -
Page 5: Sensor Overview
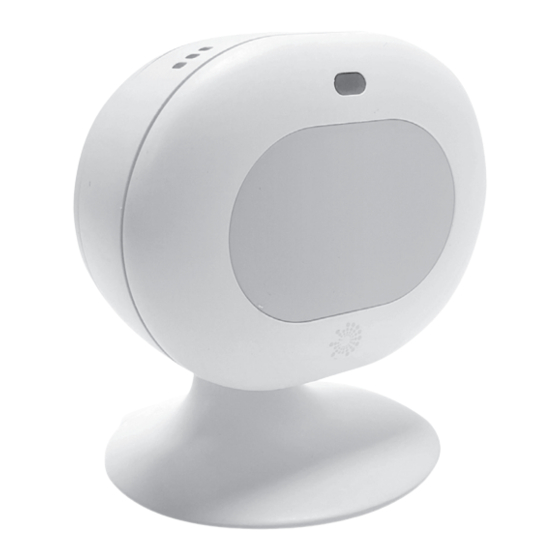
Sensor Overview Battery Cover LED Indicator Fresnel Lens Top View Stand Pairing Button Bottom View Battery Cover Double-sided adhesive (for wall mount) Slot (for stand) Stand (detachable) -
Page 6: Pairing The Sensor
Pairing the sensor Step 1: Pull the plastic tag To power up the Sensor, pull out the plastic tag from the Sensor gently. Plastic tag When the Sensor is powered up, it enters Pairing mode automatically. The LED starts blinking and continues blinking up to eight minutes. - Page 7 Pairing mode again and broadcast itself for 8 minutes for thermostat scanning. LED will blink briefly in the mode. Step 2: Add Occupancy Sensor to the system 1. Log in to your TrickleStar Portal account at: portal.tricklestar.com You can also use the QR code here.
- Page 8 Step 2: Add Occupancy Sensor to the system 1. Log in to your TrickleStar Portal account at: portal.tricklestar.com You can also use the QR code here. 2. At Dashboard screen, select Devices, then click on your Thermostat Name to enter Thermostat page.
- Page 9 If pairing is successful, the LED will blink twice. Then, the Bluetooth indicator appears on the Thermostat display. If pairing is unsuccessful or time-out after 8 minutes, the LED will stop blinking and the Sensor will go into standby mode. In Standby mode, the connection between the sensor and the thermostat is not set up.
-
Page 10: Mounting The Sensor On The Wall
Mounting the Sensor on the wall Before you mount the Sensor on the wall, be sure to check that: The sensor is connected to the Thermostat. The sensor is mounted away from direct heating or cooling sources, such as a fireplace or an air ventilator. Attach the double-sided adhesive to the Sensor. -
Page 11: Placing The Sensor On A Flat Surface
Placing the Sensor on a flat surface Before you place the Sensor on a flat surface, be sure to check that: The sensor is connected to the Thermostat. The sensor is placed on an even surface and at a safe location. The sensor is facing the direction which you want to detect occupancy. -
Page 12: Ready For Use
The sensor will automatically update the Connection Status, Room Temperature, Occupancy State and Sensor Battery Level in the Tricklestar Portal and Tricklestar App. You can enable or disable the sensor detection LED operation in Normal mode through the TrickleStar Portal Sensor settings (Occupancy Detection LED). -
Page 13: Changing Occupancy Detection Settings On The Portal
Occupancy Detection The occupancy sensor is equipped with an occupancy detection function. It uses PIR sensor to detect the infrared signal of moving human bodies. You can also enable or disable the occupancy detection function for each sensor individually through the Portal or App. When disabled, the individual sensor detection circuit will be shut off and the occupancy states will not be available. -
Page 14: Occupancy Detection
Changing Occupancy Detection settings on the Portal... - Page 15 Occupancy detection algorithm The thermostat changes the Mode automatically based on the received occupancy states from the sensors: If the Mode is “Home” You can set the Absence Detection Sensitivity as shown in the illustration above (Thermostat Sensor Settings). When the occupancy sensor detects no movement within the Absence Detection Sensitivity time set, the Mode will automatically change to “Away (set by sensor)”...
- Page 17 If the Mode is “Away” You can set the Occupancy Detection Sensitivity as shown in the illustration above (Thermostat Sensor Settings). When the occupancy sensor detects a movement within the Occupancy Detection Sensitivity time set, the Mode will automatically change to “Home (set by sensor)” and follow your preset Home Mode setting as shown below:...
- Page 18 If the Mode is “Sleep” The thermostat will not change the Mode. To cancel the Mode change Press jog dial for 3 seconds to return to Schedule Mode.
-
Page 19: Connectivity
Connectivity • Bluetooth Low Energy (BLE v4.2) connection with the TrickleStar Wi-Fi Smart Thermostat • Connection range: 98 ft. (30m) • Data refresh rate: 30 seconds (Connection Status, Temperature, Occupancy State, Battery Voltage) -
Page 20: Specifications
Specifications Temperature range Measurement : 32°F to 104°F (0°C to 40°C) Sensitivity : 0.1°F (0.05°C) Accuracy : ±1°F (60°F to 80°F), ±2°F (any others) Operating : 32°F to 122°F (0°C to 50°C) Humidity range Operating : 5% to 95% RH (non-condensing) Storage Temperature... - Page 21 Detection Range Occupancy : Passive Infrared (PIR) detection method Horizontal : 36 ft. (0°), 29.5 ft. (+/- 30°), 16.4 ft. (11 m) (9 m) (5 m) (+/- 60°) Vertical : 6.6 ft. (30° downward), 3.3 ft. (2 m) (1 m) (45°...
-
Page 22: Enviromental-Friendly Features
Environmentally-friendly features • Recyclable packaging • Mercury-free • Arsenic-free • PVC-free • PBT-Free Approvals FCC, IC (REL) - Canada, UN 38.3, RoHS compliant CA PROP 65 California Proposition Compliant... -
Page 23: Replacing The Battery
Battery critical level or below, normal operation of the sensor cannot be guaranteed. Remove the Battery Cover and replace the battery in the battery compartment. Put back the Battery Cover. The Sensor will automatically power up and reconnect to the TrickleStar Wi-Fi Smart Thermostat. Battery Cover Battery... -
Page 24: Troubleshooting
The Occupancy Sensor out fully from the Sensor and the sensor LED does not pair with the is flashing continuosly. TrickleStar Wi-Fi Smart • Check if the Sensor is within the Radio Thermostat Frequency (RF) range of 98 ft. • If the sensor LED does not flash, hold the Pairing Button for 2 seconds to initiate pairing to the Thermostat. - Page 25 (1) This device may not cause harmful interference, and (2) this device must accept any interference received, including interference that may cause undesired operation. Changes or modifications not expressly approved by the party responsible for compliance could void the user's authority to operate the equipment. FCC ID:2AG8Q-TS1921...
- Page 26 : 20cm IC:7723A-TS1921 The distance between user and device should be no less than 20cm. HVIN:TS1921 la distance entre l'utilisation et l'appareil ne doit pas être inférieure à 20 cm.
- Page 27 Toll Free: 1-888-700-1098 Patent Pending © 2021 TrickleStar Inc. TrickleStar® is a registered trademark of TrickleStar Ltd. All other trademarks are the property of their respective owners. The information in this document is subject to change without notice. TrickleStar assumes www.tricklestar.com...
Need help?
Do you have a question about the TS1921 and is the answer not in the manual?
Questions and answers