Advertisement
Quick Links
Manual - Handleiding - Bedienungsantleitung - Notice de montage
WARNING
Ruddersafe warrants that each Ruddersafe product, when properly installed, used and
maintained, will be free from defects in material from the date of receipt of the product by the
final customer.
Over-tightening of the parts will void the warranty.
tightened and secure it with the supplied locktide.
WAARSCHUWING
Ruddersafe garandeert dat elk Ruddersafe-product, mits correct geïnstalleerd, gebruikt en
onderhouden, vrij zal zijn van defecten in materiaal vanaf de datum van ontvangst van het
product door de eindklant.
Als de onderdelen te strak worden aangedraaid, vervalt de garantie.
Draai het vast te draaien deel met de hand vast en zet het vast met de meegeleverde borgmiddel.
ACHTUNG
Ruddersafe garantiert, dass jedes Ruddersafe-Produkt bei ordnungsgemäßer Installation,
Verwendung und Wartung ab dem Datum des Eingangs des Produkts beim Endkunden frei
von Materialfehlern ist.
Durch zu festes Anziehen der Teile erlischt die Garantie.
festzuziehende Teil von Hand an und sichern Sie es mit der mitgelieferten Versiegelungsmittel.
ATTENTION
Ruddersafe garantit que chaque produit Ruddersafe, lorsqu'il est correctement installé, utilisé et
entretenu, sera exempt de défauts matériels à compter de la date de réception du produit par le
client final.
Un serrage excessif des pièces annulera la garantie.
et fixez-la avec le liquidede blocage.
EN
NL
DE
FR
Hand tighten the part to be
Ziehen Sie das
Serrez à la main la pièce à serrer
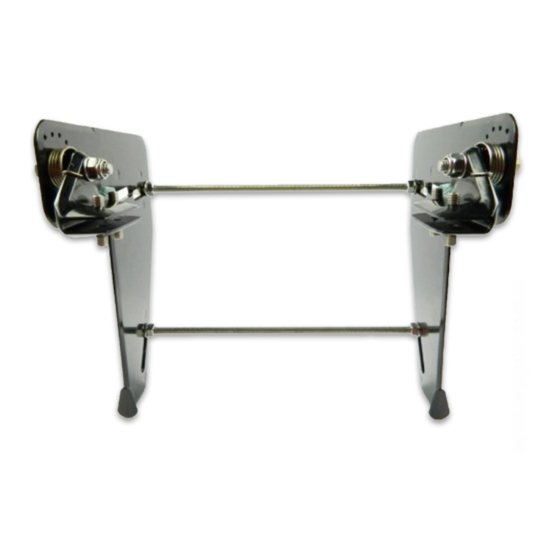
PARTS (INCLUDED IN THIS RUDDERSAFE SET)
ONDERDELEN (AANWEZIG IN DEZE RUDDERSAFE SET)
TEILE (IN DIESEM RUDDERSAFE-SET ENTHALTEN)
PIÈCES (INCLUSES DANS CET ENSEMBLE RUDDERSAFE)
C C
A
A
ENGLISH
Before installing the Ruddersafe, read this installation manual carefully and follow the instructions.
Use the supplied liquid locking agent when tightening nuts, bolts and studs. The locking agent can be
applied directly to the item to be secured. For best results, degrease the items to be secured with a
degreaser. Make sure the locking agent has cured before it gets wet.
Notes: At higher speeds, increasing water pressure on the trim tabs on the underside of the blades
will lift the rudder out of the water. The Ruddersafe must be able to move easily. At a lower speed, the
springs return the Ruddersafe to its original position. Tightening the springs can delay tilting.
After 5-10 running hours, check the adjusting screws and nuts and retighten if necessary.
The Ruddersafe should be checked during the annual maintenance of the engine. The activities are
limited to lubricating the tilting mechanism and, if necessary, proper cleaning and application of an
anti-fouling layer. Important: to protect the rudder from damage, it is recommended to provide it
and/or the tail piece with an aluminum anode.
1 1
2 2
1 1
B B
3
3
3
3
2 2
Fig. 1
Advertisement

Related Manuals for Ruddersafe Ruddersafe

Summary of Contents for Ruddersafe Ruddersafe
- Page 1 Durch zu festes Anziehen der Teile erlischt die Garantie. Ziehen Sie das will lift the rudder out of the water. The Ruddersafe must be able to move easily. At a lower speed, the festzuziehende Teil von Hand an und sichern Sie es mit der mitgelieferten Versiegelungsmittel.
- Page 2 Remarques: À des vitesses plus élevées, l’augmentation de la pression de l’eau sur les volets trimvlakjes aan de onderzijde van de bladen, het roer uit het water worden getild. De Ruddersafe dient compensateurs sous les lames soulèvera le Rudersafe hors de l’eau. Il doit donc pouvoir se déplacer makkelijk te kunnen bewegen.
- Page 3 Schutzhülse handfest in Schlitz 1 oder van het roer, niet tegen het staartstuk aan Befestigen Sie den Ruddersafe handfest an der 2. Die Gewindestange kann auf der Spitze der mag komen Dit kan worden voorkomen door Kavitationsplatte, indem Sie die oberen und Der Abstand zwischen Ruderblatt und Propeller Kavitationsplatte aufliegen.
- Page 4 Fig. 10 After correct assembly and after the set screws Après un assemblage correct et après que les For the Ruddersafe to function properly, the distance between the rudder blades at the top and nuts have been tightened, the protruding vis de réglage et les écrous ont été...
Need help?
Do you have a question about the Ruddersafe and is the answer not in the manual?
Questions and answers