
Related Manuals for View-Master J7606

Summary of Contents for View-Master J7606
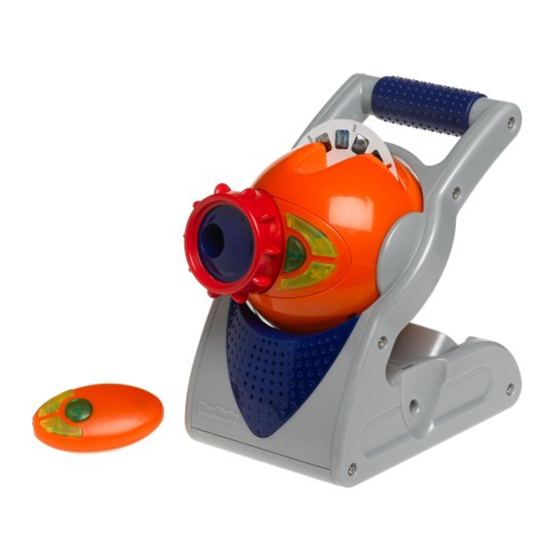
- Page 1 PROJECTOR S Proyector WITH REMOTE CONTROL CON CONTROL REMOTO f Projecteur P Projetor J7606 AVEC TÉLÉCOMMANDE COM CONTROLE REMOTO...
- Page 2 e CONSUMER INFORMATION f RENSEIGNEMENTS POUR LES CONSOMMATEURS S INFORMACIÓN AL CONSUMIDOR P INFORMAÇÕES AO CONSUMIDOR e • Please keep this instruction sheet for future reference, as it contains important information. • Requires four “AA” (LR6) alkaline batteries (not included) and two (LR44) button cell batteries (included).
- Page 3 CANADA Mattel Canada Inc., 6155 Freemont Blvd., Mississauga, Ontario L5R 3W2; 1-800-432-5437; www.service.mattel.com. MÉXICO Importado y distribuido por Mattel de México, S.A. de C.V., Insurgentes Sur # 3579, Torre 3, Oficina 601, Col. Tlalpan, Delegación Tlalpan, C.P. 14020, México, D.F. MME-920701-NB3.
- Page 4 e BATTERY INSTALLATION - PROJECTOR f INSTALLATION DES PILES - PROJECTEUR S COLOCACIÓN DE LAS PILAS - PROYECTOR P INSTALAÇÃO DE PILHAS - PROJETOR e Battery Compartment Door f Couvercle du compartiment des piles S Tapa del compartimento de pilas P Tampa do Compartimento de Pilhas 1,5 V x 4...
- Page 5 f • Trouver le compartiment des piles sur le dessous du projecteur. • Dévisser la vis du couvercle du compartiment avec un tournevis cruciforme. Retirer le couvercle. • Insérer quatre piles alcalines AA (LR6) comme indiqué à l’intérieur du compartiment. Conseil : Il est recommandé...
- Page 6 e BATTERY REPLACEMENT - REMOTE CONTROL f REMPLACEMENT DES PILES - TÉLÉCOMMANDE S COLOCACIÓN DE LAS PILAS - CONTROL REMOTO P TROCA DE BATERIAS - CONTROLE REMOTO e Battery Compartment Door f Couvercle du compartiment des piles S Tapa del compartimento de pilas P Tampa do Compartimento de Pilhas 1.5 V x 2 e LR44 or Equivalent...
- Page 7 S • Localizar el compartimento de pilas en la parte de atrás del control remoto. • Desenroscar el tornillo de la tapa del compartimento de pilas con un destornillador de estrella y retirar la tapa. • Introducir dos nuevas pilas alcalinas de botón tipo 2 x AG13 (LR44) x 1,5V como se muestra dentro del compartimento.
- Page 8 e BATTERY SAFETY INFORMATION f CONSIGNES DE SÉCURITÉ CONCERNANT LES PILES S INFORMACIÓN DE SEGURIDAD ACERCA DE LAS PILAS P INFORMAÇÕES DE SEGURANÇA SOBRE PILHAS OU BATERIAS e In exceptional circumstances, batteries may leak fluids that can cause a chemical burn injury or ruin your toy. To avoid battery leakage: •...
- Page 9 S En circunstancias excepcionales, las pilas pueden desprender líquido corrosivo que puede provocar quemaduras o dañar el juguete. Para evitar el derrame de líquido corrosivo: • No mezclar nunca pilas nuevas con gastadas (cambiarlas todas al mismo tiempo) ni mezclar nunca pilas alcalinas, estándar (carbono-cinc) y recargables (níquel-cadmio).
- Page 10 e RECYCLING INFORMATION f RENSEIGNEMENTS SUR LE RECYCLAGE S INFORMACIÓN DE RECICLAJE P INFORMAÇÕES DE RECICLAGEM e • If your product contains replaceable button cell batteries, please remove and recycle the battery(ies). If the batteries in your product are not replaceable, please recycle your product.
- Page 11 1. Locate the power/volume switch on the side of the toy and turn the toy on. The switch has four positions; on with low volume ; on with high volume ; on with no sound and off 2. Insert a View-Master reel with the caption side facing the handle. Super Sounds ® ™...
- Page 12 , volume élevé , sans sons et arrêt 2. Insérer un disque View-Master Super sons de façon que le côté avec légendes soit ® face à la poignée. S 1. Localizar el interruptor de encendido/volumen en el lado del juguete y activarlo.
- Page 13 e Turn to Focus f Faire tourner pour mettre l’image au point. S Girar para enfocar P Gire para Focar e 4. Turn the focus ring until the image is sharp. f 4. Tourner la bague de mise au point jusqu’à ce que l’image soit claire. S 4.
- Page 14 • If your child is not actively playing with the projector, it goes to sleep and the light turns off. To “wake up” the projector, slide the power/volume switch to off then on again. Hint: This projector can be used with any View-Master reels to see images only. ®...
- Page 15 Pour le rallumer, glisser l’interrupteur alimentation/volume à la position d’arrêt puis à la position de marche. Remarque : Ce projecteur peut être utilisé avec n’importe quel disque View-Master ® pour voir des images seulement (non accompagnées de sons). Seuls les disques Super sons (vendus séparément) comprennent des effets sonores, des voix de...
- Page 16 • Se o seu filho deixar de brincar momentaneamente com o projetor, ele entra no modo de espera e a luz desliga. Para que o projetor volte a funcionar, desligue o botão Liga-Desliga/Volume e ligue-o novamente. Dica: O projetor pode ser utilizado com qualquer carretel View-Master somente para ®...
- Page 17 8. Insert a View-Master Super Sounds reel with the caption side facing the handle. ® ™ f 8. Insérer un disque View-Master Super sons de façon que le côté avec légendes ® soit face à la poignée. S 8. Insertar un disco View-Master Super Sounds con el lado de la leyenda hacia el asa.
- Page 18 e Insert Super Sounds Cartridge e Insert Super Sounds Cartridge Here ™ ™ (sold separately) Here (sold separately) f Insérer une cartouche Super sons f Insérer une cartouche Super sons (vendue séparément) ici. (vendue séparément) ici. S Insertar aquí el cartucho Super S Insertar aquí...
- Page 19 e FUN TIPS f CONSEILS DE PRO S CONSEJOS P DICAS DIVERTIDAS e Remote Control f Télécommande S Control remoto P Controle Remoto e • For the steadiest picture show, place the projector on a hard, flat surface. • Make sure the room is completely dark for the best possible image. •...
- Page 20 e CARE f ENTRETIEN S MANTENIMIENTO P CUIDADOS e • Wipe this toy with a clean cloth dampened with a mild soap and water solution. Do not immerse this toy. • This toy has no consumer serviceable parts. Do not take this toy apart. f •...
Need help?
Do you have a question about the J7606 and is the answer not in the manual?
Questions and answers