Table of Contents
Advertisement
Available languages
Available languages
Quick Links
Advertisement
Chapters
Table of Contents

Summary of Contents for Miscea AQUAMORE DUO
- Page 1 Instruction manual EN ...21 - 56 AQUAMORE DUO DE ...57 - 91 AQUAMORE QUATTRO...
- Page 2 L = 19 mm L = 25 mm ø6 mm ø8 mm L = 35 mm L = 45 mm L = 45 mm L = 45 mm...
- Page 3 V 21.02...
- Page 4 1A / 1B CX-X-X-XX X.XXX W1-X.XXX-XXXX-XXXX FA-XXXX-XXXX XXXX-XXXX Voltage 24VDC Power Made in Germany Made in Germany Mod........V .....Hz .....W .....A kg ..... Class T MADE IN ITALY S1-X-XX-XX-XXXX-XXXX IFK-XXXX-XXXX XXXXXX-XXXX Made in Germany Made in Germany...
- Page 5 1A / 1B 34 - 45 mm 10 - 45 mm ø6 mm ø8 mm L = 850 mm L = 1000 mm 50 - 60 mm min 50 mm min 50 mm V 21.02...
- Page 6 L = 45 mm ø8 mm EN | Connect to water mains supply DE | Verbindung zum Eckventil 19 mm NL | Aansluiten op het waternet E1 - E5...
- Page 7 EN | The flexible hoses should not be kinked, stretched or twisted. DE | Die Schläuche nicht verdrehen! NL | De flexible aansluitslangen mogen niet worden geknikt, gebogen, uit elkaar worden getrokken of gedraaid. F1 - F2 V 21.02...
- Page 8 L = 45 mm ø8 mm G1 - G6...
- Page 9 L = 25 mm L = 19 mm Click ø8 mm H1 - H6 V 21.02...
- Page 10 L = 19 mm ø6 mm Click I1 - I5...
- Page 11 J1 - J4 V 21.02...
- Page 12 6 cm ø8 mm ø8 mm K1 - K6...
- Page 13 ø8 mm ø8 mm ø8 mm ø8 mm K7 - K12 V 21.02...
- Page 14 5 min 15 L K13 - K16...
- Page 15 V 21.02...
- Page 16 Ø 34 Ø 32 Ø 62 Ø 34 Ø 62 Ø 32 L1 - L2...
- Page 17 L3 - L4 V 21.02...
- Page 18 L5 - L6...
- Page 19 Ø 79 Ø 60 Ø 90 L7 - L9 V 21.02...
- Page 21 Instruction manual AQUAMORE DUO AQUAMORE QUATTRO...
- Page 22 Nothing in this manual represents any contractual or other commitment on the part of miscea and should not be taken as such. All possible care has been taken in the preparation of this publication. Contact miscea for suggestions of improvement. This manual is originally written in English.
-
Page 23: Table Of Contents
Table of contents General About this manual Labels in this manual Package Contents Description Components Identification of the product Installation Installation and first time set up checklist Installing the IFH and water filter Installing the Faucet Installing the HyDrain Installing the Waterbox Installing the Syrupbox Installing the Carbonator Unit Safety instructions for handling pressurized gas containers... - Page 24 Table of contents Technical Data Electrical Test Data Electrical Specifications Certifications and conformity Warranty and information Warranty Warranty conditions Contact information Updates of the manual Environment and recycling...
-
Page 25: General
A caution means that damage to the equipment is possible. A note gives additional information, e.g. for a procedure. Package Contents Refer to fig. A and B for the identification of the package contents for all miscea aquamore models. aquamore Faucet HyDrain holder... -
Page 26: Description
Description The miscea aquamore range of sensor faucets is a hygienic water dispensing system that enables you to dispense freshly filtered, chilled, still, sparkling, and flavoured water without touching the system. The faucet head has different sectors with built-in infrared sensors. The functions can be activated by moving your hands in the detection zones of the sensors. -
Page 27: Installation And First Time Set Up Checklist
Use single-phase power with 220-240V. • The miscea aquamore system and its components must be protected against mechanical damages. Installations in these locations could cause fires, electric shocks or a malfunction. Do not install the system or any of its components in locations: that are excessively dusty or damp where condensation may form on the appliance . -
Page 28: Installing The Ifh And Water Filter
/ DIN EN 806!). Be sure that the mains water supply is absolutely clean. Dirt and debris in the water can impair the function and / or damage the functional parts of the electrical appliance, miscea is not responsible for damages of this nature. •... -
Page 29: Installing The Hydrain
Installation • Refer to fig. F1-F2 for the installation of the faucet. Assemble the components in the given order. Installing the HyDrain • Do not open the HyDrain or break the seal of the HyDrain. If you do, the warranty becomes void. - Page 30 Installation CAUTION • When removing the packaging of the carbonator unit, make sure that the appliance is not damaged. Any damages must be reported to your carrier within 24 hours. • Keep the vent at the front completely clear. Do not place anything in the way that could prevent or restrict the circulation of air.
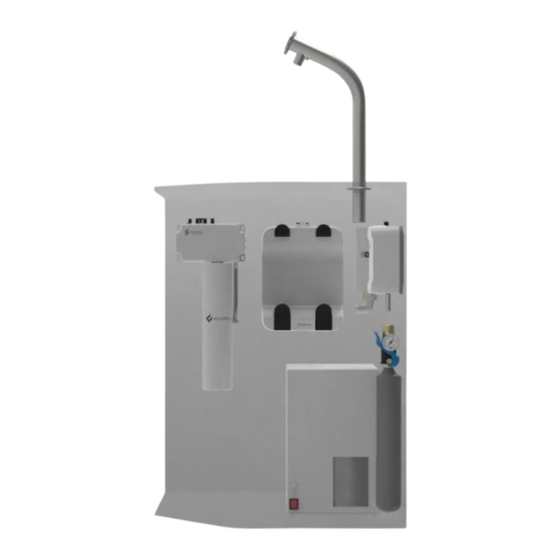
- Page 31 Installation Carbonator overview FRONT BACK FILL ICE BANK IN WATER Electrical power supply socket Level and basin unloading tube Main switch Basin water level indicator Cold water thermostat Label with technical data and serial Mains water inlet ¾ or ø8 mm number.
-
Page 32: Safety Instructions For Handling Pressurized Gas Containers
425g, please note the following information. WARNING • Connecting a CO gas cylinder larger than 425g to the miscea aquamore system should only be performed by a trained professional. CAUTION • Rechargeable cylinders larger than 425g are supplied empty. Have the cylinder filled with gas by the nearest authorized distributor. -
Page 33: Installing The Co 2 Bottle
The instructions provided in this chapter are only applicable to the 425g CO bottle and pressure reducer supplied by miscea. If using CO bottles larger than the 425g cylinder provided, please take note of the safety instructions for handling pressurized gas containers. - Page 34 Installation Adjust the level of CO supply • Turning the screw on the valve in a • Turning the screw on the valve in an clockwise direction will decrease the anti-clockwise direction will increase the quantity of gas supplied. quantity of gas supplied. min: 0 bar min:...
-
Page 35: Use
Move your hand to the same sector a second time to quickly de-activate the selected sector. • Please note for the miscea aquamore Quattro model, this is not possible for sectors 2 and 3. These sectors will automatically deactivate on its own after a few seconds if no further actions are taken. -
Page 36: Tapping Water
Dispensing water AQUAMORE QUATTRO AQUAMORE DUO Still water Activate sector 3. The sector shows a Activate sector 3. The sector shows a white light, and the tap will immediately white light. Activate sector 8. The sector shows a dispense the selected water type from white light and the tap will immediately the water outlet (1). -
Page 37: Dispensing Flavoured Water
Activate sector 8 again to stop water flow. An alternative dispensing sequence for flavour concentrates and water is available with the miscea aquamore Quattro model. To switch to this alternative sequence, please refer to the miscea remote control user manual for further instructions. -
Page 38: Using The Remote Control
Fig. N Cleaning and maintenance CAUTION • Do not try to repair the faucet, the Waterbox or the Syrupbox yourself. Only qualified miscea personnel are permitted to make repairs. If you make repairs yourself, the warranty becomes void. • Do not clean the faucet with abrasives, strong acids or bleach products. If you do, the warranty becomes void. -
Page 39: Cleaning And Care Instructions
During the hygienic flush cycles, it is still possible to use the faucet to dispense water and syrup at any time. It is also possible with the miscea remote control to set how frequent and for how long these hygienic flush cycles should occur. - Page 40 Cleaning and maintenance The system performs the following steps during an automatic hygienic flush: The cold water pipe is opened in the IFH component. The water continues to run through the entire system and rinses all lines and storage con- tainers (for cooled and carbonated water).
-
Page 41: Replacing The Syrup Pouch
Press the LED switch on the Waterbox for 1 second to exit priming mode. Replacing the filter Please use suitable filters from miscea aqualibur depending on the desired water quality. Change the filters at the specified time intervals as well as after an inoperative period of one or more weeks. - Page 42 Ensure the O-rings on the filter are not damaged or twisted during assembly. Prime the filter: AQUAMORE QUATTRO AQUAMORE DUO Turn on the power and activate the still Turn on the power. Activate the still water sector (3). The sector shows a water sector (3) and let 15 L of water white light.
- Page 43 Cleaning and maintenance Replacing the CO Bottle HISS... WARNING Any maintenance work or installation to be carried out involving CO gas cylinders larger than the supplied 425g cylinder, should only be performed by a trained professional! V 21.02...
-
Page 44: Routine Maintenance Of The Carbonator Unit
Cleaning and maintenance Routine maintenance of the Carbonator Unit Before cleaning the carbonator unit, switch it off and disconnect it from the socket. Not being switched off or accidental switching on during cleaning could cause injuries to persons or damages to the carbonator unit. The carbonator unit requires routine maintenance and care. - Page 45 Cleaning and maintenance 5 sec V 21.02...
- Page 46 Cleaning and maintenance 5 min 15 L...
- Page 47 Cleaning and maintenance Emptying the carbonator ice bank for maintenance: Disconnect the power supply cable from the outlet. After the ice has melted, empty the ice tank by removing the tank discharge tube from its fastener on the front of the carbonator and let the water flow into a container. Once the ice tank has been emptied, (ca.
-
Page 48: Routine Maintenance Of The Hydrain
Important to regularly check for calcium build up on the aerator in the HyDrain. Failure to do so could result in calcium build-up on the aerator, which will impact the system from function- ing correctly. • miscea recommends to change the aerator in the HyDrain once every 12 months. -
Page 49: Anolyte Disinfectant Safety Information
Anolyte Disinfectant Safety Information Specific end use(s) Disinfectant for water dispenser products may not be used for any other purpose. Precautions for safe handling • Keep away from heat, hot surfaces, sparks, open flames and other ignition sources. • When using, do not eat, drink or smoke. •... - Page 50 Technical data The performance specifications as mentioned in the table below have been tested and certified. PERFORMANCE SPECIFICATIONS: MISCEA AQUAMORE FAUCET AND WATERBOX Parameter Value Voltage 24 V Input voltage 100 ~ 240 V / 50 ~ 60 Hz Operating water pressure 0,5 - 8 bar Max.
- Page 51 Syrupbox Fig. L4 Fig. L5 Carbonator Fig. L6 aqualibur Filter Fig. L7 Bottle Fig. L8 miscea HyDrain Fig. L9 PERFORMANCE SPECIFICATIONS FOR CARBONATOR UNIT Parameter Value Water production 15 Lt/h Water outlet temperature 3 – 10 °C Continuous cold water production...
- Page 52 Declaration of conformity for miscea aquamore system. EU-Directives 93/68/EEC, 98/83/EC, 2006/95/EC, 89/336/EEC The miscea aquamore system can be used in areas where water hygiene is of utmost importance, such as in hospitals, aged care homes, offices, and many private and semi-public environments. Equipped with innovative miscea aqualibur water hygiene technology, the miscea aquamore system proactively protects your water against water stagnation and waterborne bacteria.
- Page 53 • EN ISO 3822: 2010 • EN 61000-6-1: 2007 All miscea fittings are certified according to WRAS guidelines and thus comply with the above standards. Germany, January, 2021. Michiel Ubink Managing Director The declarations of conformity can be requested at the following address: miscea GmbH | Hauptstr.
- Page 54 Environment and recycling The miscea aquamore is an electrical appliance for which return and collection obligations apply in many countries. miscea is involved in appropriate return systems in Germany. Your miscea product has been designed and manufactured using high-quality materials and components that are suitable for recycling and / or re-use.
- Page 55 V 21.02...
- Page 57 Bedienungsanleitung AQUAMORE DUO AQUAMORE QUATTRO...
- Page 58 Weise oder Form reproduziert, übertragen, aufgezeichnet, in einem Datenträger gespeichert bzw. in eine menschliche oder Computersprache übersetzt werden. Bei einer Verletzung des Urheberrechtes sieht miscea sich eventuell nicht mehr dazu in der Lage wirksame technische Unterstützung für das Produkt zu bieten.
- Page 59 Inhaltsverzeichnis Allgemeines Über diese Anleitung Zeichen in dieser Anleitung Verpackungsinhalt Technische Beschreibung Komponenten Identifikation des Produkts Installation Checkliste für Installation und Erst-Inbetriebnahme Installation des IFK und Filter Installation des Armatur Installation des HyDrain Installation des Wasserbox Installation des Sirupbox Installation des Kühlaggregats Umgang mit Druckgasbehältern in Getränkeschankanlagen Anschluss der CO -Flasche...
- Page 60 Inhaltsverzeichnis Technische Daten Elektrische Prüfdaten für miscea aquamore Armatur Elektrische Daten Zulassung und Konformität Garantie und Information Garantie Garantiebedingungen Kontaktinformation Aktualisierungen der Betriebsanleitung Umwelt und Recycling...
-
Page 61: Allgemeines
Vorsicht bedeutet, dass Schäden am Gerät möglich sind. Ein Hinweis liefert Zusatzinformationen, z.B. für eine Maßnahme. Verpackungsinhalt Den Abb. A und B. entnehmen Sie die Beschreibung des Verpackungsinhalts sowohl für die miscea aquamore Duo als auch für die miscea aquamore Quattro Modelle. miscea aquamore Armatur... -
Page 62: Technische Beschreibung
über verschiedene Sektoren mit eingebauten Infrarotsensoren. Die Funktionen der einzelnen Sektoren können aktiviert werden, indem Sie Ihre Hand neben dem jeweils gewünschten Sektor halten. Alle Modelle der miscea aquamore-Reihe sind mit der innovativen miscea aqualibur Wasserhygiene- Technologie ausgestattet, die die internen Komponenten des Systems proaktiv, sauber und hygienisch hält und das Risiko von Wasserverunreinigungen durch stehendes Wasser minimiert. -
Page 63: Checkliste Für Installation Und Erst-Inbetriebnahme
Anleitung beschrieben wird. Dies könnte zu Bränden, elektrischen Schlägen oder Verletzungen führen. • Das miscea aquamore System und seine Komponenten müssen vor mechanischen Beschä- digungen geschützt werden. Installieren Sie das System bzw. seine Komponenten nicht an folgenden Orten: die übermäßig staubig oder feucht sind, wo sich Kondenswasser auf dem Gerät bilden... -
Page 64: Installation Des Ifk Und Filter
Lassen Sie mindestens 15 L Stilles Wasser aus der Armatur auslaufen. Desinfektionsvorgang Anolyt durchführen. (Siehe 6.8 Wartung des Kühlaggregats: Desinfek- tionsvorgang Anolyt). Die Sirupbox Leitungen mit Sirup füllen (nur für miscea aquamore Quattro Modell). Schließen Sie die CO -Flasche an das Kühlaggregat an. -
Page 65: Installation Des Armatur
Stellen Sie sicher, dass der HyDrain mit einer Wasserwaage perfekt nivelliert ist und senkrecht montiert werden. Ansonsten werden die Überflutungssensoren aktiviert und das miscea aquamore System wird außer Betrieb gesetzt. • Die Platzierung des HyDrain ist in Bezug auf das Abflussrohr wichtig – der Winkel des Schlauchs, der den HyDrain mit dem Abflussrohr verbindet, sollte horizontal oder nach unten geneigt sein, damit das Wasser aus dem HyDrain in das Hauptabflussrohr abfließen kann. -
Page 66: Installation Des Kühlaggregats
Installation Installation des Kühlaggregates VORSICHT • Wenn der Apparat auf die Seite oder auf den Kopf gestellt wurde, müssen Sie vor dem Ein- schalten mindestens 8 Stunden warten. • Nachdem Sie die Verpackung entfernt haben, vergewissern Sie sich, dass an dem Gerät kein Schaden entstanden ist. - Page 67 Installation Kühlaggregat Übersicht BEDIENERSEITE RÜCKSEITE FILL ICE BANK IN WATER Stromspeisungsanschluss Abfluss- und Nivellierungsrohr Generalschalter Wasserspiegelanzeiger Kaltwasserthermostat Etikett technische Eigenschaften und Netzwassereintritt ¾ oder ø8 mm Matrikelnummer. -Eintritt ø6 mm Wärmeableitungspunkt (nicht Kaltwasserausfluss abdecken) Ausgang Sprudelwasser Gehäuse Wasserzufluss zum Füllen der Eisbank Kontrolllampe Wasser fehlt Bei der Installation können Luftblasen in das Innere des Kohlensäureversetzers gelangen.
-
Page 68: Umgang Mit Druckgasbehältern In Getränkeschankanlagen
Lebensmittel nachgefüllt wird. • Der Anschluss einer CO -Flasche größer als 425g an das miscea aquamore System sollte nur von einer ausgebildeten Fachkraft durchgeführt werden. • Verwenden Sie einen für die Anlagen- und Gasart zugelassenen Druckminderer mit Sicher- heitsventil, der verplombt und funktionstüchtig ist. -
Page 69: Anschluss Der Co 2 -Flasche
Anschluss der CO -Flasche VORSICHT Die Anweisungen in diesem Kapitel gelten nur für die von miscea mitgelieferten 425g -Flasche und den Druckminderer. Bei Verwendung von CO -Flaschen größer als die mitgelieferte 425g-Flasche beachten Sie bitte die Sicherheitshinweise über den Umgang mit Druckgasbehältern. -
Page 70: Gebrauch
Vor Verwendung der Armatur ist sicherzustellen, dass die Montage korrekt durchgeführt wurde. • Nur von miscea und aquamore Flüssigkeiten, Sirup und Beutel verwenden. Ansonsten verfällt jeglicher Garantieanspruch. • Dieses Gerät ist nicht für den Gebrauch durch Personen (einschließlich Kindern) mit ein- geschränkten physischen, sensorischen oder geistigen Fähigkeiten sowie mangelnder... -
Page 71: Armaturkopf
Führen Sie die Hand zum Deaktivieren der Funktion ein zweites Mal über den zugehörigen Sektor. • Bitte beachten Sie, dass dies beim Modell miscea aquamore Quattro für die Sektoren 2 und 3 nicht möglich ist. Diese Sektoren werden nach einigen Sekunden automatisch deaktiviert, wenn keine weiteren Aktionen ausgeführt werden. -
Page 72: Wasserentnahme
Gebrauch Wasserentnahme AQUAMORE QUATTRO AQUAMORE DUO Spenden von stillem Wasser Aktivieren Sie Sektor 3. Der ausgewähl- Aktivieren Sie Sektor 3. Der ausge- wählte Sektor leuchtet, und die Armatur te Sektor leuchtet. Aktivieren Sie Sektor 8. Der ausge- spendet sofort das gewählte Wasser wählte Sektor leuchtet, und die Armatur... -
Page 73: Spenden Von Aromatisiertem Wasser
Aktivieren Sie Sektor 8 erneut, um den Wasserfluss zu stoppen. Eine alternative Dosierreihenfolge für Aromakonzentrate und Wasser ist mit dem Modell miscea aquamore Quattro erhältlich. Um zu dieser alternativen Sequenz zu wechseln, lesen Sie bitte die Bedienungsanleitung der miscea Fernbedienung für weitere Anweisungen. -
Page 74: Verwendung Der Fernbedienung
Dosierung von Sirup, Spülzyklus, Lichtimpuls und Piepton. Das Zurücksetzen auf die Werkseinstellun- gen ist jederzeit möglich. Besuchen Sie für weitere Informationen unsere Website oder wenden Sie sich an Ihren miscea-Vertre- ter. Das Fernbedienungssignal wird über den Bildschirm im Armaturenkopf erkannt. Positionieren Sie die Fernbedienung zur Bedienung wie in Abb. -
Page 75: Reinigung Und Pflegeanleitung
Reinigung und Wartung Reinigung und Pflegeanleitung Um den hygienischen Betrieb des miscea Systems zu gewährleisten, empfehlen wir für die manuelle hy- gienische Reinigung das “miscea aquamore SystemCare-Set”. Alle für die hygienische Reinigung eines miscea Systems notwendigen Materialien und Werkzeuge sind im Lieferumfang des “miscea aquamore SystemCare-Set”... - Page 76 Reinigung und Wartung Während des Spülens führt das System folgende Schritte durch Die Kaltwasserleitung wird im Filterkopf geöffnet Das Spülwasser läuft weiter in das Tafelwassergerät und spült dort alle Leitungen und Vorratsbehälter (für gekühltes sowie für karboni- siertes Wasser). Nach Austritt aus dem Tafelwassergerät werden alle nachfolgenden Leitungen bis direkt zum Armaturenauslauf...
-
Page 77: Austausch Der Beutel
Filter in den vorgegebenen Zeitintervallen und auch nach längerem Stillstand des Geräts von einer oder mehrerer Wochen. Wir empfehlen folgenden Filter von miscea aqualibur: Art. Nr. 95001 – aqualibur Water Filter. Bitte folgen Sie der folgenden Anweisung, um die Filterkartusche zu wechseln. - Page 78 Reinigung und Wartung Filterkartusche entfernen Filterkartusche installieren • Schalten Sie das miscea aquamore • Setzen Sie den Filter ein und achten System aus. Legen Sie ein Handtuch Sie darauf, dass die Nuten am Filter- unter den Filter, um eventuelles Rest- anschluss mit der Öffnung für den Filter...
-
Page 79: Wechsel Des Co 2 -Flasche
Reinigung und Wartung Wechsel des CO Flasche HISS... WARNUNG Alle Wartungsarbeiten oder Installationen an CO -Gasflaschen, die größer als die mitgeliefer- te 425g-Flasche sind, dürfen nur von einer ausgebildeten Fachkraft durchgeführt werden! V 21.02... -
Page 80: Wartung Des Kühlaggregat
Reinigung und Wartung Wartung des Kühlaggregat WARNUNG Vor Reinigung der Maschine diese ausschalten und den Stromanschluss unterbrechen. Sollte die Maschine während der Reinigung nicht ausgeschaltet oder versehentlich eingeschaltet werden, könnte dies Personen- oder Maschinenschäden verursachen. Das Kühlaggregat muss regelmäßig gewartet und gepflegt werden. Nachfolgend finden Sie eine Check- liste. - Page 81 Reinigung und Wartung 5 Sek ODER V 21.02...
- Page 82 Reinigung und Wartung 5 min 15 L...
- Page 83 Reinigung und Wartung Entleerung der Eistheke (für Wartung) Unterbrechen Sie die Stromverbindung durch Entnahme des Steckers aus der Steckdose. Nach Abtauen des Eises ist es ausreichend, den senkrecht verlaufenden Schlauch zur Wasserstandangabe aus der Halterung und den Wannenablaufstöpsel zu entfernen und das Wasser ablaufen zu lassen.
-
Page 84: Wartung Des Hydrain
Reinigung und Wartung 1 sec HISS... Kurz für ca. 1 Sek. den Ring des Sicherheitsventils ziehen. Dabei strömt Luft/CO -Gemisch mit lautem Zischen in die Atmosphäre. Prozedur gegebenenfalls wiederholen. Das nachströ- mende CO Gas hat nun sämtliche Luftbestandteile in die Atmosphäre hinaus gedrückt. -
Page 85: Anolyte Desinfektionsmittel Sicherheitsinformation
Anolyte Desinfektionsmittel Sicherheitsinformation Spezifische Benutzung Desinfektionsmittel für Wasserspender darf nicht für andere Zwecke verwendet werden. Vorsichtsmaßnahmen zur sicheren Handhabung • Desinfektionsmittel ist ein brennbares Medium sowohl als Flüssigkeit als auch als Dampf. Dämpfe können mit Luft explosionsfähiges Gemisch bilden. • Von Hitze, heißen Oberflächen, Funken, offenem Feuer und andere Zündquellen fernhalten. - Page 86 Technische Daten Die Leistungsdaten gemäß Tabelle unten wurden geprüft und zertifiziert. LEISTUNGSDATEN: MISCEA AQUAMORE ARMATUR Parameter Wert Spannung 24 V Eingangsspannung 100 ~ 240 V / 50 ~ 60 Hz Betriebswasserdruck 0,5 - 8 bar max. Wassertemperatur 70 °C Schutzklasse des Leiterplattengehäuses...
- Page 87 Technische Daten Die Leistungsdaten gemäß Tabelle unten wurden geprüft und zertifiziert. LAGERUNG Parameter Wert Lagerungstemperatur 10 - 50 °C ABMESSUNGEN Komponente Abb. Armatur Standardmodell Abb. L1 Armatur Large Modell Abb. L2 Wasserbox Abb. L3 Sirupbox Abb. L4 aqualibur IFK Abb. L5 Kühlaggregat Abb.
- Page 88 Konformitätserklärung für das miscea aquamore System EU-Richtlinien 93/68/EEC, 98/83/EC, 2006/95/EC, 89/336/EEC Das miscea aquamore System kann in Bereichen eingesetzt werden, in denen die Wasserhygiene von größter Bedeutung ist, wie z. B. in Krankenhäusern, Altenheimen, Büros und vielen privaten und halböf- fentlichen Umgebungen.
- Page 89 Zurückfließen in die Wasserversorgung zu verhindern. Diese Rückschlagventile sind nach DIN-DVGW geprüft und konform zur EN 1717. Michiel Ubink, Geschäftsführer der miscea GmbH mit Sitz in Hauptstraße 2, 14979 Großbeeren, Deutschland, erklärt hiermit, dass die multifunktionale Wasserhahn-Produktfamilie, bekannt unter dem Markennamen miscea, gemäß...
- Page 90 Umwelt und Recycling Das miscea aquamore System ist ein Elektrogerät, für das in vielen Ländern Rückgabe- und Rücknah- mepflichten gelten. miscea ist in Deutschland an entsprechenden Rücknahmesystemen beteiligt. Ihr miscea-Produkt wurde unter Einsatz von qualitativ hochwertigen Materialien und Komponenten konstruiert und gefertigt, die für Recycling und/oder Wiederverwendung geeignet sind.
- Page 91 V 21.02...
- Page 92 GmbH Hauptstraße 2 14979 Großbeeren Germany W: www.miscea.com E: info@miscea.com...
Need help?
Do you have a question about the AQUAMORE DUO and is the answer not in the manual?
Questions and answers