Table of Contents
Advertisement
Quick Links
Pipettierhelfer / Pipette Controller /
Auxiliaire de pipetage / Auxiliar de pipeteado
移液管控制器 /
maneus
®
Gebrauchsanleitung
Operating Manual
Mode d'emploi
Instrucciones de manejo
操作手册
VITLAB GmbH
Linus-Pauling-Str.1
63762 Grossostheim
Germany
Telefon: +49 6026 97799-0
Fax:
+49 6026 97799-30
E-mail:
info@vitlab.com
Internet: www.vitlab.com
Advertisement
Table of Contents

Related Manuals for Vitlab maneus


Summary of Contents for Vitlab maneus
- Page 1 Pipettierhelfer / Pipette Controller / Auxiliaire de pipetage / Auxiliar de pipeteado 移液管控制器 / maneus ® Gebrauchsanleitung Operating Manual Mode d’emploi Instrucciones de manejo 操作手册 VITLAB GmbH Linus-Pauling-Str.1 63762 Grossostheim Germany Telefon: +49 6026 97799-0 Fax: +49 6026 97799-30 E-mail: info@vitlab.com...
-
Page 2: Table Of Contents
Contents 1. Safety Instructions 2. Application 3. Limitations of use 4. Operating Exclusions 5. Storage conditions 6. Components 7. Pipetting 7.1. Compress the suction bellows 7.2. Attach the pipet 7.3. Fill the pipet 7.4. Adjust the meniscus 7.5. Discharge the pipet 7.6. -
Page 3: Safety Instructions
1. Safety Instructions This instrument may sometimes be used with hazardous materials, operations and equipment. This Manual does not purport to address every safety issue which may arise during use. It is the responsibility of the user of this instrument to consult and establish appropriate safety and health practices and determine the applicability of regulatory limita- tions prior to use. -
Page 4: Application
2. Application The instrument serves to facilitate the pipetting of liquids with graduated pipettes, volumetric pipettes and blow- out pipettes made of glass or plastic within the volume range of 0.1 ml to 200 ml with a suction tube outer diameter <... -
Page 5: Components
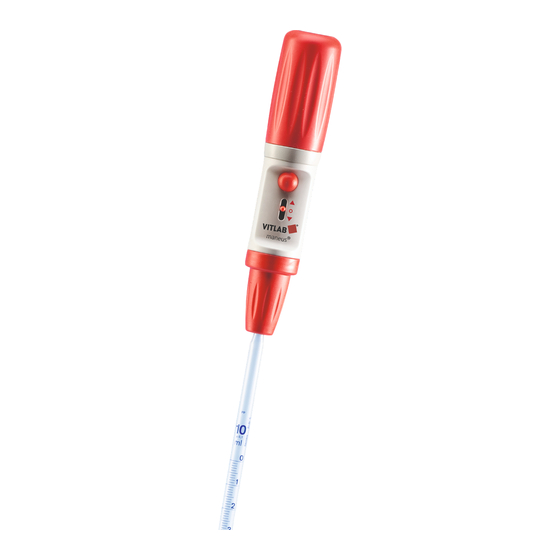
6. Components 1. suction bellows 2. blow-out button 3. valve unit 3a. filteradapter 4. pipetting knob 5. membrane filter 6. adapter 7. adapter support... -
Page 6: Pipetting
7. Pipetting 7.1 Compress the suction bellows – Before attaching the pipette, squeeze the suction bellows (1). The instrument is now ready to aspirate liquid. 7.2 Attaching the pipet Attention! Never use force. Glass and plastic pipets can break and cause injury. –... -
Page 7: Fill The Pipet
7.3 Filling the pipet – Immerse the tip of the pipet into the liquid. – Move the pipetting lever (4) upwards. – Fill the pipet to just above the desired mark. Attention! Do not over aspirate and allow any liquid to enter the instrument. -
Page 8: Discharge The Pipet
7.5 Discharging the pipet Hold the collecting vessel at an angle. Place the pipet tip against the inner wall of the vessel, push down the pipetting lever (4) to dispense the liquid. Free discharge for pipets with waiting ● time (Imprint e.g.“Ex+ 15 s”) –... -
Page 9: Maintenance / Cleaning
8. Maintenace & Cleaning With normal use, the instrument is mainte- nance-free. The exterior may be wiped with a damp cloth. The complete instrument is au- toclavable at 121 °C (250 °F), 2 bar absolute (30 psi) with a holding time of at least 15 minutes according to DIN EN 285. -
Page 10: Replacing The Membrane Filter/Cleaning The Adapter
9. Replacing the membrane filter/ Cleaning the adapter Attention! When cleaning and/or exchanging the membrane filter (5), wear hand and eye protection to avoid the risk of splashes and contamination. Remaining liquid can run out. If liquid has entered the adapter (6) or rather the membranfilter (5) or if the aspirating ef- ficiency has decreased, proceed as follows: 1. - Page 11 8. Screw in the adapter support (7) hand tight. 9. The entire instrument incl. membrane filter is autoclavable at 121 °C (2 bar) according to DIN EN 285. For autoclaving remove suction (1) bellow. Note: Not every membrane filter is suitable. Use only genuine manufacturer’s recom- mended accessories.
- Page 12 Attention! Never use force! While mounting the housing it has to be paid attention for that the pipetting lever is loosely hanging. Then place the pipetting lever scheduledly between the valves and close the housing (s. figure). Does the pipetting lever not hang loosely, but has twisted itself, the valve unit can be damaged sustainably! 10.
-
Page 13: Replace The Valve Unit
10. Replace the valve unit Attention! When cleaning and/or exchanging the valve unit, wear hand and eye protection to avoid the risk of splashes and contami- nation. Remaining liquid can run out. If liquid has entered the valve unit proceed as described below: 1. -
Page 14: Checking For Leaks
11. Checking for leaks When the pipet has been filled, no liquid should drip unless the pipetting lever is de- pressed.If leaking occurs, carefully pull out the pipet while turning and dismantle the instrument again. If necessary replace mem- brane filter (5), clean adapter (6) or replace valve unit (3). -
Page 15: Troubleshooting
12. Troubleshooting Trouble Possible Cause Action to be taken Suction capacity – membrane filter (5) dirty – replace membrane impaired filter (5) – valve unit (3) damaged – replace valve unit (3) – pipette not inserted far – carefully push pipet enough or further into securing sleeve or... -
Page 16: Ordering Information
13. Ordering Data maneus ® 1630500 complete, with membrane filter Spare Parts: Spare membrane filter (5), 1670650 3 µm, sterile, hydrophobic, PTFE (10 per pack) Suction bellows (1), 1670201 complet, red Adapter (6), 1670301 silicone Valve unit (3) 1655590 complete... -
Page 17: Repair Service
„Declaration on the Absence of Health Hazards“ to the manufacturer or supplier. Ask your supplier or the manufacturer for forms. The forms can also be downloaded on www.vitlab.com. 15. Warranty We shall not be liable for the consequences of improper...
Need help?
Do you have a question about the maneus and is the answer not in the manual?
Questions and answers