Advertisement
Quick Links
Advertisement

Subscribe to Our Youtube Channel
Related Manuals for GSSI PaveScan RDM 2.0

Summary of Contents for GSSI PaveScan RDM 2.0
- Page 1 MN36-731 Rev A...
- Page 2 Geophysical Survey Systems, Inc. PaveScan RDM 2.0 Quick Start Assembly Guide Copyright ©2020 Geophysical Survey Systems, Inc. All rights reserved including the right of reproduction in whole or in part in any form Published by Geophysical Survey Systems, Inc. 40 Simon Street...
- Page 3 OF ITS EQUIPMENT, WHETHER OR NOT DEFECTIVE. Before returning any equipment to GSSI, a Return Material Authorization (RMA) number must be obtained. Please call the GSSI Customer Service Manager who will assign an RMA number. Be sure to have the serial number of the unit available.
- Page 4 Geophysical Survey Systems, Inc. PaveScan RDM 2.0 Quick Start Assembly Guide MN36-731 Rev A...
-
Page 5: What's In The Box
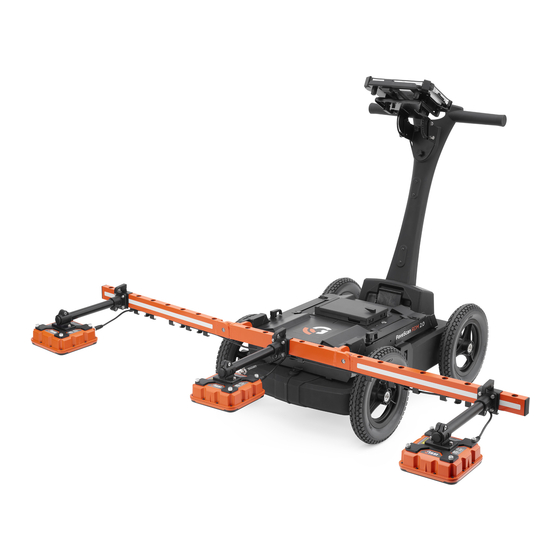
Geophysical Survey Systems, Inc. PaveScan RDM 2.0 Quick Start Assembly Guide What’s in the Box Parts Included: Tablet mounting bracket Velcro ties Concentrator box Panasonic G1 ToughPad with preloaded OS and cable Cart handle Up to 4 digital sensor cables, 1 for each sensor and 1 for tablet... - Page 6 Geophysical Survey Systems, Inc. PaveScan RDM 2.0 Quick Start Assembly Guide Assembly Instructions Step 1: Using a Phillips head screwdriver, attach the cable management bracket to the back of the handle. Step 2: Insert handle into cart and lock into place. Attach tablet mount to the handle using thumb screws.
- Page 7 Geophysical Survey Systems, Inc. PaveScan RDM 2.0 Quick Start Assembly Guide Step 3: a) Pull the knob located underneath the orange arms to unlock and unfold the arms. Should click into place at 90 degrees. Will also lock at 45 (more on that later).
- Page 8 Geophysical Survey Systems, Inc. PaveScan RDM 2.0 Quick Start Assembly Guide Step 4: Inserting Concentrator Box: a) Unlock lid by disengaging pressure tabs and lift lid. b) Place box into slot. MN36-731 Rev A...
- Page 9 Geophysical Survey Systems, Inc. PaveScan RDM 2.0 Quick Start Assembly Guide Step 5: a) Attach each sensor at appropriate distance and lock with pressure latch. b) Plate must be behind stew heads when connecting the sensor boom to the bar prior to locking the latch.
- Page 10 Geophysical Survey Systems, Inc. PaveScan RDM 2.0 Quick Start Assembly Guide Step 6: Attaching Cables: a) Line up key and hand tighten cable. b) Using cable management bracket under arm guide cable through. MN36-731 Rev A...
- Page 11 Geophysical Survey Systems, Inc. PaveScan RDM 2.0 Quick Start Assembly Guide c) Then continue towards center and connect to sensor port. Repeat for all sensors. d) Use included Velcro ties to organize cables accordingly. MN36-731 Rev A...
- Page 12 Geophysical Survey Systems, Inc. PaveScan RDM 2.0 Quick Start Assembly Guide e) Also use Velcro to attach boom bars. Step 7: Survey Wheel Cable: a) Grey cable attached to cart is to be guided underneath handle. MN36-731 Rev A...
- Page 13 Geophysical Survey Systems, Inc. PaveScan RDM 2.0 Quick Start Assembly Guide b) Guide the cable to the right side (facing to the front of the cart from behind the handle) of the casing, into the gap. MN36-731 Rev A...
- Page 14 Geophysical Survey Systems, Inc. PaveScan RDM 2.0 Quick Start Assembly Guide Step 8: Survey Wheel Extension Cable: a) Attach male end to sensor (middle sensor recommended). Guide through center and attach to grey survey wheel cable. b) Use Velcro to tidy up and attach both cables together.
- Page 15 Geophysical Survey Systems, Inc. PaveScan RDM 2.0 Quick Start Assembly Guide Step 9: Attaching Tablet Cable: a) Key in and rotate to hand tighten. Guide cable through same path as survey wheel cable and up through cable management bracket and up through oval at top of handle.
- Page 16 Geophysical Survey Systems, Inc. PaveScan RDM 2.0 Quick Start Assembly Guide b) Lock in place. c) Then attach cable to tablet. MN36-731 Rev A...
- Page 17 Geophysical Survey Systems, Inc. PaveScan RDM 2.0 Quick Start Assembly Guide d) Use slots to customize viewing angle of tablet. Close lid and lock. MN36-731 Rev A...
- Page 20 Geophysical Survey Systems, Inc. 40 Simon Street www.geophysical.com • sales@geophysical.com Nashua, NH 03060-3075 USA...
Need help?
Do you have a question about the PaveScan RDM 2.0 and is the answer not in the manual?
Questions and answers