Table of Contents
Advertisement
Available languages
Available languages
Quick Links
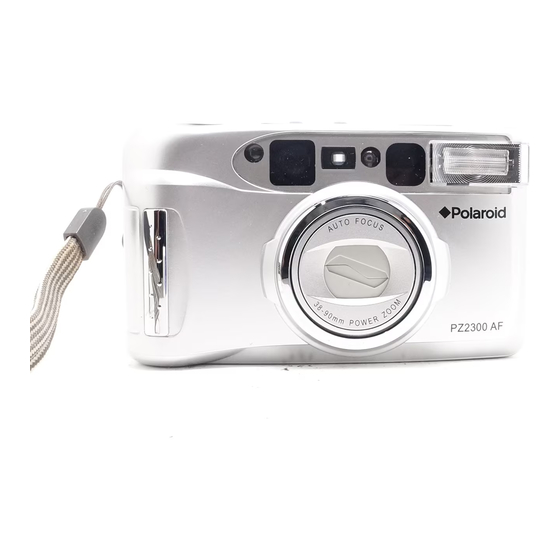
PZ2300AF
Polaroid PZ2300AF
INSTRUCTION MANUAL
1. Power Button
14. Zoom Buttons (Wide/Tele)
2. Shutter Release Button
15. AF LED
3. Mid-roll Rewind Button
16. Viewfi nder Eyepiece
4. CDS Photo Sensor
17. Film Spool
5. Lens/Lens Door
18. Film Tip Mark
6. Flash
19. Film Door Switch
7. Mode Button
20. Film Compartment Door
8. Self-Timer Button
21. Film Pressure Plate
9. LCD Panel
22. DX Window
10. Self-Timer LED
23. Film Chamber
11. Red Eye Reduction LED
24. Battery Compartment Door
12. AF Sensor
25. DX Film Contacts
13. Film Door Switch
26. Tripod Socket
1. Landscape
1
2. Red-eye reduction
3. Flash indicator
2
(on/off/charging)
4. Night scene
3
5. Battery check
4
6. Film counter
7. Self- timer
Thank you for buying this 35mm power zoom camera. Please read
these instructions carefully before operating, to ensure correct usage.
This camera is confi rmed to comply with the requirements set
out in the council directive 89/336/EEC on the Approximation
of the laws of the Member States relating to Electromagnetic
Compatibility.
Attaching the Strap
Please attach the wrist strap to prevent dropping the camera.
1. Thread the small loop end of the strap through the Wrist-Strap
Eyelet. (Fig. 1)
2. Pass the other end of the strap through the smaller loop. (Fig. 2)
3. Securely tie the strap onto the wrist strap eyelet.
Loading the Batteries
Use two fresh AA Alkaline batteries to power up the camera.
1. Turn off the camera power.
2. Open the Battery Compartment by sliding the Battery
Compartment Door in the direction of the arrow. (Fig. 3)
3. Gently lift up on the Battery Compartment Door. (Fig. 3)
4. Insert two AA alkaline batteries into the battery compartment,
checking that the (+) and (-) on the batteries are aligned
according to the polarity indication shown on the contact plate.
(Fig. 4)
5. Close the Battery Compartment Door and slide it back until it
latches.
Note:
•
Always replace both batteries at the same time.
•
After the camera is powered on, the lens door will open and the
lens will extend slightly. The LCD will be set to auto mode and
the battery power level icon
will be displayed on the LCD
at all times.
Checking the Battery Power
1.
: Batteries are in good condition
2.
: Batteries are running low, replace batteries with new
ones
3.
: Batteries are drained, replace batteries with new
ones. No function can be used except the fi lm
rewinding.
•
The batteries can be replaced if there is fi lm loaded in the
camera.
•
Remove the batteries from the camera if it is not in use for
an extended period of time to reduce the possibility of battery
leakage.
Power Save Function
If the camera is not in use for over 7 minutes, the camera will turn
off automatically to save battery power. Press the Power Button to
turn the camera back on.
About the Film Speed
This camera can accept DX-coded fi lms with speeds ranging from
ISO 50 to ISO 3200 and can set the fi lm speed automatically by
reading the Black and Silver pattern on the fi lm cassettes.
Loading the Film
1. Open the Film Compartment Door by sliding the Film Door
Latch upward, then gently lift up the Film Compartment Door.
(Fig.5)
2. Insert the fi lm into the Film Chamber, then pull the fi lm tip
across to the Film Tip Mark. (Fig.6)
3. Make sure that the fi lm lies fl at and is positioned evenly
between the guide rails. (Fig. 6)
4. Close the Film Compartment Door until it clicks and latches.
The Film Take-Up Spool will automatically take up the fi lm.
5. After closing the door. The fi lm will automatically advance and
the LCD Panel will show "1". (Fig. 8)
Note:
If the LCD Panel does not show "1" or has a blinking "E", when
the Film Compartment Door is closed, the fi lm may not be loaded
properly. Please open the Film Compartment Door and repeat the
fi lm loading procedures.
Taking photographs
1. Press the Power Button to turn on the camera. The Lens Door
will open and the lens will extend slightly.
2. Hold the camera steady with both hands. Be careful not to
block the Lens, Auto focus Sensor, Flash and Flash Sensor
with your fi ngers or hair.
Viewfi nder
Picture Frame
AF(Auto Focus lock)
frame mark
AF Frame mark:
Place the AF Frame over the subjects you want to take.
3. Look through the Viewfi nder Eyepiece and center the main
subject in the Viewfi nder. To ensure sharp pictures, make your
subject is at least 3ft. (0.9m) away from the camera and the AF
frame mark is positioned over your subject.
4. To compose your picture using the power zoom feature, simply
press one of the power zoom buttons
Tele Power Zoom button, marked with "T", the lens will extend
outward toward the 90mm telephoto setting to allow you
to zoom in on your subject. By pressing the Wide Power Zoom
button, marked with "W", the lens will retract back into the
camera toward the 38mm wide or normal setting.
5. This camera is equipped with an
513477-00(EN-SP) 1
38-90mm Power Zoom Camera *
* Effective zoom range 38-85mm
1
2
3
4
5
6
5
6
7
Focus (Focus Lock). The green AF LED will light up and allow the
camera to automatically set and lock the correct focus. While still
pressing the Shutter Release Button halfway, you can move your
camera until your subject(s) are where you want them within the
frame while still remaining in focus.
6. Then completely press the Shutter Release Button to take your
picture.The camera will advance automatically to the next
frame.
Note:
•
While using the Auto Focus (Focus Lock) feature, if the green
AF LED is blinking, then your subject is probably too close to
the camera and you will not be able to take a picture, even
though you press the Shutter Release Button. This helps to
prevent your pictures from being out of focus.
•
Always make sure the fl ash icon "
blinking before you take your next picture.
•
When taking vertical pictures, always position the camera with
the fl ash at the top.
•
Do not take pictures toward the sun directly.
About the Flash
This camera is equipped with 3 fl ash modes.
1. Auto Flash (default setting) - No fl ash symbol will show on
the LCD Panel
a. The camera determines when fl ash is needed and
fi res the fl ash automatically.
b. When the fl ash is charging, the fl ash icon "
blink.Once the fl ash icon stops blinking and no longer
shows on the LCD Panel, press the Shutter-Release
Button to take a fl ash photograph.
2. Fill-in Flash
a. This camera also has a Fill-in fl ash function that
helps obtain better pictures in daylight shooting
when your subject is in a shadow or has their back to
the light source. In this mode the fl ash will fi re under
any lighting conditions.
b. Press the Mode Button twice until the fl ash icon "
appears on the LCD Panel and remains lit. Press the
Shutter-Release Button to take a picture with Fill-in
fl ash.
3. Flash-off
a. This camera also has a Flash-off Mode that helps to
obtain a more natural effect or when using the fl ash
is forbidden (such as in a museum, exhibitions or
aquariums). The fl ash will be disabled in this mode.
b. Press the Mode Button three times until the fl ash off
icon "
Press the Shutter-Release Button to take a picture
without fl ash.
Note:
•
For fl ash pictures, please wait for the fl ash icon "
blinking before taking your next fl ash picture. Flash recycle
time is about 7 seconds.
•
For Flash-off mode pictures, the camera should be placed on a
steady support (use of a tripod is recommended).
fl ash ranges:
38mm (wide setting)
2.62 to 8.86ft.(0.8 to 2.7m)
Note: GNO; wide 11.5, tele 15.0
"Intelligent" Flash Interlock
This camera is featured with an "Intelligent" Flash Interlock
function. If the fl ash is not ready and the lighting level is low, the
shutter will not fi re even if the Shutter Release button is pressed.
This helps to prevent your pictures from turning out too dark.
"Smart" Flash Ready Icon
This camera is featured with a "Smart" Flash Ready Icon that
works with the Auto Flash unit.
•
The fl ash icon "
whenever the fl ash is fully charged.
•
Even if the fl ash is not fully charged, indicated by the fl ash icon
"
" still blinking, but the lighting condition is satisfactory to
take a good picture without fl ash you will be able to take your
picture before the fl ash is fully charged.
•
If the fl ash is not fully charged, indicated by the fl ash icon "
still blinking, but the level of lighting is insuffi cient to take a
good picture without fl ash, the "Intelligent" Flash Interlock will
activate, not allowing you to take a picture until the fl ash is fully
charged.
Using Red-Eye Reduction
This camera has a built-in red-eye reduction feature which
it possible to minimize the red eye effect that sometimes occurs
when taking portrait photographs with fl ash.
1. Press the Mode Button once until the Red Eye Reduction icon
"
" appears on the LCD Panel and remains lit.
. By pressing the
2. Press the Shutter Release Button and the Red Eye Reduction
LED will light up for about 1 second before the fl ash fi res and
the shutter is released.
Note:
•
Since there is a delay effect of about 1 second for the fl ash to
fi re and shutter to release, in order for the red-eye reduction
feature to function effectively, press the Shutter Release button
7
8
9
10
11
12
13
Fig.1
Fig.2
Auto Focus (Focus Lock) feature.
Once you have composed your
picture and the AF frame mark is
positioned over your subject, then
press the Shutter Release Button
halfway down to activate the Auto
"on the LCD Panel is not
" will
"
" appears on the LCD Panel and remains lit.
" to stop
90mm (tele setting)
2.95 to 7.54ft.(0.9 to 2.3m)
" will not blink or show on the LCD Panel
"
makes
14
15
16
17
18
19
Fig.3
Fig.4
Fig.6
Fig.7
4
3
5
FILMTIP
and hold the camera steady for about 1 second until the fl ash
fi res and the shutter releases.
Using the Landscape Mode
This camera is equipped with a landscape mode, allowing you to
take clear landscape pictures or photographing remote scenes
through glass. The fl ash does not fi re in this mode, so the fl ash-off
is set automatically.
1. Press the Mode Button four times until the Landscape
icon "
" appears on the LCD Panel and remains lit.
2. Follow steps 2 to 6 in the section Taking photographs.
Note:
•
The Landscape mode function will be cancelled automatically
after each time shooting.
Using the Night Portrait Mode
This camera is equipped with a night portrait mode, allowing you
to take a better picture at night or in dark environments. In this
mode, the shutter speed slows down to 1/1.4 seconds and the
fl ash remains on.
1. Press the Mode Button fi ve times until the Night Portrait
icon "
" appears on the LCD Panel and remains lit.
2. Follow steps 2 to 6 in the section Taking photographs.
Note:
•
When using the Night Portrait mode setting, it is recommended
to mount your camera on a tripod to prevent the camera from
any jittery movement that may cause blurred images.
•
Ensure that the subject remains still for a moment after the
fl ash fi res.
•
The Night Portrait mode function will be cancelled automatically
after each time shooting.
Using the Self-Timer
This feature allows the photographer to join in on the picture.
When using this mode, the camera should be placed on a steady
support (use of a tripod is recommended).
1. Press the Self-Timer button once, until the self-timer icon "
appears on the LCD Panel and remains lit.
2. Place the camera on a steady support and focus on the
subject. Make sure your subject is at least 3ft. (0.9m)
away from the camera and use the tele or wide zooming
buttons to compose your picture.
3. Press the Shutter Release button.
4. The Self-Timer LED will light up for about 7 seconds and
then blink for the last 3 seconds before releasing the shutter
automatically.
Note:
•
The Self-Timer function can also be combined with the different
fl ash features, red eye reduction, landscape mode and night
portrait mode.
•
To cancel the self-timer function once it has been activated,
press the Power Button or the Self-Timer Button.
Rewinding the Film
When the end of the fi lm is reached, the fi lm will not advance when
you press the Shutter Release Button.
1. Once the end of the fi lm is reached the fi lm will rewind
automatically.
2. To rewind the fi lm in mid roll, press the Mid-Roll Rewind button.
3. While rewinding, the Film Counter on the LCD Panel will count
down and "E" will display on the LCD Panel when the fi lm
rewinding is complete. The power will then shut off
automatically.
4. Open the Film Compartment Door and remove the fi lm for
processing.
Note:
•
Do not open the Film Compartment Door if the fi lm has not
been completely rewound, otherwise the fi lm may be ruined.
Precautions
•
Store the camera in a cool, dry place;
•
Do not expose the camera to heavy dust or water;
•
Do not expose the camera to extreme high or low temperature
and humidity (they may cause serious damage to the camera);
•
Do not attempt to disassemble the camera by yourself (to avoid
risk of electronic shock);
•
Avoid excessive force or impact caused by handling, bumping
or dropping;
•
Do not break up the batteries or throw them into fi re;
•
Keep batteries away from children;
•
If necessary, clean the lens and auto focus sensors by
gently wiping them with a clean, lint-free cloth. Do not use
chemicals or other cleaning agents. Remove the dust from the
fi lm compartment by using an air blower.
Specifi cations
Type: 35mm Power Zoom Camera with an LCD Panel Display
Lens: 38mm (f/7.0) - 90mm (f/10.5), 4 element, 4 groups
(effective zoom range is 38-85mm)
Focusing: Active infrared auto focus system, 3ft. to infi nity
(0.9m to infi nity)
Shutter: Programmed AE Shutter
Shutter Speed: 1/1.4 to 1/360 seconds
Specifi cations are subject to change, for improvement, without
prior notice
20
21
22
23
24
25
26
Fig.5
1
2
Fig.8
5
"
3117106C
8/13/04, 5:35:02 PM
Advertisement
Table of Contents

Related Manuals for Polaroid PZ2300 AF


Summary of Contents for Polaroid PZ2300 AF
-
Page 1: Instruction Manual
PZ2300AF Polaroid PZ2300AF INSTRUCTION MANUAL 1. Power Button 14. Zoom Buttons (Wide/Tele) 2. Shutter Release Button 15. AF LED 3. Mid-roll Rewind Button 16. Viewfi nder Eyepiece 4. CDS Photo Sensor 17. Film Spool 5. Lens/Lens Door 18. Film Tip Mark 6. - Page 2 PZ2300AF Polaroid PZ2300AF MANUAL DE INSTRUCCIONES 1. Botón de encendido 14. Botón de zoom (amplio / Tele) 2. Botón disparador 15. LED AF 3. Botón de rebobinado en la 16. Visor mitad del rollo 17. Bobina de la película 4. Fotosensor CDS 18.
Need help?
Do you have a question about the PZ2300 AF and is the answer not in the manual?
Questions and answers