Table of Contents
Advertisement
Quick Links
Advertisement
Table of Contents

Related Manuals for NIWA Grow Hub

Summary of Contents for NIWA Grow Hub
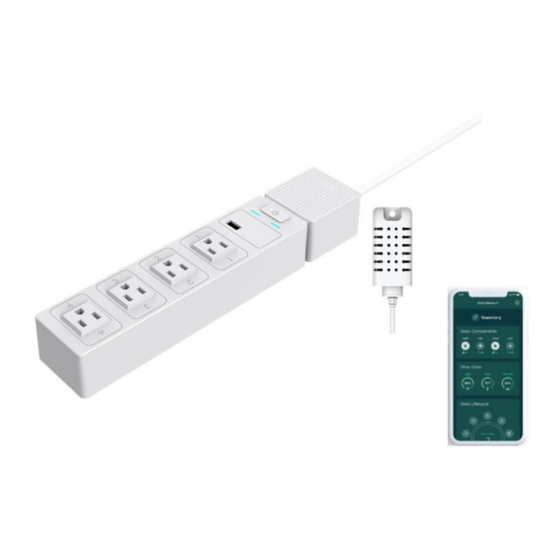
- Page 1 Niwa Grow Hub User Manual www.getniwa.com Ed210720...
-
Page 2: Table Of Contents
Hardware overview Set up instructions Set up your Niwa Grow Hub device Download the App and register your user Connect your Niwa Grow Hub to your Wi-Fi Alternative Wi-Fi setup (Advanced AP mode) Wi-Fi tips & Troubleshooting General issues: Internet Wi-Fi router related:... - Page 3 Change Device’s Network VPF Leaf Temperature Offset Account Settings Support Managing multiple Niwa Grow Hubs Adding a new device Controlling different devices Niwa Grow Hub LED status Warnings & Cautions Main Features Grow recipes Recipe stages Alarms Live dashboard Configuration, outlets.
-
Page 4: Introduction
Introduction With the goal of supporting a hassle free and high performance grow, Niwa has developed a powerful software that enable growers to automate their setups in a very simple way just by having them plug their existing devices (such as lamps, fans, humidifiers, dehumidifiers, A/C, pumps, or heaters) to their Niwa Grow Hub. -
Page 5: Set Up Instructions
Please note: Only one outlet can be configured for each device type. For example, if you have two fans, you can only set one Niwa Grow Hub outlet for fan control. CAUTION! Make sure the maximum total resistive load does not exceed 10A per... - Page 6 Niwa app. Make sure you download the Niwa Grow Hub app, for there is our Niwa One Greenhouse app from our Niwa One product line. You will find links to the Niwa Grow Hub app in the getniwa.com site as well.
-
Page 7: Connect Your Niwa Grow Hub To Your Wi-Fi
Important: Your Niwa Grow Hub will connect to the same Wi-Fi network that your mobile phone is connected to. As the majority of IoT devices, the Niwa Grow Hub only works with 2.4GHz b/g/n Wi-Fi networks. Most Internet routers are 2.4GHz or 2.4Ghz compatible. - Page 8 2. 5. Once you get your confirmation message you can tap on “Configure” to set your Niwa Grow Hub up, assigning the different outlets to your different grow devices, or “Do it later”. 6. If you get an error message or experience any issue, please check the Wi-Fi Tips &...
-
Page 9: Alternative Wi-Fi Setup (Advanced Ap Mode)
AP mode that you can use following the steps below. 1. Power cycle your Niwa Grow Hub: unplug it from the main outlet, wait 5 seconds, and plug it back to the main outlet. - Page 10 WiFi credentials or get your BSSID number. If this happens, you need to power cycle your Niwa (unplug/plug) and restart the Niwa app and repeat all the steps from the first one above. Based on our internal testing, it will work (the iPhone won’t disconnect) on the second attempt.
- Page 11 Grow Hub. Take into account it must be a 2.4Ghz Wi-Fi network and the router should be near the Niwa Grow Hub, at least for the first time setup. b. The password for your Wi-Fi network. c. Tap on “Connect”.
-
Page 12: Wi-Fi Tips & Troubleshooting
Niwa Grow Hub from power. If you want to change your Niwa Grow Hub from one Wi-Fi set up mode to another ● (i.e. from standard mode to access point mode or vice versa) please power cycle... -
Page 13: Standard Mode Common Issues
● Wi-Fi settings and “forget” any Wi-Fi network within the current range of your phone. Some phones, even when they are connected to the Niwa**** network AP, will keep trying to connect to other available known Wi-Fi networks in range. -
Page 14: Using The Niwa Grow Hub
Using the Niwa Grow Hub Introduction The Niwa Grow Hub is not just a monitoring system but a growing controller. Hence the main benefit for the grower is being able to automate climate control, light cycles and watering cycles reducing the human error and making sure all the parameters are kept as desired. -
Page 15: The Dashboard
● Current DP (Dew Point). ● Current light level. The Grow Hub sensor incorporates an illuminance sensor, ● measuring luminous flux per unit area. This measurement shows the current light level percentage between 0 and the maximum set from the settings menu “Calibrate light sensor”. -
Page 17: The Alarms
You will get a push notification every time a new alarm is triggered and your alarms will also be logged on the notifications panel. The Niwa Grow Hub must be online (blue LED flashing every 2 seconds) for the alarm to be triggered and received then sent to your mobile phone. -
Page 18: The Notifications Panel
New types of alarms from this or other devices will keep being notified, for example, if at some point the humidity in your Grow Hub 1 is below the threshold, you will get a new alarm “Low humidity in Grow Hub 1”. -
Page 19: The Recipes
Stop growing!; this button will enable if the selected recipe is the currently loaded ● one, hit it to stop the recipe. Please note: the Grow Hub wont activate any outlet if there is no grow recipe running. Edit recipe*; this button allows you to edit the different settings for all the recipe ●... -
Page 20: Watering
Set the VPD (Vapor Pressure Deficit) temperature and/or humidity targets for a defined period of time within the day. The Grow Hub will control your heater, fan, a/c, humidifier and/or dehumidifier depending on your outlet configuration. You can add up to three cycles... -
Page 21: When Setting Your Climate Parameters You Have Three Choices
Pro tip: If you need to create an overnight cycle, for example from 8.00 pm (20.00) to 8.00 am (8.00), and since the days ends at 11.59pm (23.59), you need to create two separate climate cycles: 1st light cycle from 20:00 to 23:59 ●... -
Page 22: How A Recipe Is Executed
Regardless of the recipe settings, the Grow Hub will automatically adapt the recipe to match its current outlet setup. For example, if you set a temperature target of 80ºF but you don’t have any heating element plugged into your Grow Hub, it won’t try to connect the heater when temperature is below target. -
Page 23: Dead Zones
Dead zones In order to protect your climate control equipment (heater, fan, A/C, humidifier or dehumidifier), the Grow Hub enables a "dead zone" for both temperature control and humidity control. Temperature dead zone range: 0.5ºC ● Humidity dead zone range: 5% ●... -
Page 24: The Stats
The Stats In this section you can check the historic information captured by the Grow Hub sensors. You can choose between current day, week or month views. -
Page 25: Settings
Settings Outlet Configuration Once you have installed your Niwa Grow Hub sensor inside your growing tent is time to plug your existing devices into your outlets, you can plug up to four of the following devices at the same time: ●... - Page 26 If you don’t have this information, you can assume the starting current can be up to 3x times the running current, hence the max running current the Grow Hub can handle would be 3A (this way the starting current will be below the max 10A the Grow Hub can handle).
- Page 27 Grow Hub and make sure it is below the MAX power ratings of the Grow Hub -10A MAX (1200W @120V) per outlet; 15A MAX (1800W @120V) total.- Otherwise it's risky and while it may work for a period of time, it will damage your Grow Hub at some point and thus voiding the guarantee.
- Page 28 0 (total darkness) and the maximum level when your lamp is ON. Every set up is different so you need to calibrate your sensor to let the Grow Hub learn the light level when the lamp is connected.
- Page 29 3. Now subtract AET-APT to find your Leaf Temperature Offset. Please note, this offset will usually be a negative value, around -3ºF. 4. Then, open your ‘Settings’ section and select the “VPD Leaf Temperature Offset” 5. Slide the cursor left or right to set the right offset, please take the sign into account.
- Page 30 Managing multiple Niwa Grow Hubs Adding a new device To add an additional Niwa device to your account, tap on the name of your current device, a dropdown will show: From there tap on “add device” and follow the same steps you followed when you added your first device.
- Page 32 Niwa Grow Hub LED status Mode / status Blue LED Red LED Standard SC Wi-Fi setup is enabled Fast blinking Backup AP Wi-Fi setup is enabled Fast Fast blinking blinking The Internet is connected. All OK Slow blinking Internet disconnected. Time is synced. Offline data logger Slow enabled.
- Page 33 Do not connect the Niwa Sensors cord to anything but the Niwa Grow Hub USB ● connector port. Do not put your Niwa Grow Hub or your Niwa Sensors in an area where it can get ● wet or sprayed.
- Page 34 “next stage” and choose their optimum settings for their plants' next growth phase. Alarms The Niwa app will notify growers if something is going wrong in their grow set-up. High temperatures and humidity along with mold or lamp malfunction are some of the possible alerts a grower can set to keep their plants safe and healthy.
- Page 35 On top of that, the Niwa Grow Hub is fitted with the Niwa Grownet standard that will connect growers with the next generation of Niwa Grow devices effortlessly and wirelessly.
- Page 36 All returns or repairs must be accompanied by a Return Merchandise Authorization ● (RMA) number given by a Niwa representative prior to any service of a Niwa product. This warranty shall not apply to this product or any part thereof which had been ●...