
Subscribe to Our Youtube Channel
Summary of Contents for SereneLife SLMIGWL135
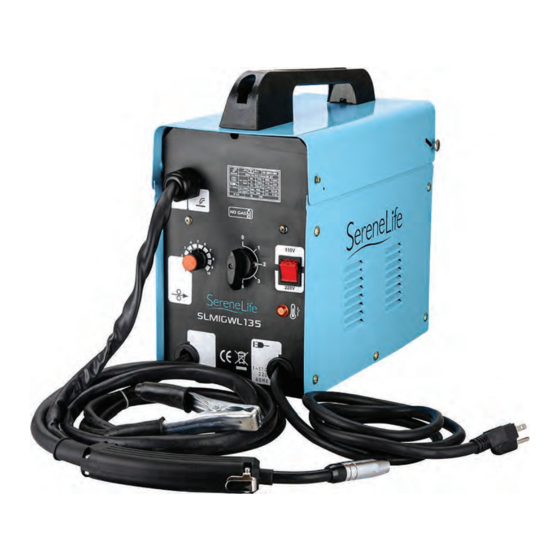
- Page 1 SLMIGWL135 Portable Digital MIG Welding Machine MIG Inverter Welder with Complete Accessories Set for Household Worker, Supports Dual Voltage 110V/220V...
-
Page 2: Welding Preparation
WARNING! Read and understand all safety warnings and instructions carefully before using this machine. Failure to follow the warnings and instructions may result in electric shock, re and/or serious injury. Save this manual for future reference. Only quali ed persons should install, operate, maintain, and repair this unit. WELDING SAFETY TIPS: Exposure to a welding arc is extremely harmful to the eyes and skin. -
Page 3: Fire Precautions
FIRE PRECAUTIONS • All ammable materials MUST be removed from the welding area. • DO NOT strike an Arc on or near the gas cylinder. • DO NOT attempt to weld fuel or gas containers unless adequate procedures have been taken to ensure that no vapour remains. Fuel tanks should be thoroughly steam cleaned before welding. -
Page 4: Parts Description
PARTS DESCRIPTION www.SereneLifeHome.com... - Page 5 2.2k potentiometer Ø4 rebar M4 self-locking nut; stop nut Ø4 Riveting fastening The case cover plate M4*12 bolt Board potentiometer in chassis M4*50 Cross screw with half round head Chassis plate M4 nut M4 flat gasket M4*12 Cross screw with half round head Wire holding plate adapting piece thermal protector...
-
Page 6: Setting Up The Weld
NOTICE: While installing the new solder wire. Please take o the protective sheath and contact tip of the MIG torch (see picture 1). Then press the Mig torch switch to let the wire out till 3.5cm. At last assemble the protective sheath and contact tip back (see picture 2 and 3). - Page 7 4. Clamp Ground Cable to bare metal on the workpiece near the weld area, or to the metal workbench where the workpiece is clamped. 5. Set the Wire Speed Dial and the Current Switch to the desired settings. Refer to the chart on the Welder or the chart on the facing page.
-
Page 8: Basic Welding Technique
BASIC WELDING TECHNIQUE 1. Press (and hold) Trigger and contact area to be welded with electrode wire to ignite arc. 2. For a narrow weld, you can usually draw the wire in a steady straight line. This is called a stringer bead. For a wider weld, draw the wire back and forth across the joint. -
Page 9: Voltage Adjustment Knob
3. FAULT/THERMAL OVERLOAD INDICATOR LED This will be illuminated under the following conditions: a. The duty cycle of the machine has been exceeded or air ow is blocked. The fan will continue to run until the machine has cooled, but output power will be disabled. -
Page 10: On/Off Switch
If the ground clamp is not connected to the metal workpiece you intend to weld, the welder will not have a completed circuit and you will be unable to weld. A poor connection at the ground clamp will create an erratic arc and may damage your welder. -
Page 11: Troubleshooting
TROUBLESHOOTING PROBLEM POSSIBLE CAUSES • Welding voltage too low. Weld deposit too thick • Torch moved over the work piece too slowly. Weld deposit incomplete • Torch moved over the work piece too quickly. and stringy Rust, paint or grease on the work piece. Arc unstable, excessive spatter •... -
Page 12: Routine Maintenance
ROUTINE MAINTENANCE Electrical repairs must only be carried out by a quali ed or approved engineer. Welding Cables: Regularly inspect their connections. Torch: Regularly dean the contact tip and shroud to remove spatter that will eventually disturb ow. Spraying the tip and shroud with anti-spatter spray can reduce the build up of spatter. -
Page 13: What's In The Box
FEATURES: • Easy to Use and Convenient to Carry • Powerful and Rugged MIG Welding Machine up to 120 Amp Output • Nice Machine Appearance and Screen Printing • Anti-corrosion & Water Resistant Metal Machine Case • Easy to Read the Numbers of Scale •... -
Page 14: Technical Specs
TECHNICAL SPECS: • Construction Material: Low Carbon Steel, Low Alloy Steel, and Stainless Steel • Power Supply: 110V/220V • Maximum Input Current: 110V/8A, 220V/19A • Frequency Response: 50/60Hz • Rated Input Power: 4.2KVA • Current & Voltage Adjustment Range (MIG) : 60A/17V-130A/20.5V •... - Page 15 www.SereneLifeHome.com...
- Page 16 Questions? Issues? We are here to help! Phone: (1) 718-535-1800 Email: support@pyleusa.com...
Need help?
Do you have a question about the SLMIGWL135 and is the answer not in the manual?
Questions and answers