Advertisement
solaratticfan.com
800.363.9865
WARNING: Please take the time to read
through the ENTIRE instructions prior
to starting any work. Not following the
instructions will invalidate the warranty.
Precautions:
1. Ensure normal safety precautions are taken when
using tools, ladder and walking on roofs.
2. Do not cut any structural members in the house.
3. Install only in dry weather.
Tools Required:
■ Power Drill
■ Phillips Screwdriver
■ Caulking Gun
■ Ladder
■ Electrical Tape
■ 1/4" Masonry Bit (for tile roofs)
Installation Pointers:
When determining location of the solar panel, consider potential problems such as objects shading the unit during certain
times of the day (southern exposure is recommended). To ensure proper ventilation, install the Gable Solar Fan so that it
covers the entire gable opening.
Step 1 Choose location to install the gable fan. The fan must be installed
between studs in the gable area. For proper ventilation, the fan unit must
cover the entire gable opening. If the gable opening is larger than the fan
unit shroud, the excess opening must be blocked. DO NOT CUT ANY WOOD
FRAMING. From inside the attic, position the gable fan (with the motor facing
the attic) to the desired location and secure the shroud with the provided
wood screws (E) - see Figure 1.
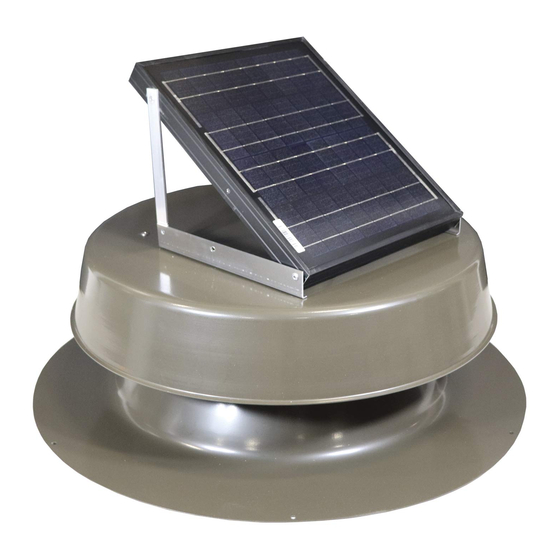
Step 2 Locate area to install the solar panel on the roof where it will gather
the most amount of sunlight (southern exposure is recommended). Attach
the L-brackets (C) to the long sides of the solar panel with the self-tapping
(F) screws into the pre-drilled holes on the panel frame. Attach solar panel
to roof using the provided wood screws - see Figure 2. Caulk around the
wood screws to prevent leaks. FOR TILE ROOFS: Pre-drill hole in tile to
accommodate the anchors provided (H). Tap anchors into holes and secure
L-bracket using provided screws (G) - see inset.
Step 3 Use one of the following two options for routing the power cable from
the fan to the solar panel:
OPTION 1: Route the power cable from the fan unit through the gable vent
and along the outside of the house up to the roof.
OPTION 2: Drill a small hole next to the solar panel on the roof. Route the
power cable from the fan unit through the attic and up through the hole.
Caulk around hole to prevent leaking.
Step 4 Connect the power cable from the fan unit to the power cable from
the solar panel. Connect the black wire to the black wire and the red wire
to the red wire - see Figure 3. If the power cables do not reach, a power
adapter cable is available. If wire connections are located outside of the attic
space, wrap the connections with electrical tape to prevent water infiltration.
Secure any loose wires using wire staples (not provided).
Gable Fan Installation Kit:
A. Gable Fan
B. Solar Panel
C. (2) L-Brackets
D. Caulk
E. (14) Wood Screws
F. (4) Self-Tapping Screws
(L-bracket to panel)
G. (4) Machine Screws (for tile roofs)
H. (4) Anchors (for tile roofs)
NOTE: Additional power cable is available
C.
D.
B.
Gable Mount Fan
Installation Instructions
A.
E.
F.
Optional Power Cable Adapter
G.
H.
For Tile installs Only
Advertisement
Table of Contents

Related Manuals for Natural Light Solar Attic Fan


Summary of Contents for Natural Light Solar Attic Fan
- Page 1 Gable Mount Fan solaratticfan.com Installation Instructions 800.363.9865 Gable Fan Installation Kit: WARNING: Please take the time to read through the ENTIRE instructions prior A. Gable Fan to starting any work. Not following the B. Solar Panel instructions will invalidate the warranty. C.
- Page 2 You can register online at www.solaratticfan.com or fill out the form and mail it to: Natural Light Energy Systems • 10821 N 23rd Ave • Phoenix, AZ 85029 R E G I S T R A T I O N...
Need help?
Do you have a question about the Solar Attic Fan and is the answer not in the manual?
Questions and answers