Advertisement
Quick Links
Advertisement

Summary of Contents for Cedar Shed DOVER
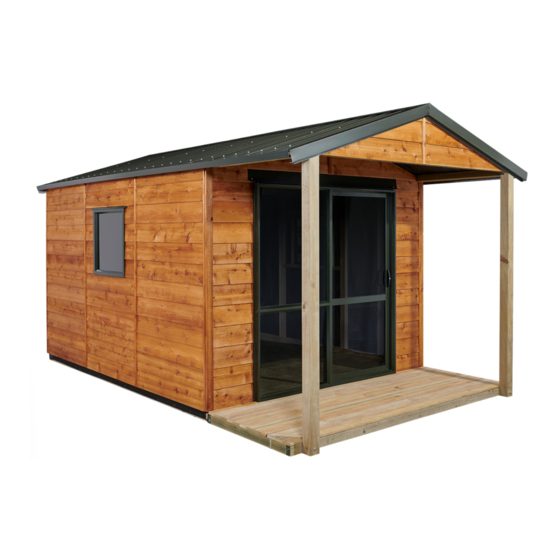
- Page 1 CEDARSHED INSTRUCTIONS DOVER - COLOURSTEEL ROOF Base size: 3600mm x 2775mm deep...
- Page 2 DOVER • Battery Drill Tools Required: • Riveter • Hammer • Tape Measure • Ladder • Skillsaw • Level • Screwdriver - Flat • 3/8 Hex Drive bit • 8mm Hex Drive bit • Drill Bit 3.5mm • Tin Snips •...
- Page 3 DOVER PARTS LIST Description Size Cabin with Plywood Floor Ranchslider 1820 x 1890 Standard Wall Panels 1200 x 2057 Gable Wall Panels 1342 x 2510 Gable Wall Panels (R/S) 1342 x 2510 Door Lintel 90 x 45 x 1800 Cedar Corner Clashings...
- Page 4 DOVER PARTS LIST Description Size Floor Option Floor Joists 70 x 45 x 3590 Floor Joists 70 x 45 x 2675 Floor Joists 70 x 45 x 546 Plywood Flooring 1382 x 1200 x 17 Plywood Flooring 1382 x 1190 x 17...
- Page 5 DOVER CONCRETE FLOOR - OPTIONAL Building a Raised Concrete Base Step 3: Establish size of shed and excavate sufficient area. Re- member to allow for rear roof overhang up to 150mm, and 120mm on each end. Step 4: Ensure that the base substrate is compacted firmly.
- Page 6 DOVER FLOOR - OPTIONAL Step 1: Lay out floor joists, and assemble sub floor as shown below, nailing sub floor together with 90mm nails. Ensure joists are level and supported every 800mm. Check diagonals before screwing 6 sheets of 17mm ply to frame using 40mm screws as shown.
- Page 7 DOVER WALL PLAN 1342L 1342R 1200 1200 1200 1200 1200 1200 1342L 1342 15 x 17mm Std Cedar bead Tek Screws Floor 30 x 17mm Std Cedar bead Purlins Truss 30 x 17mm Gable Cedar bead Corner Clashing PG 6...
- Page 8 DOVER WALLS Step 3: Unpack panels and identify wall panels and door positions as per plan on following page. Select two panels that go either side of a corner (gable and standard panel) and stand together. Step 4: Screw the two wall panels together using...
- Page 9 Screw remaining panels together as per wall plan, using 3 Tek screws per join and 4 on the longer gable end panels. DOVER TOP STIFFENER Step 7: Using 75mm framing nails, nail both top plate stiffeners into standard wall panels studs, as shown using 2 nails per stud.
- Page 10 DOVER TOP LINTEL Step 9: Using 4 x 75mm Tek screws screw door lin- tel to studs. Door Lintel shown from inside DOVER CORNER CLASHINGS Step 10: Silicone and nail 15 x 17mm beads on all corners as shown using 5 x 50mm bead nails, per bead.
- Page 11 DOVER RANCHSLIDER Step 12: Silicone around the 2 sides and top of door opening before placing ranch slider in position. Using 40mm screws, screw Ranch slider to the wall panels each side, 3 screws per side. Place Lintel flashing centrally over ranchslider and predrill 3mm holes to nail through the weatherboard and flashing to the studs.
- Page 12 DOVER ROOF Step 14: Position roof truss in centre of the side walls. Using 4 x 40mm screws, screw truss to top plate stiffeners. Step 15: Position 12 purlins on roof. Top purlins should be together and bottom purlins should be against top plate.
- Page 13 DOVER ROOF Step 18: Lay out remaining full roof sheets and 1/2 sheet. Rivet these sheets together, 2 rivets per join, to make 1 large roof panel as shown in photo. Tack remaining top corner and bottom corner ensuring edge of sheet is flush with end of purlins and height is correct.
- Page 14 DOVER DECK- OPTIONAL Step 21 :Lay out Deck joists and assemble sub floor as shown below, nailing sub floor together with 90mm nails. Place 30 x 45mm packer between sub floor and shed floor then attach sub floor to shed floor, with 5 x 100mm tek screws.
-
Page 15: Warranty Registration
4. This warranty does not cover natural variations, expansion, contractions as can be reasonably expected from a timber product. Painting or coating of your Cedar Shed with a dark colour will cause increased timber temperature and movement which will render this warranty null and void.