Table of Contents
Advertisement
Quick Links
AUTOMATIC TECHNOLOGY AUSTRALIA PTY LTD
Pro Series 2000
COMMERCIAL ROLLER
SHUTTER OPENER
WARNING
OWNERS COPY
It is vital for the safety of persons to follow all
instructions. Failure to comply with the installation
instructions and the safety warnings may result in
serious personal injury and/or property and remote
Installation Instructions
control opener damage.
Please save these instructions for future reference.
Advertisement
Table of Contents

Subscribe to Our Youtube Channel
Related Manuals for ATA AXESS 2000 Pro Series

Summary of Contents for ATA AXESS 2000 Pro Series
- Page 1 AUTOMATIC TECHNOLOGY AUSTRALIA PTY LTD Pro Series 2000 COMMERCIAL ROLLER SHUTTER OPENER WARNING OWNERS COPY It is vital for the safety of persons to follow all instructions. Failure to comply with the installation instructions and the safety warnings may result in serious personal injury and/or property and remote Installation Instructions control opener damage.
-
Page 2: Table Of Contents
CONTENTS PAGE CONTENTS IMPORTANT SAFETY WARNINGS FEATURES PRODUCT DESCRIPTION DRIVE UNIT INSTALLATION WIRING DIAGRAM - LEFT HAND INSTALLATION WIRING DIAGRAM - RIGHT HAND INSTALLATION SETTING TRAVEL LIMITS SPECIFICATIONS MAINTENANCE RECORD PARTS LIST WARRANTY AND EXCLUSION OF LIABILITY Automatic Technology Australia Pty Ltd to the extent that such may be lawfully excluded hereby expressly disclaims all conditions or warranties, statutory or otherwise which may be implied by laws as conditions or warranties of purchase of an Automatic Technology Australia Pty Ltd automatic opener and Automatic Technology Australia Pty Ltd hereby further expressly excludes all or any liability for any injury, damage, cost, expense or claim whatsoever suffered by any... -
Page 3: Features
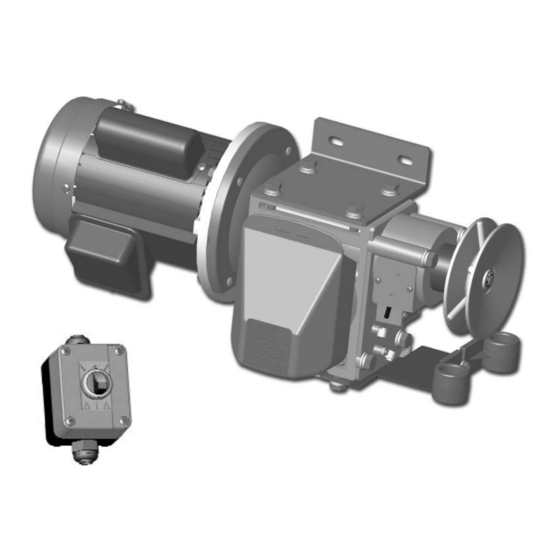
FEATURES Thank you for purchasing the ATA Axess Automatic Opener. This opener is designed to suit commercial heavy duty roller shutter doors. The components and materials used in this opener are of the latest technology and highest quality. -
Page 4: Product Description
IP42 standard. DRIVE UNIT INSTALLATION The ATA Axess Roller Shutter Opener is designed to operate 1. The door moves freely for the full travel in both directions. most commercial and heavy duty slat roller shutter doors. The 2. - Page 5 DRIVE UNIT INSTALLATION MOUNTING THE DRIVE UNIT The mounting plate holes are slotted for fine adjustment of the 3. Mount the base plate to door bracket either by welding in output gear position. Follow the procedure below to ensure final place or using M12 hex bolts, washers and nuts.
- Page 6 INITIAL ELECTRICAL INSTALLATION CAUTION: CABLES WHICH HAVE A GREEN/YELLOW COLOURED INSULATION ARE FOR EARTHING PURPOSES ONLY. NEVER USE THESE CABLES FOR ANY OTHER PURPOSE. SELECTING LEFT OR RIGHT HAND INSTALLATION. NOTE: The wiring diagram on Page 7 is for right hand Using the figure below, place the motor connector for the drive installation.
-
Page 7: Wiring Diagram - Left Hand Installation
WIRING DIAGRAM - LEFT HAND INSTALLATION THREE POSITION PENDANT SWITCH... -
Page 8: Wiring Diagram - Right Hand Installation
WIRING DIAGRAM - RIGHT HAND INSTALLATION THREE POSITION PENDANT SWITCH... -
Page 9: Setting Travel Limits
SETTING TRAVEL LIMITS SETTING DOOR TRAVEL LIMITS FIG. 7 Note: Door should be moved manually to half open position. 1. Turn pendant switch anticlockwise to move door to desired open position (Fig. 7). 2. If desired position is reached and green OPEN limit cam is not in contact with limit switch, adjust cam until limit switch “clicks”. -
Page 10: Maintenance Record
MAINTENANCE RECOMMENDED MAINTENANCE DAILY DUTY RECOMMENDED The door and opener should be inspected and serviced at CYCLES MAINTENANCE regular intervals based on usage. The table at right indicate Over 150 every 1 month ideal maintenance schedules based on duty cycle. 100 - 150 every 2 months The following elements should be examined at each service:... -
Page 11: Parts List
PARTS LIST... -
Page 12: Warranty And Exclusion Of Liability
12. This warranty is not transferable. 13. Where the Product is retailed by any person other than ATA, except for the warranty set out above, such person has no authority from ATA to give any warranty or guarantee on ATA's behalf in addition to the warranty set out above.
Need help?
Do you have a question about the AXESS 2000 Pro Series and is the answer not in the manual?
Questions and answers