Table of Contents
Advertisement
Quick Links
Advertisement
Table of Contents

Summary of Contents for Cellink Volumetric LUMEN X+
- Page 1 USER MANUAL...
-
Page 2: Table Of Contents
Table of Contents 1.Safety information 1.1GeneralSafety Information 1.2Electrical information 1.3Protective Equipment 1.4Hazardous Materials 1.5Compliance 2. Specifications 3. Getting started 3.1Unpacking 3.2 Contents 3.3 Overview 3.4 Setting Up 3.5License and Acknowledgments 3.6 Software Overview 3.7Measuring Power Output 4. Troubleshooting 5. Maintenance 6. -
Page 3: Safety Information
1.Safety information Please review the entire manual before you start using the Lumen X. The following symbols will be used to indicate if there is risk of personal injury or equipment damage. This symbol indicates that there is a general risk of personal injury or equipment damage. -
Page 4: Generalsafety Information
1.1General Safety Information Use the instrument only for its intended purpose as described in the manual. Do not open, disassemble, modify the instrument or sub-components. Do not attempt any servicebeyond the maintenance instructions provided in the manual. Caution! Never reach into the instrument when parts are m o v i n g . -
Page 5: Electrical Information
1.2Electrical information Caution! Always connect the Lumen X+ to a grounded socket and always use the voltage provided in the specifications. Not doing this can damage the Lumen X+ and cause personal injury. 1.3Protective Equipment Caution! Always wear protective goggles and gloves, and secure the environment around the instrument from other personnel while operating the Lumen X+. -
Page 6: Compliance
1.5Compliance By using the Lumen X+ and accepting the terms of use, you agree to the terms stated here and in the warranty information (see Chapter six:Warranty). Except for the expresswarranty set forth in the warranty information, printing formulation, equipment, software provided hereunder are provided “as is”... -
Page 7: Specifications
2. Specifications Hardware Build volume: 64 x 40 x 50 mm. Display resolution: 1280 x 800. Pixel resolution (XY):50 µm. Minimum size thickness (motor): 50 µm. Wavelength: 405 nm. Projection power output: 10- 30 mW/cm2. Heated platform: 35°C. Dimensions: 24 x 43 x 41cm. Weight: 9 kgs. -
Page 8: Getting Started
3. Getting started The Lumen X+ is designed to study biology for improving the quality of life of human patients. -
Page 9: Unpacking
3.1Unpacking The Lumen X+ requires approximately 30 x 61 cm (12 x 24 in) of bench space. Place the Lumen X+ on a sturdy bench, with the adjustable rubber feet all the way in and on the bench surface. (Go to section 4 to adjust the rubber feet for every surface) Ensure that there is at least two inches of space on all sides of the Lumen X+ for adequate air flow into the printer. -
Page 10: Contents
• 5x coated vats • 5x plastic razor blades • 2x 10 mL PEGDA PhotoInk (with Material Safety Data Sheet) • 2x 10mL PEGDA Start PhotoInk (with Material Safety Data Sheet) Note: Platforms, vats, power cable, and PhotoInks must be purchased through CELLINK. -
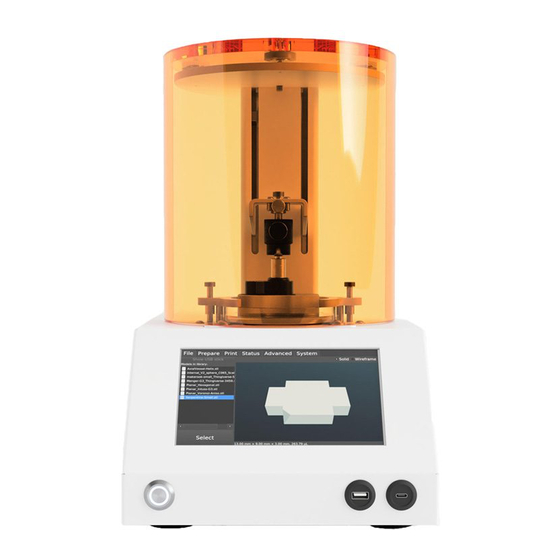
Page 11: Overview
3.3 Overview PLATFORM ADJUSTMENT LIGHT SHIELD KNOBS BUILD PLATFORM VAT CLAMPS TOUCHSCREEN POWER BUTTON (USB-A, USB-C) USB PORTS Note: Do not disassemble the Lumen X+ printer. Note: Do not look directly at the light during projection. - Page 12 Ensure that the USB flash drive used is FAT32 format. Do not plug in a smartphone or mechanical hard drive into the USB ports (USB-A, USB-C). Operating conditions • Indoors • Temperature: Use at room temperature (~15-30degrees Celsius). • Humidity: 40-80%. •...
-
Page 13: Setting Up
3.4 Setting Up Initial Preparation 1.Connect power outlet to back of the Lumen X+ and to a grounded wall socket. Push the power connector into the back of the Lumen X+ until a click is heard. Orient the power connector so that the flat side is on the top. - Page 14 Rotate blue clip counterclockwise to secure platform in place. 4. Placed a coated vat onto the dish holder and secure the clamps by r o t a t i n g t h e m . Push dish clamp up and rotate counterclockwise.
-
Page 15: License And Acknowledgments
To sterilize the build platform Ethanol sterilization: 1.Placethe build platform in a petri dish filled with 70% ethanol. 2. Allow the build platform to sit in ethanol for >30 minutes. 3. Remove the build platform from ethanol and let it sit for >30 minutes to dry. -
Page 16: Software Overview
3.6 Software Overview 1.Connect power outlet to back of the Lumen X+ and to a grounded wall socket. INTERACTIVE TOUCHSCREEN MODEL SIZE MODEL VOLUME 3.6.1Select Tab 1.Choose the desired 3D file and press “Select”. • To print a model from a USB drive, insert the USB drive into the front USB port and select “Show USB Stick”.Ensure that the model is stored within the parent USB directory. - Page 17 3.6.2 Prepare Tab 1.Select the desired layer thickness and press “Slice”. 2. Loosen the top silver metal knob (knob #1), move the platform assembly up, and secure the silver metal knob (knob #1). KNOB #1 KNOB #2 KNOB #2 3. Tap the “Prepare” button, the build platform will be lowered and stop.
- Page 18 5. Lower the build platform until the platform touches the coated vat. 6. Secure the platform knob #1and knob #2. 7. Press “Continue”. BURN-IN FOR FIRST 2 LAYERS RANGES FROM 0.25 – 30 S RANGES FROM 20 – 80 % 3.6.3 Print Tab 1.Adjust the exposure time per layer and the burn-in time factor for the first layers.
- Page 19 3.6.4 Status Tab 1.Press “Start”. 2. Add the recommended volume of printing formulation, as shown in the middle of the screen. • To avoid running out of print formulation, add 2-3xvolume of the model volume. 3. Press “Print”. Stopping a Print Status •...
- Page 20 • If a resin part is printed, submerge in isopropyl alcohol for 10-15 minutes, then remove to air dry. • If a hydrogel part is printed, submerge in appropriate media (DI water, PBS, cell media), until dye no longer elutes from the printed gel, and replace media every 2-4 hours.
- Page 21 If printing a new model: 1.Go to “Select” tab and select a new model. 2. Follow instructions and follow 3.6.1-3.6.4. 3.6.5 Advanced Tab Using the heating function 1.Turn heating on by selecting the box next to “Print bed - heating”. You can adjust the temperature between 30 °...
- Page 22 3.6.6 System Tab Updating Software 1.Extract contents of update zip file (.kit and .kit.sig files) into parent directory of the USB. 2. After inserting USB into the Lumen X+, the “Update Software” button will fade in. 3. Tap “Update Software” and select the latest LightField version. •After the update is complete, the Lumen X+ will reboot.
-
Page 23: Measuring Power Output
3.7 Measuring Power Output The power level can be adjusted to obtain a specific power output (in mW/cm2) using the Volumetric Light Meter (sold separately). 1.Connect the light probe to the light meter and turn on. 2. Place vat onto printer. 3. -
Page 24: Troubleshooting
4. Troubleshooting Photo-ink moves to one side of the vat because the printers is on an uneven surface. • The Lumen X+ rubber feet are adjustable. Place a drop of water on the center of the vat and see what direction it is moving. You can lift the printer softly from the side that the water is moving and unscrew the rubber feet until you see that the water move to the center. -
Page 25: Maintenance
Features within print are not preserved. • Decrease exposure time and/or power output. After preparation step, the “Print” tab is inactive. • Resliced the selected file at the desired layer thickness. 5. Maintenance The Lumen X+ can be left powered on when not in use. The maintenance activities below can be performed by the user, no special skillset is needed for general maintenance. - Page 26 Focusing Lumen X+ 1.Place the included Focus Film onto a vat. 2. Navigate to the “Advanced” Tab and enable “Project focus image”. 3. Turn down the “Projector power level” by adjusting the slider and be sure to wear the included safety glasses. 4.
-
Page 27: Warranty
6. Warranty... - Page 28 CELLINK and Volumetric are not in any way responsible for any consequential lossesor downtime what-so-ever caused by a problem in the performance of our products. Volumetric is not responsible for additional customs fees and tariffs.
- Page 29 (moisture, fire, water, flood, lightning, etc.),or any other form of neglect on the customer ’s part. If you are unsure about something, feel free to contact CELLINK prior to using the Lumen X+. The user shall not attempt any maintenance other than what is mentioned in the previous section (Section 5).
- Page 30 Volumetric will determine on sole discretion whether an issue is covered under the warranty or not. disposal, please contact CELLINK support@cellink.com. Once process is formally initiated, hardware will be sent to Volumetric to dispose of the hardware properly.
Need help?
Do you have a question about the Volumetric LUMEN X+ and is the answer not in the manual?
Questions and answers