
Summary of Contents for Technovare OPS-DRD2
- Page 1 OPS-DRD2 USERS MANUAL v1.2 _OPS-DRD2 : OPS Digital Signage Player_ Users Manual v1.2 03/15/2017 OPS Form Factor Android Player for Commercial Applications...
- Page 2 The documentation and the software included with this product are copyrighted 2017 by Technovare Systems Inc. All rights are reserved. Technovare Systems Inc. reserves the right to make improvements in the products described in this manual at any time without notice. No part of this manual may be reproduced, copied, translated or transmitted in any form or by any means without the prior written permission of Technovare Systems Inc.
- Page 3 Product Warranty (36 Months) Technovare warrants to you, the original purchaser, that each of its products will be free from defects in materials and workmanship for 36 Months from the date of purchase. This warranty does not apply to any products which have been repaired or altered by persons other than repair personnel authorized by Technovare, or which have been subject to misuse, abuse, accident or improper installation.
- Page 4 (such as your sales receipt) in a shippable container. A product returned without proof of the purchase date is not eligible for warranty service. Technovare shall not be responsible for lost, stolen or misdirected mail or for damage to the product incurred during shipping.
- Page 5 OPS-DRD2 USERS MANUAL v1.2 Declaration of Conformity This product has passed the CE test for environmental specifications. Test conditions for passing included the equipment being operated within an industrial enclosure. In order to protect the product from being damaged by ESD (Electrostatic Discharge) and EMI leakage, we strongly recommend the use of CE-compliant industrial enclosure products.
- Page 6 OPS-DRD2 USERS MANUAL v1.2 Warnings, Cautions and Notes Warning! Warnings indicate conditions, which if not observed, can cause personal injury! Caution! Cautions are included to help you avoid damaging hardware or losing data. e.g. There is a danger of a new battery exploding if it is incorrectly installed. Do not attempt to recharge, force open, or heat the battery.
- Page 7 OPS-DRD2 USERS MANUAL v1.2 Safety Instructions CARE SHALL BE TAKEN TO STORE AND OPERATE THIS EQUIPMENT ACCORDING TO ITS SPECIFICATIONS. DO NOT LEAVE THIS EQUIPMENT IN AN ENVIRONMENT WHERE THE STORAGE TEMPERATURE MAY GO BELOW -20° C (-4° F) OR ABOVE 60° C (140° F). THIS COULD DAMAGE THE EQUIPMENT.
-
Page 8: Table Of Contents
OPS-DRD2 USERS MANUAL v1.2 Product Specifications ..................9 General ..............................9 Power ..............................10 Mechanical ............................10 Environmental ............................. 10 External Connections ..................11 Bottom of Card (BOC) ......................... 11 Top of Card (TOC) ..........................11 Installation ....................... 13 Operating Instructions ..................15 Power ON ............................ -
Page 9: Product Specifications
OPS form-factor. Targeted for Commercial Applications such as Digital Signage, Quick Service Restaurant, and/or Display Walls, the OPS-DRD2 is based on a 2.0 GHz Quad Core ARM processor with an integrated Multi-Media Processor capable of 4k playback and the ability to run certified third party software. -
Page 10: Power
OPS-DRD2 USERS MANUAL v1.2 Power Input Power 12.0 V – 19.0 V (16.0V Nominal) Idle : 2.5 Watts Power Consumption Max : 8.0 Watts Mechanical Dimensions OPS Form Factor (200mm x 119mm x 30mm) Weight 1.2 lbs / 0.52 kg Gross Weight 2.2 lbs / 0.98 kg... -
Page 11: External Connections
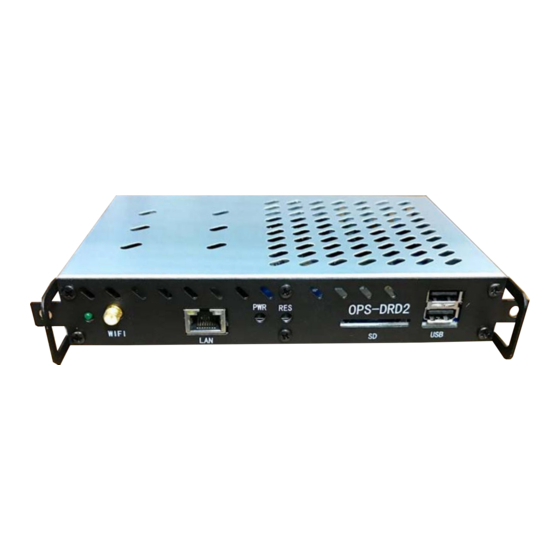
External Connections Bottom of Card (BOC) The OPS-DRD2 media player provides a single BOC connector for the purpose of mating with an OPS compatible display or docking station. This 80-pin connector provides connectivity for the following interfaces: a. HDMI Video b. - Page 12 One (1) SMA connector for attaching the provided WiFi antenna. This port supports 802.11b/g/n wireless standards. One (1) standard SD Card Slot for installing additional flash storage. In addition to the TOC connectors, the OPS-DRD2 provides the TOC switches as shown below. SERVICE WiFi...
-
Page 13: Installation
Installation 1. Ensure power is OFF on OPS-compatible display. 2. With the USB Ports of the unit towards the top, slide the OPS-DRD2 media player into the OPS slot on display. 3. Apply medium inward insertion force to unit such that the BOC connector positively engages monitor connector. - Page 14 OPS-DRD2 USERS MANUAL v1.2 5. Attach peripheral devices as required. See Figure below. RECOVERY SERVICE SWITCH WiFi RESET 1000BT OPS-DRD2 Connections 14 | P a g e...
-
Page 15: Operating Instructions
Ensure that the displays audio input is set to OPTION. d. Turn ON the OPS-compatible display. The OPS-DRD2 media player power LED should illuminate and the units begin to boot. At the completion of the devices first boot, the following Out-of-Box-Experience screen will be... -
Page 16: Power Off
1. Press and hold the POWER button until the POWER LED becomes illuminated. Power OFF 1. The OPS-DRD2 unit can be powered OFF by pressing and holding the POWER BUTTON until a message indicating device shutdown appears on the display. - Page 17 OPS-DRD2 USERS MANUAL v1.2 - Hides the Navigation Bar. Click-Swipe upwards from bottom edge of display to un-hide. - Go back one screen. - Go to Home Screen. - Show recent applications. To select a recent app, click the title bar for the application you want to navigate to.
- Page 18 OPS-DRD2 USERS MANUAL v1.2 OPS-DRD2 Recent Application List The Navigation Bar has 3 modes of operation : 1. Enabled : Navigation Bar is always visible unless an application is configured to display content in full screen. 2. Disabled : Navigation Bar is always invisible.
-
Page 19: Restore Factory Defaults
OPS-DRD2 USERS MANUAL v1.2 Navigation Bar Mode Pop-Up Restore Factory Defaults Caution! RESTORING FACTORY DEFAULTS WILL CAUSE ALL INSTALLED APPLICATIONS, DATA AND SETTINGS TO BE LOST. BACKUP ALL IMPORTANT DATA BEFORE CONTINUING. 1. Open the Settings application and click on the “Storage & reset” menu item. - Page 20 OPS-DRD2 USERS MANUAL v1.2 Storage & Reset Screen #1 Storage & Reset Screen #2 20 | P a g e...
- Page 21 OPS-DRD2 USERS MANUAL v1.2 Factory Data Reset Screen #1 Factory Data Reset Screen #2 The OPS-DRD2 unit will shutdown and automatically restart as it restores factory defaults. This process should take approximately 2 minutes. 21 | P a g e...
-
Page 22: Applications
Applications Factory Installed Applications The OPS-DRD2 provides the factory installed applications shown in the figure below. These applications provide basic media player functions such as slideshow displays, video and audio playback as well as content management on internal/external storage. - Page 23 Browser This is the default web browser application. FileManager This application is used to navigate the OPS-DRD2 file system, allowing the user to manage files/folders via create, move, copy and delete operations. Gallery This is an application for displaying image content. Also provides basic slideshow capabilities.
- Page 24 The left side of the screen contains several icons for the various application functions. Media Center App : Main Screen 1. Setup a name for the OPS-DRD2 media player by clicking on Settings and then Target Name. 2. Type in a unique name for the OPS-DRD2 media player.
- Page 25 5. Select the DLNA Server you wish to play content from and then navigate to the media to play. 6. Once selected the media will be streamed from the DLNA Server to the OPS-DRD2 media player. Media Center App : Setup Media Player Name...
- Page 26 Media Stream Casting to OPS-DRD2 In order to cast a media stream to the OPS-DRD2, its Digital Media Receiver needs to be enabled. 1. Select the DLNA_DMR menu item as shown below. 2. Enable the Digital Media Receiver by clicking “Start DMR”.
- Page 27 5. Select the target to cast the stream to. A pop-up window, as shown below will display to show the status/control of the stream. 6. The media stream will now be playing on the OPS-DRD2 target selected. Media Stream Casting to OPS2-DRD2 DLNA Target...
- Page 28 OPS-DRD2 USERS MANUAL v1.2 Gallery Application The Gallery application is represented by the icon shown on the right. It provides facilities for the display of static image content. Preview Pane 1. Open the Gallery by single clicking Gallery icon in the APPS section.
- Page 29 OPS-DRD2 USERS MANUAL v1.2 Gallery App : Preview Pane - Albums Gallery App : Preview Pane - Images 29 | P a g e...
- Page 30 OPS-DRD2 USERS MANUAL v1.2 5. Once a photo is selected, the media viewer will display the photo. From the viewer, you have 3 icons/options available to you. a. The icon on the bottom left will open up the image editor. From here you can Crop, add effects, add borders, and zoom in and out.
- Page 31 OPS-DRD2 USERS MANUAL v1.2 Gallery App : Image Edit Controls 6. To exit the App, simply right click until you are back to the Android desktop 31 | P a g e...
- Page 32 The Miracast application is represented by the icon shown on the right. It provides facilities for receiving wireless display content from a remote device via the WLAN. The OPS-DRD2 is the Miracast Receiver and devices such as smart phones and tablets with wireless display features are Miracast Transmitters.
- Page 33 The OPS-DRD2 should connect and begin receiving the casted audio/video stream. At this point the wireless display functions of the OPS-DRD2 will mirror actions and content from the Miracast Transmitter Device. If the transmit device is rotated, the display of the OPS-DRD2 will also rotate.
- Page 34 OPS-DRD2 USERS MANUAL v1.2 The MoviePlay application is represented by the icon shown on the right. It provides facilities for the display of video content. Navigation Screen 1. Open the application by single clicking the MoviePlayer icon in the APPS section.
- Page 35 OPS-DRD2 USERS MANUAL v1.2 MoviePlayer – Video Selection 5. To display the video controls, left click near the bottom of the video player window. The controls shown below will be displayed and have the behaviors listed as referenced by their respective alpha character index [a, b, c …..].
- Page 36 OPS-DRD2 USERS MANUAL v1.2 MoviePlayer – Controls Screen 1 6. Controls Screen 2 is shown below. It will have the behaviors listed as referenced by their respective alpha character index [a, b, c …..]. Control Screen 1 - This control sends you back to Control Screen b.
- Page 37 OPS-DRD2 USERS MANUAL v1.2 Display Mode - This control sets the aspect ratio of the video playback. Video Information – This control will display information about the current video. h. 3D Mode – This control selects the mode for 3D playback.
-
Page 38: Installing New Applications
OPS-DRD2 USERS MANUAL v1.2 SignageManager Application The SignageManager application is represented by the icon shown on the right. It provides simple, yet powerful facilities for media playback and basic content management, including playlist creation and scheduling Refer to the SignageManager User’s Guide for a detailed description of this application. - Page 39 OPS-DRD2 USERS MANUAL v1.2 Example Application Install Screen Note: If you receive the following error-popup, click SETTINGS and make sure that you enable installation of applications from unknown sources. Application Installation Blocked 39 | P a g e...
-
Page 40: Uninstalling Applications
OPS-DRD2 USERS MANUAL v1.2 Allow Application Installation from Unknown Sources Uninstalling Applications Any installed application that was not provided by the factory can be uninstalled. To do so, left- click and hold the app icon until an “Uninstall” prompt appears at center top of screen. Drag the app over this prompt until it turns red. -
Page 41: Adding/Removing Installed Applications From Desktop
OPS-DRD2 USERS MANUAL v1.2 Adding/Removing Installed Applications from Desktop Applications can be added to the user desktop simply by left-click-holding over the app you want and then dragging it to the desired location on the desktop. Similarly, applications can be added to the bottom task bar area of the main screen by following the same left-click-hold and drag action. - Page 42 OPS-DRD2 USERS MANUAL v1.2 Removing Applications from the Home Screen 42 | P a g e...
-
Page 43: System Configuration
1. Attach Wi-Fi antenna to front panel connector. 2. If attached, disconnect the wired Ethernet cable from the front panel connector. 3. Using the mouse, click on the Settings app on the desktop. OPS-DRD2 Settings Control 1 Screen 43 | P a g e... - Page 44 OPS-DRD2 USERS MANUAL v1.2 4. Click on More Settings. The following screen will be displayed: OPS-DRD2 Settings Control 2 Screen 5. Click on Wi-Fi to show the Wi-Fi Enable/Disable screen. WLAN Enable/Disable Screen (Wi-Fi OFF) 6. Click slider to turn WLAN ON.
- Page 45 11. The Wi-Fi screen will either show “Saved” or “Connected” status as shown below: a. “Saved” indicates that the WLAN security passphrase has been saved, but the connection to the WLAN has not been made. This will occur if the OPS-DRD2 is currently connected to a wired Ethernet LAN.
- Page 46 OPS-DRD2 USERS MANUAL v1.2 WLAN Enable/Disable Screen (Saved) WLAN Enable/Disable Screen (Connected) 12. The status of the WLAN can be accessed via the Settings App at : Network : Wi-Fi : [WLAN-SSID] : Status info 46 | P a g e...
-
Page 47: Lan Configuration
1. Ensure there is no Ethernet cable plugged into the unit. 2. Using the mouse, click on the Settings app on the desktop. OPS-DRD2 Settings Control 1 Screen 47 | P a g e... - Page 48 OPS-DRD2 USERS MANUAL v1.2 3. Click on “Network”. A screen showing network devices will be displayed. Note that Ethernet is Not Connected at this time. Network Device Screen 4. To configure IP Address settings, click on Ethernet : Advanced Options : IP Settings.
- Page 49 6. Once the network configuration is complete, plug the network Ethernet cable into the RJ45 connector on the front panel of the unit. 7. The OPS-DRD2 will automatically connect to the network. You can check for status by clicking Settings : Network : Ethernet.
-
Page 50: Backup And Restore
Backup and Restore A backup and restore of user installed data is available via the OPS-DRD2 Update & Backup App. To launch this app, click on its icon from the applications screen. The main screen will be displayed as shown below. -
Page 51: User Data Restore
2. Click [Restore My Data] to start the automatic restore. The data will be retrieved from the most recent backup database stored on the internal flash of the OPS-DRD2. User Data Restore Screen... -
Page 52: System Software Updates
OPS-DRD2 USERS MANUAL v1.2 System Software Updates The version of system software installed on the OPS-DRD2 media player can be determined via the About menu item within the Settings Application. OPS-DRD2 Firmware Version From time to time product improvements may be made available via a system software update. -
Page 53: Over-The-Air (Ota) Update
An OTA update is a system software update obtained via a wired or wireless network connection to an OTA server. This feature is not supported on OPS-DRD2 and thus the [Online Update] button on the Update & Backup Main Screen should not be used. -
Page 54: Local Update
3. Click [Local Update] from the main screen to start the update process. The OPS-DRD2 will restart and display the Android Update screen. Once complete, the system will return to the main desktop screen. A check of the system software version after an update via the About settings screen will show a new version number is currently installed.
Need help?
Do you have a question about the OPS-DRD2 and is the answer not in the manual?
Questions and answers