Table of Contents
Advertisement
Available languages
Available languages
Quick Links
RED
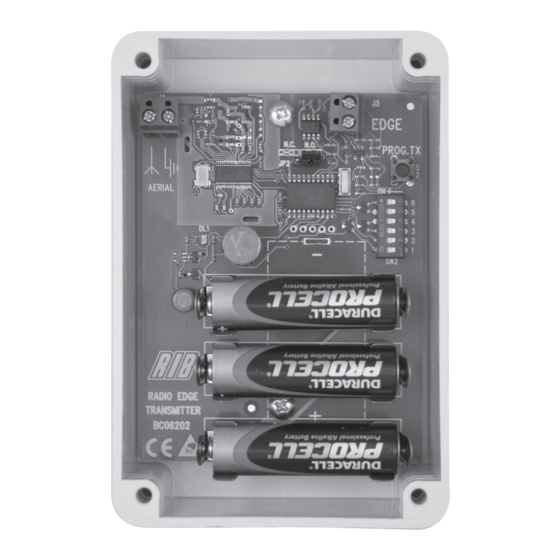
RADIO EDGE DEVICE
TRASMETTITORE RADIO PER COSTE MECCANICHE E RESISTIVE
Dispositivo di protezione PL "c" di Categoria 2
TRANSMETTEUR RADIO POUR BARRE PALPEUSE MÉCANIQUE ET RÉSISTIF
Dispositif de protection PL"c" de Catégorie 2
RADIO TRANSMITTER FOR MECHANICAL AND RESISTIVE STRIPS
PL "c" Category-2 safety system
RADIO SENDER FÜR MECHANISCHE UND RESISTIVE KONTAKTLEISTE
Schutzvorrichtung der PL "c" Kategorie 2
TRANSMISOR RADIO PARA COSTA MECÁNICA Y RESISTIVA
Dispositivo de protección PL "c" Categoría 2
Necessita di 3 batterie AA non incluse - Fonctionne avec 3 piles AA non incluses - 3 AA batteries needed not included - Benötigt 3 AA Batterien nicht beiliegend - Necesita 3 baterías AA no incluidas
ITALIANO pag. 02 / FRANÇAIS pag. 08 / ENGLISH page 14 / DEUTSCH pag. 20 / ESPAÑOL pag. 26
code ACG6202
Scarica questo manuale sul tuo cellulare
Téléchargez ce manuel sur votre mobile
Download this manual on your mobile
Laden Sie dieses Handbuch auf Ihr Handy herunter
Descarga este manual en tu móvil
DA ABBINARE A:
POUR UNE UTILISATION AVEC:
FOR USE WITH:
ZUR VERWENDUNG MIT
PARA USO CON:
MASTER Wi-Fi
code ACG6099
MASTER Wi-Fi OS
code ACG6152
MASTER Wi-Fi FR
code ACG6150
MASTER NO TOUCH 868
SOLO COME SICUREZZA PER PORTA PEDONALE
SEULEMENT QUE COMME SÉCURITÉ POUR PORTE PIÉTONNE
ONLY AS SAFETY FOR PEDESTRIAN DOOR
NUR ALS SICHERHEITSVORRICHTUNG AN DER FUSSGÄNGER-TÜR
SÓLO COMO DISPOSITIVO DE SEGURIDAD DE LA PUERTA PEATONAL
code ACG6154
Advertisement
Table of Contents

Summary of Contents for RED MASTER Wi-Fi
- Page 1 POUR UNE UTILISATION AVEC: MASTER Wi-Fi FOR USE WITH: ZUR VERWENDUNG MIT code ACG6099 PARA USO CON: MASTER Wi-Fi OS code ACG6152 MASTER Wi-Fi FR code ACG6150 MASTER NO TOUCH 868 SOLO COME SICUREZZA PER PORTA PEDONALE SEULEMENT QUE COMME SÉCURITÉ POUR PORTE PIÉTONNE ONLY AS SAFETY FOR PEDESTRIAN DOOR NUR ALS SICHERHEITSVORRICHTUNG AN DER FUSSGÄNGER-TÜR...
- Page 2 RIB, è un dispositivo di protezione PL “c” di Categoria 2. L’installatore deve assicurarsi che RED sia monitorato come specificato nella norma RED permette la realizzazione di un impianto con coste fissate anche sull’anta in EN 12453 al punto 5.1.2 da una centrale elettronica in grado di effettuare un controllo movimento senza dover utilizzare sistemi raccogli cavo.
- Page 3 - PREDISPOSIZIONE IMPIANTO RED può essere installato su diverse tipologie di automazione. Di seguito indichiamo alcune possibilità. NO ! SI ! MASTER Wi-Fi MASTER Wi-Fi NO ! SI ! MASTER Wi-Fi MASTER Wi-Fi NO ! SI ! MASTER MASTER NOTOUCH 868...
- Page 4 È importante l’applicazione di una resistenza (in dotazione, se non già integrata nella del cancello (massimo 2,5 m) e quindi applicare il RED nelle immediate vicinanze. costa) da 8,2 KΩ ed 1/4 di Watt in serie al contatto se viene utilizzato un contatto Possono essere utilizzate coste con contatto N.O.
- Page 5 ON, il LED EDGE PHOT 3 si accenda verde/rosso mentre il led DL2 si spegne, e che - Premere il tasto PROG. TX (S2) sul RED con DIP 2 su ON => il LED EDGE PHOT 2 da il buzzer emetta una serie di toni per 1 minuto.
-
Page 6: Sostituzione Delle Batterie
I led DL2 e DL3 si spengono e MASTER Wi-Fi blocca l’automazione. - premere il tasto S2 PROG. TX sul RED: su MASTER NO TOUCH 868 il led DL1 da verde Il LED EDGE PHOT riferito al RED con batterie completamente scariche o guasto, lampeggiante si spegne. -
Page 7: Caratteristiche Tecniche
Sostituire le batterie del RED in quanto scariche lampeggia verde/rosso Togliendo le batterie dal RED il buzzer non suona Verificare su MASTER Wi-Fi che il DIP EDGE PHOT corrispondente al RED sia su ON CARATTERISTICHE TECNICHE - FREQUENZA 868,3 MHz - SENSIBILITÁ... - Page 8 REFERENCES DES NORMES POUR PORTES ET PORTAILS AUTOMATIQUES tableau électronique RIB, c’est un dispositif de protection PL “c” de Catégorie 2. L’installateur doit s’assurer que RED soit reliée comme spécifié dans la norme EN RADIO EDGE DEVICE permet la réalisation d’une installation avec cordon fixées 12453 au point 5.1.2 à...
- Page 9 - PREDISPOSITION INSTALLATION RED peut être installé sur différentes typologies d’automation. Vous trouverez ci-dessous quelques possibilités. NO ! MASTER Wi-Fi MASTER Wi-Fi NO ! MASTER Wi-Fi MASTER Wi-Fi NO ! MASTER MASTER NOTOUCH 868 NO TOUCH 868...
- Page 10 (maximum 2,5 m) et fixer donc la boîte du NC (en dotation, si elle n’est pas intégrée dans la cordon), ou bien en parallèle au transmetteur RED dans les zones proches. contact NO (voir exemples ci-dessous).
- Page 11 - IDENTIFICATION Chaque RED est livré avec les DIP en OFF pour éviter que les piles se déchargent quand il n’est pas utilisé (si celles-ci sont insérées). Chaque RED doit OBLIGATOIREMENT être identifié de manière unique en positionnant un seul des six DIP (SW2) sur ON.
-
Page 12: Remplacement Des Piles
Le BUZZER émet un son entrecoupé pendant 1 minute, afin d’attirer l’attention de - appuyer sur le bouton S2 PROG. TX sur RED: sur MASTER NO TOUCH 868 la LED DL1 l’utilisateur, qui devra soit changer les piles soit réparer la panne. -
Page 13: Caracteristiques Techniques
Remplacer les piles de la RED car elles sont déchargées clignotera vert/rouge En enlevant les piles de la RD, aucun bip n’est émis Vérifier sur MASTER Wi-Fi que le DIP EDGE PHOT correspondant à la RED soit en position CARACTERISTIQUES TECHNIQUES - FREQUENCE... -
Page 14: Electrical Connections
AUTOTEST. Standard at section 5.1.2 by a control board able to run a self test before the gate/ RED allows to build a safety system made with one or more safety strips fixed to door shuts (AUTOTEST). the moving leaf/shutter without having to use cable-reel. -
Page 15: Installation Options
POINT B - INSTALLATION OPTIONS RED can be installed on several types of automation. NO ! MASTER Wi-Fi MASTER Wi-Fi NO ! MASTER Wi-Fi MASTER Wi-Fi NO ! MASTER MASTER NOTOUCH 868 NO TOUCH 868... - Page 16 It’s strictly necessary to connect a 8.2kΩ 1/4w resistor in series (if the safety strip height (max. 2,5 m) and apply one RED nearby each of them. contact is NC) or in parallel (if the safety strip contact is NO).
- Page 17 1 minute (the time available for recording). LED 3 blinks red/green while LED DL2 turns off, and that the buzzer emits tones for - Push the button PROG. TX (S2) on the RED with DIP 2 in ON position => the EDGE 1 minute.
- Page 18 - Push PROG TX button on the RED to restart the MASTER Wi-Fi. - The buzzer of the MASTER Wi-Fi will turn off and the LEDs DL2-DL3 (if in alarm status) will turn on. The EDGE PHOT LED corresponding to the safety device with the replaced batteries will turn off.
-
Page 19: Troubleshooting
Replace the batteries of the RED as they are empty PHOT LEDs blinks green/red. The buzzer does not sound when the batteries are removed from the strip On the MASTER Wi-Fi, verify that the EDGE PHOT DIP corresponding to the RED is in ON position TECHNICAL FEATURES... - Page 20 13241-1 entspricht. RED Batterie werden ständig überprüft. RIB kann für eventuelle Schäden, die durch unsachgemäßen, falschen oder Das RED ist sowohl für normalerweise offene (NO) als auch für normal geschlossene unvernünftigen Gebrauch des Produktes hervorgerufen wurden, nicht haftbar (NC) Sicherheitsstreifen geeignet.
- Page 21 - VORBEREITUNG DER ANLAGE RED kann auf verschiedenen Automatisierungstypen installiert werden. NEIN ! MASTER Wi-Fi MASTER Wi-Fi NEIN ! MASTER Wi-Fi MASTER Wi-Fi NEIN ! MASTER MASTER NOTOUCH 868 NO TOUCH 868...
- Page 22 Quetschbereich an und bringen Sie jeweils einen ROTEN in der Nähe an. Sicherheitsstreifenkontakt NC ist) oder parallel (wenn der Sicherheitsstreifenkontakt Der RED kann den Kontakt des Sicherheitsstreifens mit normalerweise offenem NO ist) anzuschließen. (NO) oder normal geschlossenem (NC) Kontakt des Sicherheitsstreifens verwalten.
- Page 23 (zum Beispiel: RED Nummer 3). - Drücken Sie die Taste PROG TX (S2) auf dem RED mit DIP1 in der Position ON => Die - Überprüfen Sie ob die EDGE PHOT LED 3 grün blinkt und ob die gekoppelte LED DL2 rot blinkende EDGE PHOT LED 1 leuchtet grün und ein Signal vom Summer zeigt an,...
- Page 24 - Tauschen Sie die Batterien aus und prüfen Sie, ob die Polarität korrekt ist. - Drücken Sie die Taste PROG TX auf dem ROT, um das MASTER Wi-Fi neu zu starten. - Der Summer des MASTER Wi-Fi erlischt und die LEDs DL2-DL3 (falls im Alarmstatus) WARNSTATUS (Batterien austauschen) leuchten auf.
-
Page 25: Fehlerbeseitigung
Ersetzen Sie die Batterien des RED, da sie leer sind EDGE PHOT-LEDs blinkt grün/rot. Der Summer ertönt nicht, wenn die Batterien aus dem Streifen entfernt werden Vergewissern Sie sich im MASTER Wi-Fi, dass der EDGE PHOT DIP, der dem RED entspricht, auf ON steht TECHNISCHE MERKMALE... - Page 26 El transmisor RED puede gestionar bandas de seguridad ya sea con contacto N.O. como N.C. Cada RED posee un código interno propio que lo identifica y lo distingue de los otros. - CONEXIONES ELÉCTRICAS EDGE Conexión contacto banda de seguridad...
- Page 27 - PREDISPOSICIÓN DE LA INSTALACIÓN RED se puede instalar en diferentes tipos de automatización. Aquí tienes algunas posibilidades. NO ! SI ! MASTER Wi-Fi MASTER Wi-Fi NO ! SI ! MASTER Wi-Fi MASTER Wi-Fi NO ! SI ! MASTER MASTER...
- Page 28 Pueden utilizarse bandas de seguridad con contacto N.O. o N.C., por lo tanto, seleccionar mediante el puente JP2 el tipo de contacto utilizado. entra en estado de alarma. Conectar la banda de seguridad al borne J3 del RED. Conexión para BANDA DE SEGURIDAD MECÁNICA R = 8,2 KΩ...
- Page 29 - Compruebe que el correspondiente LED EDGE PHOT 3 parpadea verde y que el - Presione la tecla PROG TX (S2) sobre el RED con el DIP 1 en ON => el LED EDGE respectivo led DL2 se apague momentáneamente y después se vuelva a encender.
- Page 30 1 minuto (tiempo útil para realizar la memorización); avería. - presione la tecla S2 PROG. TX en RED: en MASTER NO TOUCH 868, el LED DL1 Frente a un mando de la puerta, el estado de alarma se renueva por 1 minuto.
-
Page 31: Características Técnicas
El buzzer emite un tono alternado y uno del LED EDGE PHOT parpadea verde/rojo. Quitando las baterías del RED, el buzzer no suena. Verifique sobre MASTER Wi-Fi que el DIP EDGE PHOT correspondiente al RED es en ON. CARACTERÍSTICAS TÉCNICAS... - Page 32 ITALIANO RAEE - Informazione agli utilizzatori Il simbolo del cassonetto barrato riportato sull’apparecchiatura o sulla sua confezione indica che il prodotto alla fine della propria vita utile deve essere raccolto separatamente dagli altri rifiuti. L’utente dovrà, pertanto, conferire l’apparecchiatura giunta a fine vita agli idonei centri comunali di raccolta differenziata dei rifiuti elettrotecnici ed elettronici. In alternativa alla gestione autonoma, è...
- Page 33 NOTES...
- Page 35 Costa meccanica Trasmettitore radio RED Barre palpeuse Transmetteur radio RED Mechanical strip BLOCK Wi-Fi Radio transmitter Mechanische Radio RED - Sender Kontaktleiste Selettore a chiave via radio Transmisor radio RED Costa mecánica Sélecteur à clé via radio Code ACG6202 Code ACG3015 Key Selector operating by radio Funkgesteuerter Schlüsselwählschalter...
- Page 36 DICHIARAZIONE DI CONFORMITÁ - DECLARATION OF COMPLIANCE - DÉCLARATION DE CONFORMITÉ - ÜBEREINSTIMMNUGSERKLÄRUNG - DECLARACIÓN DE CONFORMIDAD R.I.B. S.r.l. - Via Matteotti, 162 - 25014 Castenedolo - Brescia - Italy Tel. ++39.030.2135811 - www.ribind.it - ribind@ribind.it Apparecchio modello : Oggetto della dichiarazione : Modèle d'appareil : Objet de la déclaration : Apparatus model :...
Need help?
Do you have a question about the MASTER Wi-Fi and is the answer not in the manual?
Questions and answers