Advertisement
Available languages
Available languages
Quick Links
MOTORISIERTES GESTELL
FÜR VERSTELLBAREN SCHREIBTISCH
- AUFBAU- & BEDIENUNGSANLEITUNG -
Installationsvideos und Aufbauanleitungen
zu unseren Produkten finden Sie unter
Nutzername: jet-line • Passwort: user2011
Weitere Produkte für Ihr Büro
https://office-shopping.eu
Produkt-Code:
Produkt-Maße:
„AURELIO"
Artikel-Nr.: 12206
www.jet-line-e-trade.de
finden Sie unter
12206
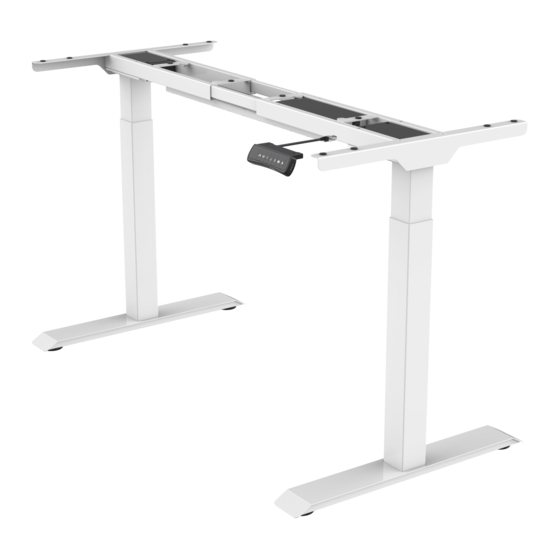
Gesamt-Höhe: ca. 690-1180 mm, Gesamt-Breite: ca. 1100-1900 mm
Advertisement

Related Manuals for Jet-Line AURELIO


Summary of Contents for Jet-Line AURELIO
- Page 1 FÜR VERSTELLBAREN SCHREIBTISCH „AURELIO“ Artikel-Nr.: 12206 - AUFBAU- & BEDIENUNGSANLEITUNG - Installationsvideos und Aufbauanleitungen zu unseren Produkten finden Sie unter www.jet-line-e-trade.de Nutzername: jet-line • Passwort: user2011 Weitere Produkte für Ihr Büro finden Sie unter https://office-shopping.eu Produkt-Code: 12206 Produkt-Maße: Gesamt-Höhe: ca. 690-1180 mm, Gesamt-Breite: ca. 1100-1900 mm...
- Page 2 Technische Daten: Säulen-Anzahl: Max. Tragkraft: 70 kg Max. Tempo: 25 mm/s Niedrigste Position: 710 mm Höchste Position: 1210 mm Min. Platten-Breite: 500 mm Max. Platten-Breite: 800 mm Min. Platten-Länge: 1000 mm Max. Platten-Länge: 1600 mm Arbeits-Zyklus: Dauerbetrieb für max. 2 Min., danach min.
- Page 3 Aufbau in der Übersicht: SCHRITT 1 Verbinden Sie die Standfüße (1) mittels der Schrauben (A) und dem Inbussschlüssel 5x5 (C) mit den Säulen (2) und (3)
- Page 4 SCHRITT 2 Lösen Lösen Sie die Schrauben (4) mittels Inbusschlüssel 4x4 (C) und ziehen Sie den Träger (4) auseinander, sodass dieser der Breite Ihrer Tischplatte Auseinanderziehen entspricht Auseinanderziehen Verbinden Sie den Träger (4) mittels der Schrauben (B) und dem Inbusschlüssel 5x5 (C) mit den Säulen (2) und (3) Ziehen Sie die Schrauben am Träger (4) mittels Inbusschlüssel...
- Page 5 SCHRITT 4 Verbinden Sie die Trägerplatten (6) mittels der Schrauben (A) und dem Inbussschlüssel 5x5 (C) mit den Säulen (2) und (3) SCHRITT 5 Montieren Sie den Schaltkasten (7) und das Bedienpanel (9) Verbinden Sie die Tischplatte mittels der Schrauben (F) und einem Akkuschrauber mit dem Gestell.
- Page 6 Verbinden Sie alle Kabel gemäß folgender SCHRITT 7 Zeichnung mit dem Schaltkasten (7) Öffnen Fixieren Sie alle Verbindungs- kabel wie abgebildet mit dem Kabelmanager (11) Kabel durchführen Fixieren Stromanschluss Stromanschluss Port für das Port für das Bedienpanel Verbindungs- Bedienpanel Verbindungs- kabel zur kabel zur Hubsäule...
-
Page 7: Fehlerbehebung
Fehlerbehebung: Folgende Tipps helfen Ihnen dabei, häufig auftretende Fehler zu erkennen und zu beheben. Sollten Sie mit einem Fehler konfrontiert sein, der nicht in dieser Liste zu finden ist, kontaktieren Sie bitte den Händler, von dem Sie den Artikel gekauft haben. - Page 8 Achtung: 1. Stromversorgung: AC100V-240V, 50/60Hz 2. Funktionstemperatur: 0-40°C 3. Vor der Reinigung den Stecker ziehen, Oberflächen mit einem leicht feuchten Tuch abwischen. Achten Sie darauf, dass keine Feuchtigkeit ins Innere gelangt und lösen Sie nicht die Verbindungen 4. Der Schaltkasten beinhaltet elektrische Komponenten, Metall, Plastik, Kabel usw. und muss gemäß...
- Page 9 Installationsvideos und Aufbauanleitungen zu unseren Produkten finden Sie unter www.jet-line-e-trade.de Nutzername: jet-line • Passwort: user2011 Weitere Produkte für Ihr Büro finden Sie unter https://office-shopping.eu KBW Trading GmbH Gewerbering 2 88518 Herbertingen Deutschland Tel: 07586-921160 Fax: 07586-9211616 E-Mail: info@jet-line.de www.office-shopping.eu...
- Page 10 FOR ADJUSTABLE DESK „AURELIO“ Article-No.: 12206 - INSTALLATION & USER MANUAL - Installation-videos and further instructions for our products can be found on www.jet-line-e-trade.de Username: jet-line • Password: user2011 Further products for your office can be found on https://office-shopping.eu Product-Code: 12206 Product-Dimensions:...
- Page 11 Technical Data: Number of Columns: Max. Load Capacity: 70 kg Max. Speed: 25 mm/s Lowest Position: 710 mm Highest Position: 1210 mm Min. Tabletop-Width: 500 mm Max. Tabletop-Width: 800 mm Min. Tabletop-Length: 1000 mm Max. Tabletop-Length: 1600 mm Duty Cycle: Max.
-
Page 12: Assembly Overview
Assembly Overview: STEP 1 Use the screws (A) and the Allen Key 5x5 (C) to connect the pedestals (1) with the Columns (2) and (3) - Page 13 STEP 2 Loosen Use Allen Key 4x4 (C) to loosen the Screws (4). Then stretch the Support Beam (4) so far that it matches the width of your tabletop Stretch Auseinanderziehen Use the Screws (B) and the Allen Key 5x5 (C) to connect the Support Beam (4) with the Pedestals (2) and (3) Use Allen Key 4x4 (C) to tighten the...
- Page 14 STEP 4 Use Screws (A) and Allen Key 5x5 (C) to connect the Support Plates (6) with the Columns (2) and (3) STEP 5 Install the Control Box (7) and the Hand Switch (9) Use the Screws (F) and an electric drill to mount the tabletop onto the frame Make sure that the outer edge of the tabletop is no more than 20 cm (max.)
- Page 15 Connect all your cables with the Control Box (7) STEP 7 according to the following drawing Tear open Use the Cable Tie (11) to fix all the connection cables on your desk Manage cables Fix them Power port Power port Port for cable Port for cable Hand Switch...
- Page 16 Common Fault Treatment: The following tips will help you detect and solve common faults and errors. If the problem you met is not listed below, please contact your supplier. Only the manufacturer and other professionals are capable to investigate and correct such faults and errors Problem Description Suggested Solution...
-
Page 17: Waste Disposal
Attention: 1. Power Supply: AC100V-240V, 50/60Hz 2. Applicable Work-Temperature: 0-40°C 3. Disconnect the power plug before cleaning. Only use a slightly wet dishcloth to remove dust from the surface. Make sure not to let any moisture enter the internal parts and do not loosen the connectors 4. - Page 18 Installation-videos and further instructions for our products can be found on www.jet-line-e-trade.de Username: jet-line • Password: user2011 Further products for your office can be found on https://office-shopping.eu KBW Trading GmbH Gewerbering 2 88518 Herbertingen Deutschland Tel: 07586-921160 Fax: 07586-9211616 E-Mail: info@jet-line.de...
Need help?
Do you have a question about the AURELIO and is the answer not in the manual?
Questions and answers