Table of Contents
Advertisement
Quick Links
Advertisement
Table of Contents

Summary of Contents for Harmopool Duo
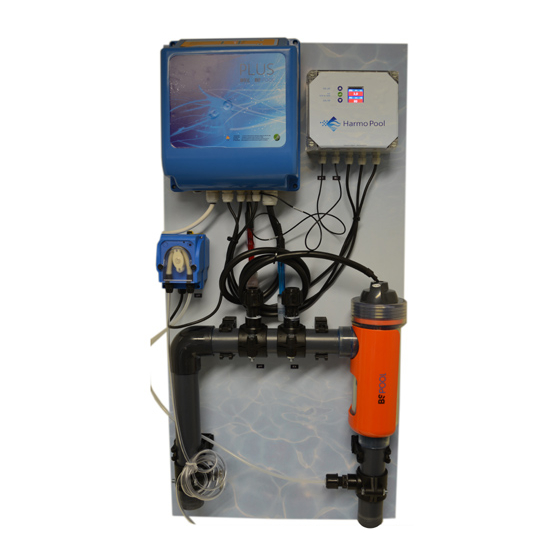
- Page 1 Harmo Pool Duo water treatment system ZWMX0113-P and ZBSX0114-P ...
-
Page 2: Table Of Contents
Table of content Introduction ............................ 3 Characteristics ............................ 3 Specifications ............................ 4 Installation ............................. 4 Installation items .......................... 4 Installation of water treatment plate .................... 5 Setting parameters .......................... 9 Winter ready ............................ 12 Spring startup .......................... 13 Maintenance and inspection ....................... 13 Maintenance ............................. 13 Warnings ............................ 14 ... -
Page 3: Introduction
Introduction This manual contains all of the necessary information for installation, debugging and maintenance. Read the manual thoroughly before opening or using the unit. The manufacturer of this product will not be responsible for damage or damage caused by the product as a result of improper installation or maintenance. -
Page 4: Specifications
Specifications ZWWX0113 ‐P/ ZWWX0114 ‐P PH CONTROL ZWMX2155 Peristaltic pomp CHLORINE CONTROL BSV salt electrolysis ZBSX0003 = ZWMX0113-P ZBSX0004 = ZWMX0114-P POOL CONNECTION 50mm rubber FLOW SWITCH Optional SAFETY DIMENSION PLATE 100 x 50 cm DISPLAY CARD Harmo pool ref ZWMX7010 RELAY CHART Harmo pool ref ZWMX7011 Installation Installation items... -
Page 5: Installation Of Water Treatment Plate
The product must be installed indoors. If you want to do this outside you should contact your supplier The dosing devices must not be used with hydrochloric acid (HCl). Sulphuric acid 15 or 30% must be used. ... - Page 6 3. Connect water inlet and outlet so the water first passes through the redox and pH measuring electrode and then along the salt electrolysis. Preferred installation in bypass configuration: 4. Make the electrical connections in such a way that: ...
- Page 7 5. Start the filter pump 6. Verify that the installation does not leak 7. Stop the filter pump and remove the electrodes from the container and calibrate pH and redox electrodes Attention! a) If you do not have a bypass configuration, close the holes of the electrode holders with a rubber stopper (Product Code: ZFPX4640) that prevents the water from spraying the probe during the calibration b) The electrodes calibration procedure may take several minutes.
- Page 8 1) Dip the measuring heads into the pH (pH7) and Redox calibration fluids (465-468 mV) and give them 5 minutes the time to equilibrate before continuing the calibration process 2) Press pH and Redox for 10 seconds: (A) buttons (upper and lower buttons) separately in to 2 red led;...
-
Page 9: Setting Parameters
If the calibration fails, the LED (B) remains flicker, and the electrode must be changed. If you do not have a bypass configuration, you can insert two rubber caps ZFPX4640 into the electrode holders to avoid water coming out of the electrode holders during the calibration Setting parameters A number of parameters must be set. - Page 10 During 2 minutes, the following happens: o If the PH value is much higher than the setpoint (target), the metering pump always rotates o If the PH value comes closer to the setpoint value, the metering pump goes on and off.
- Page 11 4. PH SP (Setpoint) Press the lower button. The setting "PH SP" is now checked. Press the center button to activate this setting. Now you see a preset value. In order to set the setpoints, navigate to the "Settings" menu.
-
Page 12: Winter Ready
5. Rx SP (Redox Setpoint) The redox is a measure of the chlorine content. In the beginning, we recommend setting the setpoint to 700mV, in the same way as described above for pH. After the first startup, measure the chlorine content using a color method. Change the setpoint for redox (decrease if chlorine is too high, increase if chlorine is too low). -
Page 13: Spring Startup
The electrodes must be stored frost-free, in KCl storage fluid The PVC pipes must be made water-free Spring startup When your dosing equipment protected from winter, use the following steps to complete the system spring: 1. Calibrate the electrodes 2. -
Page 14: Warnings
Warnings Incorrect installation can create an electrical or chemical hazard, which can result in serious injuries Never mix acid and liquid chlorine Keep installation and chemicals out of reach of children. Always wear safety gloves and safety goggles during work on the installation ...
Need help?
Do you have a question about the Duo and is the answer not in the manual?
Questions and answers