Table of Contents
Advertisement
Quick Links
Advertisement
Table of Contents

Summary of Contents for Kyla KCTR-610-WR
- Page 1 SMART CURTAIN EASY START GUIDE...
- Page 3 Thank you for using Kyla product(s)! Please keep this Easy Start Guide for future reference. For support or help, visit kylas.aztech.com DISCLAIMER Aztech Technologies Pte Ltd, its holding company and its associated companies (hereinafter referred to collectively as “Aztech”) does not guarantee that adequate warning or protection will be given, and disclaims all warranties and representations, whether expressed, implied or otherwise statutory, concerning the product, including without limitation any warranty of merchantability or fitness for a particular purpose.
- Page 4 ATTENTION This product is not intended for use by persons (including children) with reduced physical, sensory or mental capabilities, or lack of experience and knowledge, unless they have been given supervision or instruction concerning use of this product by a person responsible for their safety. Children should be supervised to ensure that they do not play with this product.
-
Page 5: Package Contents
PRODUCT DESCRIPTION The Smart Curtain Motor, controllable via the Kyla app on a mobile device or the curtain remote control, provides improved flexibility over traditional manual curtains. The curtain can be adjusted to open or close based on different scene settings, in accordance to the comfort and environment of the user. -
Page 6: Specifications
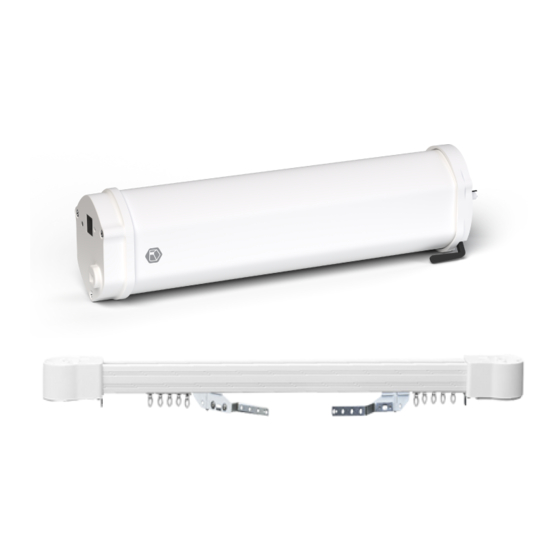
SPECIFICATIONS Model: KCTR-610-WR Input: 100–240 VAC, 50–60 Hz Maximum Current: 0.2 A Maximum Power: 45 W Operating Temperature: -20–70°C Operating Humidity: ≤ 85% RH Connectivity: 2.4 GHz WiFi, RF 433 MHz Track Length: 1/2/4 m Maximum Load: 50 kg (Curtain with 4m Track) Rated Torque: 1.5 N.m... - Page 7 STRUCTURE AND INSTALLATION KIT Belt Sub box Track Master box Lock Lock Hanger Pulley Hook Master box Sub box Pulley Ceiling bracket Belt Track Curtain motor Hanger Lock Splice Connector Single track bracket Double track bracket...
- Page 8 INSTALLATION GUIDELINES ATTENTION: The minimum installation distance from the bottom of the Smart Curtain to the floor is 2.5m Single track Duel tracks (fabric and silk curtains) Double track (two curtains) Distance between two brackets ≤ 500mm Ceiling bracket...
- Page 9 INSTALLING THE CURTAIN TRACK Attach the buckle and clip at the end Attach the pulley on the buckle. Slide the pulley through the track. Detach both the buckle and pulley of the belt. from the belt.
- Page 10 INSTALLING THE CURTAIN TRACK Place the gear into the end cap. Insert the belt into the end cap Place the buckle and pulley at the end Attach the end cap to the track. through the gear. of the belt. Then slide the pulley until it reaches the tip of the track.
- Page 11 INSTALLING THE CURTAIN TRACK Measure 12cm belt between the front Slide the pulley out until the belt Gently remove the end cap from the Joint two pulley with a metal nut end of the belt and the front end of (measured at 12cm) reaches the tip track with the belt being pulled out holder.
- Page 12 INSTALLING THE CURTAIN TRACK Assemble the metal plate onto the Attach two buckles onto the track with Attach the assembled piece in step 13 Slide the pulley through the track and pulley. one teeth gap. onto the buckle. attach back the end cap.
- Page 13 INSTALLING THE CURTAIN TRACK Insert the belt through the gear box. Attach the buckle at the tip of the belt. Attach another buckle on the other Slide the pulley through the track and tip of the belt and joint the 2 ends attach the front end simultaneously.
- Page 14 INSTALLING THE CURTAIN TRACK Insert 8 curtain rings into the track for Screw in all the remaining metal both sides. (Total 16 pieces). pieces on both sides to cover the gear boxes and lock the curtain rings.
- Page 15 INSTALLING THE CURTAIN MOTOR Check and keep the lock lever on the Attach the motor to the master box. Push the lock lever to the right to the CAUTION: left. lock the attachment. • Ensure the lock lever is in the correct position as illustrated.
- Page 16 REMOVING THE CURTAIN MOTOR Push the lock lever to the left to unlock Detach the motor from the master CAUTION: the curtain motor. box. • Ensure the lock lever is in the correct position as illustrated. • The ceiling must be strong enough to support the track, motor and curtain.
-
Page 17: Led Status Indicator
OVERVIEW Power cable Red LED indicator RJ22 Connector Port Reset/Pairing button LED STATUS INDICATOR RESET / PAIRING BUTTON ACTION RESULT STATUS Device is in Remote Control Pairing Mode Press Once Blink continuously NOTE: Red LED will blink for approximately 30 seconds before connection time-out. Device is in WiFi Pairing Mode Press and hold for at least 5 seconds Blink continuously... -
Page 18: Resetting The Device
4. From the app, select Add Device > Curtains and Roller Blind > Smart Curtain > Search Device > Kyla-CurtainMotor-xxxx 1. Download and login to Kyla App from Google Play/App Store. Requirement: NOTE: If the device is undetectable, reset the device and try again. After pairing •... - Page 20 © 2020 Aztech Technologies Pte Ltd. All rights reserved.
Need help?
Do you have a question about the KCTR-610-WR and is the answer not in the manual?
Questions and answers