Table of Contents
Advertisement
M
M
M
M
M
M
M
M
M
a
a
a
a
a
a
a
d
d
d
d
d
d
d
e
e
e
e
e
i
i
i
n
n
n
n
n
G
G
G
G
G
G
G
G
e
e
e
e
e
e
r
r
r
r
r
r
m
m
m
m
m
m
a
a
a
a
a
n
n
n
n
n
y
y
y
y
y
Barograph User's Manual
p
p
p
p
p
p
p
r
r
r
r
r
r
r
e
e
e
e
e
e
e
e
s
s
s
e
e
e
e
e
e
e
e
n
n
n
n
n
n
n
t
t
t
t
e
e
e
e
e
e
e
e
e
e
d
d
d
d
d
b
b
b
b
b
b
b
b
b
b
b
b
y
y
y
y
y
y
y
y
y
y
y
y
Advertisement
Table of Contents

Related Manuals for FISCHER 225

Summary of Contents for FISCHER 225
- Page 1 Barograph User’s Manual...
- Page 2 English Edition Copyright ©, 2011 Feingeratebau K. Fischer GmbH (Germany) Feingerätebau K.Fischer GmbH Fischer USA Venusberger Straße 24 3050 NW 63rd St D-09430 Drebach Seattle, WA 98107 Germany Tel +49 (0) 37341 / 487-0 Tel +1 206-783-1414 Fax +49 (0) 37341 / 487-30 Fax +1 206-783-9209 Email info@meteoclima.de...
- Page 3 ® Barograph User’s Manual...
-
Page 4: Table Of Contents
Barograph User’s Manual ® Table of Contents 1. General Information ..................5 2. About Barographs ..................5 2.1 Mechanical Diagram ................6 2.2 Technical Data ..................7 2.3 Model Specifications ................8 3. Unpacking the Barograph ................10 4. Start Up ..................... 11 4.1 Setting the Drum Revolution Cycle ............ -
Page 5: General Information
® 1. General Information This manual contains important information about the function, start-up, and maintenance of Fischer Barographs. Please review all of the information before initial use of the barograph. For the barograph to function as intended, all instructions in this manual must be followed in detail. If the instructions are not followed closely, operational malfunctions may occur. -
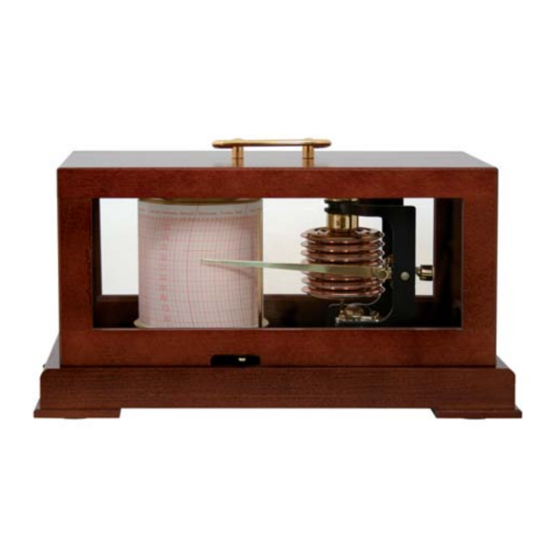
Page 6: Mechanical Diagram
Barograph User’s Manual ® 2.1 Mechanical Diagram 13. Housing lock 1. Precision Movement 14. Disengaging rod release 2. Socket 15. Pen-arm 3. Grub screw set 16. Fiber pen 4. Pressure adjustment screw 17. Disengaging rod 5. Upper telescope case 18. Clockwork 6. -
Page 7: Technical Data
Chart paper write range 80 mm; resolution 1 hPa (inches charts also available) Materials Transmission system: brass matte-chromium-plates, axles in chrome-plated steel Movement stand: aluminium (2S5/267M Brass polishes) Housing cover part : 225 / 227 aluminium and chrome-plated steel X5CrNi1810, corrosion resistant, other models, polished wooden cases Accessories Additional chart paper... -
Page 8: Model Specifications
Dimensions 290 x 145 x 190 mm (11.4” x 5.7” x 7.5”); weight 2.5 kg (5.5 lbs) Model 225 Mechanical wind-up clockwork. Runs in 2 modes: daily or weekly. Model 225Q Quartz clockwork. Runs in 3 modes: daily, weekly, and monthly. - Page 9 Barograph User’s Manual ® “Admiral’s Choice” Models 265, 267 Housing made of beech hardwood with a mahogany stain finish. Glazing cut glass with beveled edges. Base plate and movement of polished brass; includes front drawer for charts and pens. Dimensions 345 x 190 x 185 mm (13.6”...
-
Page 10: Unpacking The Barograph
Warning: Be sure to remove all accessories (chart paper, fiber-pens, battery, and clock- work key) from the package before discarding it. To open the housing, move the housing lock (13) to the left and raise the lid. For models 225/227 move the housing lock to the left and right. -
Page 11: Start Up
Barograph User’s Manual ® Connect the decoupled pieces by inserting the pins in the slots provided. The weight of the pen-arm will keep it in place. 4. Start Up The following instructions will prepare you for the initial start up of the barograph including setting the drum revolution cycle, winding the mechanical clockwork or setting the quartz clockwork, and begin- ning recording. -
Page 12: Mechanical Clockwork
Barograph User’s Manual ® 4.2. Mechanical Clockwork To remove the drum, insert the clockwork key in the drum and turn the key in a clockwise motion. Us- ing both hands, place fingers underneath the edge of the drum and lift it off the clockwork. After that, the revolution cycle can be set by inserting the gear wheel in the desired orientation (daily or weekly). -
Page 13: Quartz Clockwork
Barograph User’s Manual ® 4.3. Quartz Clockwork Using both hands, place fingers underneath the edge of the drum and lift it off the clockwork. After that, the revolution cycle can be set by moving the red gear wheel to the desired position (daily, weekly, or monthly). -
Page 14: Starting The Barograph
Barograph User’s Manual ® 4.4. Starting the Barograph For instructions on attaching the chart paper see section 5.3 Replacing the Chart Paper. The Barographs are supplied with two fiber pens. Each pen should last 6 to 8 months under normal usage. -
Page 15: Maintenance
Barograph User’s Manual ® 5. Maintenance The following instructions will detail the proper maintenance procedures to insure that the barograph functions to its full potential. 5.1. Winding the Mechanical Clockwork The mechanical clockwork can last on its own for at least 1 week. After that the clockwork must be re- wound in its entirety. -
Page 16: Replacing The Chart Paper
Barograph User’s Manual ® 5.3. Replacing the Chart Paper At the end of the drum revolution cycle, move the pen-arm away from the drum using the lever at- tached to the Disengaging rod (see section 2.1 Mechanical Diagram). Then remove the recording drum from the clockwork. -
Page 17: Setting The Correct Local Pressure
Barograph User’s Manual ® 5.4 Setting the correct local pressure Your barograph will provide accurate pressures to within ± 0.7 hPa, but it is best to check the pres- sure at first installation and adjust the pen position as needed. Local airports or weather services offer pressure values as do some newspapers. -
Page 18: Troubleshooting
Barograph User’s Manual ® 5.6 Troubleshooting Error Possible Cause Solution The fiber pen is not touching the Move lever to the right. recording drum. The protective case has not been Remove the protective case. The barograph is not removed from the fiber pen. recording Dampen the pen with a drop of The fiber pen has dried up. -
Page 19: Eec Conformity
Barograph User’s Manual ® 6. EEC Conformity We hereby confirm that the barographs series 205/207, 225/227, 215/217, 265/267, 285/287 conform to the following regulations: EEC guideline on electromagnetic compatibility 89/336/EWG as modified by guideline 92/31/EWG. Further EU guidelines have not been established for the equipment. -
Page 20: Liability Limitations
No liability is assumed by Feingeratebau K.Fischer GmbH for damages and/or Injury resulting from use of equipment supplied by this company. In no event will Feinieritebau K. Fischer be liable for indirect or consequential damages whatsoever resulting from loss of use, data or profits arising out of connection with the use or performance of Feirtgeritebau K. -
Page 21: Appendix 1. Pressure Corrections For Elevation
Barograph User’s Manual ® Appendix 1. Pressure corrections for Elevation Elevation Correction Elevation Correction Feet Meters hPa = mb Feet Meters hPa = mb 1200 43.2 1250 44.9 1300 46.7 1350 48.5 1400 50.2 1450 52.0 1500 53.7 1600 57.2 1700 60.7 1800...
Need help?
Do you have a question about the 225 and is the answer not in the manual?
Questions and answers