Advertisement
Quick Links
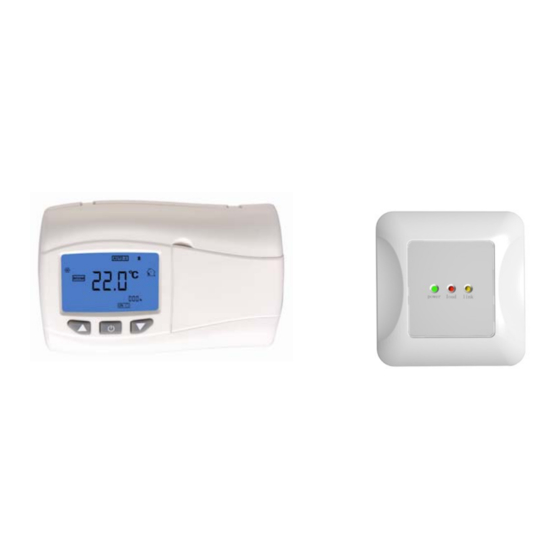
R205 Series Wireless heating Thermostat
R205 LCD Heating Thermostat
1.General
R205 is a Radio Controlled Room Thermostat which requires no wiring and can be fitted in any normal operating
enviroment within a typical 30 meter range of the TR205 RF Transceiver. It is available for Non-programmable and
Programmable.
AC819 Transceiver should be mounted on a vertical flat surface near the boiler or centrial heating wiring centre.
Do not place it too close to objects which might interfere with the radio signal. It is preferable to mount the
transceiver such that an imaginary straight line between it and the transmitter thermostat is not obscured by the
boiler or any other large metal objects.
2. Model
R205GA: 5A
R205GB: 16A
3.Technical data
2-1. Work Voltage: 3V±0.2V(DC)
2-2. Consumption: <1.5W
2-4. Accuracy: ±0.5ºC
2-6. Timing Error: <1%
2-8. Dimension: 136mm x 90mm x 30mm
2-9. Power Supply for Transceiver: 220VAC±10%,50/60 HZ
4. Sizes
Thermostat Size: 136mm x 90mm x 30mm
4. Wiring
AC819 Transceiver
2-3. Load Current: <16A
2-5. Set-point Range: 5.0ºC - 30.0ºC
2-7. Rated Power: <200W
Transceiver Size:86mm x 90mm x 20mm
Note: we won't provide batteries.
Advertisement

Summary of Contents for Arduino R205 Series
- Page 1 R205 Series Wireless heating Thermostat R205 LCD Heating Thermostat AC819 Transceiver 1.General R205 is a Radio Controlled Room Thermostat which requires no wiring and can be fitted in any normal operating enviroment within a typical 30 meter range of the TR205 RF Transceiver. It is available for Non-programmable and Programmable.
- Page 2 R205 Series Wireless heating Thermostat 5. Installation Instruction 5-1. Use a small size screwdriver (approx. 3.5 mm 5-2.Turn up the screwdriver with a little pressure, width) insert to the notch of LCD Display unit about 4 and open the LCD unit 5-3.
- Page 3 R205 Series Wireless heating Thermostat 7. Symbols Power:Power on/off. : Manual mode setting :Programmable mode setting : Time adjusting. The order is Min – Hour – Week P: Function. Press P into week programmable : Confirm Menu Setting and Menu Save.
- Page 4 R205 Series Wireless heating Thermostat 9. Senior setting During power off, press and hold P for 3 sec. into Serior option setting. It includes temperature correction, Weekend setting, IP High address and Low address of 485 communication. Then press P changeover into the relative item.
Need help?
Do you have a question about the R205 Series and is the answer not in the manual?
Questions and answers