Table of Contents
Advertisement
Quick Links
Advertisement
Table of Contents

Related Manuals for Xoro HRS 8760 CI+


Summary of Contents for Xoro HRS 8760 CI+
- Page 1 HRS 8760 CI+ User manual (EN)
-
Page 2: Table Of Contents
Inhalt (EN) Content Safety Precaution ..................3 Reference ....................4 General Features ..................4 Accessories ..................... 4 Product Overview ..................5 Front Panel ..................... 6 Rear Panel ....................7 Remote Control Unit (RCU) ..............8 Installation ....................10 Powering On ..................10 Initial setting .................. - Page 3 Media Player ..................13 REC Setting ....................17 PVR Storage Setting ................17 PVR Setting ..................17 Basic Operation ..................17 Audio ..................... 17 EPG ...................... 17 Subtitle ....................17 TXT ....................... 17 Channel List ....................18 OK List ....................18 Favorite List ..................
-
Page 4: Safety Precaution
Safety Precaution This STB has been designed and manufactured to satisfy the international safety stan- dards. Please read the following safety precautions carefully before operating this re- ceiver. Main Supply: Before operating, please check the units operating voltage is 230V AC 50/60Hz. Overload: Do not overload a wall outlet, extension cord or adapter, neither use damaged power cord or touch it with wet hand as this may result in electric shock. -
Page 5: Reference
Reference General Features • DVB-S2 Compliant (MPEG-II/ MPEG-IV/ H.264) • Auto Search supported • PAL/NTSC Conversion • True full Color (16 bits) on screen display (OSD) • Storing memory: 5000 channels • Favorite group and parental lock supported • CI/CI+ supported •... -
Page 6: Product Overview
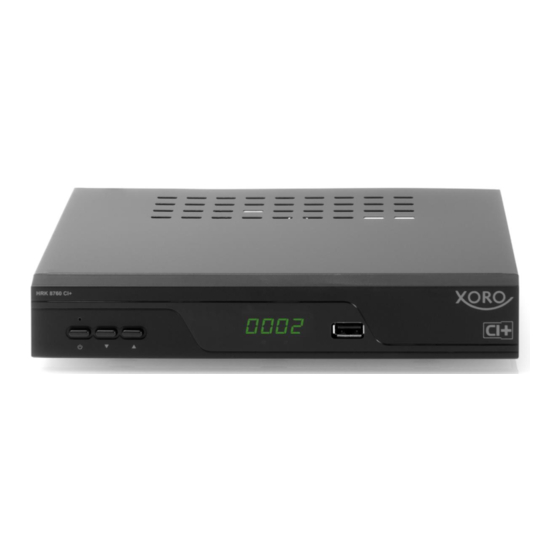
Product overview Front panel (HRS 8760 CI+) 1. Power button Switch between operation and standby modes. 2. Power LED Power indicator 3. ▲ /▼ Change channel in viewing mode and move the cursor up/down in menu mode. 4. Display It displays channel information. In standby mode it displays local time. 5. -
Page 7: Rear Panel
Connections Rear panel (HRS 8760 CI+) CI/CI+ slot LNB in HDMI in AV out S/PDIF (Digital Audio Coaxial) Power cable USB 2.0 (USB 2) Note: Disconnect all devices from the power supply before making or disconnecting cable connections to other devices. Connect to satellite antenna Connect the cable from your satellite receiver to the LNB IN of the receiver. -
Page 8: Remote Control Unit (Rcu)
Remote Control Insert the battery and operating radius • Insert the batteries into the compartment. Please ensure correct polarity (+/-) when inserting the battery. • Slide the battery door open again. • Always point the remote control at the remote sensor (remote control receiver). The distance to the device should not be more than 5 meters and the operating angle should not be greater than 60 °... - Page 9 Remote Control Unit (RCU) 1. Power button 2. Mute button 3. USB: Browse PVR data in USB device 4. TIMER: 5. SUB-T: Display the subtitle language list 6. AUDIO: Display the audio list 7. ⊳⊳: Fast rewind. : Fast forward. 9.
-
Page 10: Installation
Installation You should install the receiver when powering on your product for the first time after pur- chase. Tip: The default password is 0000. If you have forgotten your password, please contact your local product distributor. Powering On 1. Connect the power cord of the product to a wall outlet. 2. -
Page 11: Edit Channel
Program Edit TV Channel List Edit Channels enables you to move, delete, skip the channels in the channel list conven- iently, and set favorite. : Radio Channels operation similar to the TV Channels. System Setup OSD Language Enter OPTION menu, you can set the OSD Language, Audio Language, Subtitle Lan- guage. -
Page 12: Parental Lock
Let you install a new software version on the device. This of course must be connected to a USB HDD or memory stick with the update file in the root directory. Upgrade & Save Visit www.xoro.de to get update Firmware. EN-12... -
Page 13: Media Player
Media Player Media Player Menu->APPLICATIONS->Media Player It’s Media Player. It can play many kinds of media files, you also can record channels and playback them and you can do various operations when using USB HDD or USB stick. You can press VOL+/VOL- button to change media type in Image/Video/Record/Music. Photo If you want to display pictures with the HRS 8760 CI +, select the menu item... - Page 14 Music If you want to play music with the HRS 8760 CI +, select the Music menu item with the ◄ / ► buttons. After successfully reading the USB memory, the directory structure is dis- played in the file browser. Use the ◄...
- Page 15 Video If you want to display videos with the HRS 8760 CI +, select the menu point Movie with the ◄ / ► buttons. After successfully reading the USB memory, the directory structure is displayed in the file browser. Use the ◄ / ► / ▲ / ▼ buttons to select the desired file and open it with the OK button. The first video file is previewed.
- Page 16 Video Video Playback >> |: Switch to the next piece of video | <<: Switch to the previous piece of video ► / ||: Play / Pause the video playback Exits the video playback ■: <<: fast return >>: fast forward Slow motion: Play slow motion Setting the repeat mode (single, folder, random folder)
-
Page 17: Rec Setting
REC setting PVR Storage Setting Menu->OPTION->PVR File System->Select Disk You can press OK button to see the selected partition information of USB HDD or mem- ory stick. If you are connecting 2 USB device, then press to change USB device. ◄... -
Page 18: Channel List
Channel List This chapter will help you manipulate the channel list. OK List 1) Press the OK button to enter the channel list while watching a program. 2) Press the ◄ /► button to switch the Radio list / FAV group. 3) Press the CH+/CH- button to move the highlighting, and press OK button to watch the highlighting channel. - Page 19 Timeshift Timeshift Timeshifte allows you to pause a live broadcast and return to it later and continue where you left off. In order to use the Time Shift function, you must navigate to EPG->Time Record (green button)->Timer Setting. And the timeshift will start automatically while play the program. CAM Module If you want to watch Pay-TV, then you need a CAM module with the appropriate subscrip- tion card.
-
Page 20: Additional Information
Additional Information Trouble Shooting Before contacting your local service centre, please read the tips below carefully. If the problem persists after completing the following procedure, please contact your local product distributor or service centre for further instructions. 1. No message displayed on the front display. (The product will not switch on.) •... -
Page 21: Limited Warranty
RMA No. to following address. Please note the RMA number clear and in large numbers on the outer package. MAS Elektronik AG Weidegrund 3 21614 Buxtehude Germany Support e-mail: support@ersservice.de Hotline: +49 (0)4161 800 24 24 Fax: +49 (0)4161 800 24 61 Internet: www.xoro.de/service EN-21...
Need help?
Do you have a question about the HRS 8760 CI+ and is the answer not in the manual?
Questions and answers