Advertisement
Quick Links
5067668C
www.simu.com
FR NOTICE
EN INSTRUCTIONS
DE ANLEITUNG
TIMER MULTI
A
a
= OFF
1/2
b
c
i
j
d ( )
e ( )
= ON
2/2
k
m
l
f
n
p
o
r
q
18 mm
47 mm
g
45°C
3 mm max.
h
0°C
IP20
Ø3 mm
www.timer-multi.com
FR - Par la présente, SIMU déclare que l'équipement radio couvert par ces
instructions est conforme aux exigences de la Directive Radio 2014/53/
UE et aux autres exigences essentielles des Directives Européennes
applicables. Le texte complet de la déclaration UE de conformité est
disponible sur www.simu.com.
EN- SIMU hereby declares that the radio equipment covered by these
instructions is in compliance with the requirements of Radio Directive
2014/53/EU and the other essential requirements of the applicable
European Directives. The full text of the EU declaration of conformity is
available at www.simu.com.
DE- SIMU erklärt hiermit, dass das in dieser Anleitung beschriebene
Produkt die Anforderungen der Funkanlagenrichtlinie 2014/53/EU sowie
die grundlegenden Anforderungen anderer geltender europäischer
Richtlinien erfüllt. Der vollständige Text der EU-Konformitätserklärung ist
unter der Internetadresse www.simu.com verfügbar.
SIMU S.A.S. au capital de 5 000 000 € - Zone Industrielle Les Giranaux -
70100 ARC-LÈS-GRAY - FRANCE - RCS VESOUL B 425 650 090 - SIRET
425 650 090 00011 - n° T.V.A CEE FR 87 425 650 090
B
= ON
= OFF
1 s
D
5.
5.
1
2
Mise en service : Après la mise en place des piles et l'appui sur une touche, "YEAR/SET/2010"
FR
s'affichent. Pour effectuer le réglage de l'horloge maintenant, faire les opérations 7.2 à 7.11, pour
effectuer ce réglage ultérieurement, appuyer 3 s. sur la touche de validation (●).
1
Présentation
a. Témoin d'émission
Caractéristiques techniques
b. Mode réglage actif
- Compatible avec les récepteurs & moteurs
c. Témoin de piles faibles
- Niveau de sécurité : classe III
d. Touche de validation (●)
- Alimentation : 2 Piles 1,5 V, type AAA (LR03).
e. Touches de défilement (◄,►)
- Bande fréquence d'émission : 433,050 MHz -
f. Touches de commande (▲, ■, ▼)
434,790 MHz F: 433,420 MHz. Puissance maximale
g. Bouton de programmation (PROG)
transmise : ERP < 10 mW
h. Support mural
- Portée radio (en milieu normalement pollué): 20 m à
travers 2 murs de béton armé, 200 m en champ libre.
Affichage mode manuel
:
= OFF
i. Nom du canal sélectionné
Sécurité et responsabilité
j. Numéro du canal sélectionné
Responsabilité : Ces notices doivent être conservées
Affichage mode automatique
= ON
:
par l'utilisateur. Le non respect de ces instructions ou
k. Heure courante
l'utilisation du produit hors de son domaine d'application
l. Jour de la semaine
est interdit et entraînerait l'exclusion de la responsabilité et
m. Mode simulation de présence actif
de la garantie SIMU. Ce produit SIMU doit être installé par
n. Programmes mémorisés
un professionnel de la motorisation et de l'automatisation
de l'habitat. L'installateur doit par ailleurs, se conformer
o. Fonction crépuscule active
aux normes et à la législation en vigueur dans le pays
p. Heure du prochain ordre
d'installation, et informer ses clients des conditions
q. Canaux sélectionnés pour le prochain ordre (1>6)
d'utilisation et de maintenance du produit. Avant toute
r. Prochain ordre de commande
installation, vérifier la compatibilité de ce produit avec les
équipements et accessoires associés. Si un doute apparaît
lors de l'installation de ce produit et/ou pour obtenir des
L'émetteur Hz TIMER MULTI (6 canaux) permet de
informations complémentaires, consulter un interlocuteur
commander jusqu'à 6 moteurs ou groupes de moteurs/
SIMU ou aller sur le site www.simu.com.
récepteurs de la gamme SIMU- Hz. Deux modes de
Consignes de sécurité : Dans le cas d'utilisation avec un
fonctionnement sont possibles :
moteur, se reporter également aux instructions de celui-ci.
- Mode manuel (
) : Les touches ◄ et ► permettent
= OFF
Ne pas installer ni utiliser le produit à l'extérieur. Ne pas
de sélectionner le canal d'émission et les touches ▲, ■ et
laisser le produit à la portée des enfants. Ne pas utiliser
▼ de commander les moteurs. Il est possible d'attribuer
des produits abrasifs ni de solvants pour le nettoyer. Ne
un nom (5 caractères alphanumériques max.) à chacun
pas exposer le produit à des chocs ou des chutes, à des
des 6 canaux (§6). Les programmations du mode
matières inflammables ou à une source de chaleur, à
automatique sont désactivées.
l'humidité, à des projections de liquide, ne pas l'immerger.
- Mode automatique (
) : L'horloge intégrée permet
= ON
de mémoriser jusqu'à 6 programmes automatiques
Avertissement : Ce produit contient des
(commandes▲, ▼ et position intermédiaire*) pour
piles bâtons. Ne pas avaler la pile : risque de brûlures
chacun des jours de la semaine. Les touches ◄ et ►
chimiques en à peine 2 heures pouvant être mortelles.
permettent de visualiser les programmes mémorisés. Les
En cas d'introduction de la pile dans une partie du corps
touches ▲, ■ et ▼ ne permettent pas la commande des
ou en cas de doute, appelez immédiatement un médecin.
Tenir hors de portée des enfants les piles (neuves et
moteurs. La fonction crépuscule
calcule, en fonction
usagées) et le produit. Si le compartiment pile ne ferme
des valeurs renseignées (7.8 à 7.11), un horaire différent
plus, ne plus utiliser le produit et le tenir hors de portée
pour toute l'année afin que l'exécution d'un programme
des enfants. Risque d'explosion, de fuite de liquide ou
suive le crépuscule (voir § 7 INFO). La fonction
de gaz inflammables de la pile si elle est maintenue à
simulation de présence
fait varier aléatoirement
haute température (four chaud, feu), écrasée, coupée,
l'horaire de déclenchement des programmes de 0 à +30
ou soumise à une pression de l'air extrêmement faible.
minutes afin de simuler une présence dans l'habitation.
Les batteries non rechargeables ne doivent pas être
* Non disponible sur les récepteurs Hz.
rechargées.
2
Installation
Ce produit ne doit pas être installé à une hauteur supérieure à 2 m.
Éloigner l'émetteur de toutes surfaces métalliques qui pourraient nuire à son bon fonctionnement (perte
de portée). L'utilisation d'appareil radio utilisant les même fréquences peut dégrader les performances de
notre produit.
3
Changement de mode de fonctionnement
Pour passer du mode automatique au mode manuel (et inversement), appuyer brièvement sur la touche ●.
Pour les opérations des chapitres §4, §5 et §6, l'émetteur doit être en mode manuel.
4
Programmation de l'émetteur sur une installation existante (mode manuel)
4.1- Appuyer 3 s. sur la touche PROG de l'émetteur de commande individuelle.
4.2- Sélectionner le canal de l'émetteur TIMER MULTI à programmer grâce aux touches de défilement ◄ et ►.
4.3- Appuyer 1s. sur le bouton PROG de l'émetteur TIMER MULTI. L'opération est terminée.
5
Utilisation de l'émetteur TIMER MULTI (mode manuel)
5.1- Sélectionner un canal avec les touches de défilement ◄ et ►.
5.2- Appuyer ensuite sur la touche correspondant à l'ordre de commande souhaité (▲, ■, ▼).
6
Identification des canaux (mode manuel)
6.1- Sélectionner un canal avec les touches de défilement (◄, ►).
6.2- Appuyer 3 s. sur la touche de validation ● pour activer le mode réglage.
6.3- Sélectionner l'emplacement du caractère à éditer avec les touches de défilement (◄, ►).
6.4- Appuyer 1 s. sur la touche de validation ● pour éditer un caractère à cet emplacement.
6.5- La lettre A clignote, pour modifier le caractère, appuyer sur les touches de défilement (◄,►).
6.6- Pour enregistrer le caractère affiché, appuyer 1 s. sur la touche de validation ●.
Répéter les opérations 6.3 à 6.6 pour chacun des caractères composant le nom du canal.
6.7- Pour quitter le mode réglage, appuyer 3 s. sur la touche de validation ●.
C
4.
1
= OFF
= ON
1 s
E
= OFF
6.
6.
1
First use: After the installation of the batteries, press on any key. "YEAR/SET/2010" is
EN
displayed. To start the clock setting, make operations 7.2 to 7.11. To do the setting later,
press 3 seconds on the validation key (●).
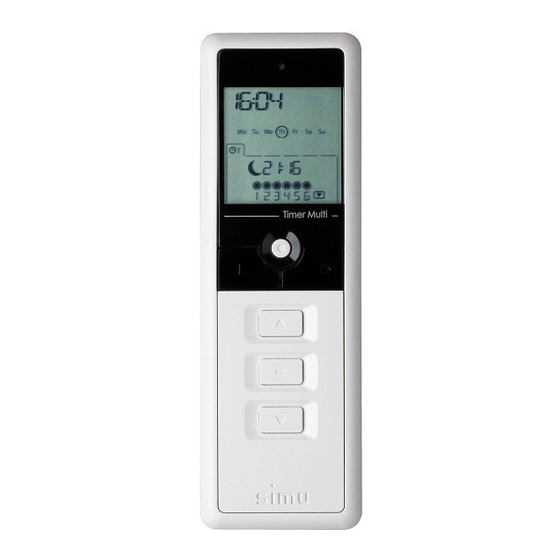
Figure A
1
Presentation
a. Transmission LED
Technical data
b. Setting mode
- Compatible with motors & receivers
c. Low batteries indicator
- Safety level : class III
d. Validation key (●)
- Power supply : 2 batteries 1,5 V, typ AAA (LR03).
e. Selection keys (◄,►)
- Frequency range: 433,050 MHz – 434,790 MHz
f. Control keys (▲, ■, ▼)
F: 433,420 MHz. Max power used: ERP < 10 mW.
g. Programm key (PROG)
- Radio range (in normal pollution condition): 20 m
h. Wall bracket
throught 2 concrete walls, 200 m in open space.
Manual mode display
:
= OFF
i. Channel name
Safety and liability:
j. Selected channel number
Liability: These instructions must be kept by the
Automatic mode display
= ON
:
user. Failure to follow these instructions or use
k. Current time
of the product outside its field of application is
l. Day of the week
forbidden, and will invalidate the warranty and
discharge SIMU of all liability. This SIMU product
m. Random function
must be installed by a professional drive and home
n. Memorized control
automation installer. Moreover, the installer must
o. Twilight function
comply with the standards and legislation currently
p. Time of the next order
in force in the country in which the product is being
q. Selected channel for the next order (1>6)
installed, and inform his customers of the operating
r. Next control
and maintenance conditions for the product. Never
begin installing without first checking the compatibility
of this product with the associated equipment and
The Mobile Hz transmitter TIMER MULTI (6 channels)
accessories. If in doubt when installing this product
can control up to 6 motors or groups of motors/
and/or to obtain additional information, contact a
receivers of the SIMU-Hz range. Two operating modes
SIMU adviser or go to the website www.simu.com.
are possible :
Safety instructions : If used with a motor, you should
- Manual mode (
): The keys ◄ and ► make
also consult the instructions provided with the motor.
= OFF
possible the selection of the channel and the keys ▲,
Do not use or install this product outdoors. Keep
■ and ▼ the control of motors. Each channel can be
the product out of the reach of children. Do not use
abrasive products or solvents to clean it. Do not knock
named (5 alphabetic / numeric characters) in order to
or drop the product, expose it to flammable materials
facilitate its identification (§6). The programmings of
or sources of heat or moisture, or splash or immerse it.
the automatic mode are de-activated.
- Automatic mode (
): The integrated timer
= ON
allows to programme up to 6 controls (up, down and
batteries. Do not swallow the battery: risk of potentially
intermediate position*) for each day of the week. You
fatal chemical burns in less than 2 hours. If the battery
can visualize all programs by using the keys ◄ and
is inserted into a part of the body or if in any doubt,
►. You can not control the motors with the keys ▲, ■
call a doctor immediately. Keep batteries (new and
and ▼. The twilight function
calculates, according
used) and the product out of the reach of children. If
to the registred values (7.8 à 7.11), a differente twilight
the battery compartment no longer closes, do not use
schedule for all days of the year (see §7 INFO).
the product and keep it away from children. Risk of
The Random function
offsets randomly the
explosion, leaking flammable liquids or gases from the
programmed hour by 0 to +30 minutes to simulate
battery if it is kept at a high temperature (hot oven, fire),
crushed, cut or subject to very low air pressure. Non-
presence in your home.
rechargeable batteries must not be recharged.
*Not available for Hz receivers.
2
Installation
This product must not be installed at a height greater than 2 m.
Do not position the transmitter near metal in order to ensure its good working (reduced range). A radio
appliance using the same frequency may deteriorate our product's performance.
3
Change of working mode
To switch from automatic mode to manual mode (and conversely), press briefly the ● key.
Figure B
For the steps §4, §5 et §6, the transmitter must be in manual mode.
4
Programming the transmitter with an existing installation (manual mode)
4.1- Press the PROG key on the motor individual control transmitter for about 3 seconds.
Figure C
4.2- Select the channel of TIMER MULTI transmitter to be programmed with the selection keys
(◄,►).
4.3- Press the PROG key on the TIMER MULTI transmitter for about 1 second. The operation is
done.
5
Use of the TIMER MULTI transmitter (manual mode)
Figure D
5.1- Select the channel with the selection keys (◄,►).
5.2- Press the keys (▲, ■, ▼) corresponding to the wished control.
6
Identifiying the channels (manual mode)
Figure E
6.1- Select the channel you wish to name with the selection keys (◄,►).
6.2- Press 3 s. on the validation key ● to activate the setting mode. SET is displayed.
6.3- Select one space in order to edit one character with the selection keys (◄,►).
6.4- Press 1 s. on the validation key ● to edit one character at this space.
6.5- The letter A flicks, to change this letter press the selection keys (◄,►).
6.6- To record the displayed letter, press 1 s. on the validation key ●. the following space flicks.
Repeat operations 6.3 to 6.6 for each character of the channel name.
6.7- To save the settings and exit the setting mode, press 3 s. on the validation key ●.
4.
2
PROG ≥ 3s
6.
6.
6.
2
3
4
5
1 s
3 s
1 s
Inbetriebnahme: Nach Einlegen der Batterien und Drücken einer beliebigen Taste erscheint
DE
"YEAR/SET/2010" im Display. Um die Uhr einzustellen, bitte Kapitel 7.2 bis 7.11 durchführen.
Um diese Einstellung später vorzunehmen, 3 Sek. lang auf die SET-Taste (●) drücken.
Figure A
1
Darstellung
a. Anzeige Sendebetrieb
b. Einstellungsmodus
c. Anzeige Batterie schwach
d. SET-Taste (●)
e. Auswahltaste (◄,►)
f. Bedientasten (▲, ■, ▼)
g. Programmiertaste (PROG)
h. Wandhalterung
Anzeige Handbetrieb
= OFF
i. Namen des angewählten Kanals
j. Nummer des angewählten Kanals
Anzeige Automatischer Betrieb
k. Uhrzeit
l. Wochentag
m. Urlaubsfunktion/Zufallsgenerator aktiv
n. Abgespeicherte Programme
o. Dämmerungsfunktion aktiv
p. Uhrzeit des nächsten Befehls
q. Für den nächsten Befehl angewählte Kanäle (1>6)
r. Nächster Steuerbefehl
Mit dem Hz Handsender Hz TIMER MULTI (6 Kanäle)
können bis zu 6 Motoren oder Motor-/Empfängergruppen
der Baureihe SIMU-Hz gesteuert werden. Es sind zwei
Betriebsarten verfügbar :
- Handbetrieb (
): Mit Hilfe der Tasten ◄ und ►
= OFF
kann der Kanal und mit Hilfe der Tasten ▲, ■ und ▼ kann
die Steuerung des Motors oder der Motoren ausgewählt
werden. Um seine Erkennung zu erleichtern, kann jedem
Kanal ein Name (5 alphabetische / numerische Zeichen)
gegeben werden (§6). Die Programmiermöglichkeiten der
automatischen Betriebsart ist deaktiviert.
- Automatischer Betrieb (
Warning: This product contains stick cell
= ON
ermöglicht eine Abspeicherung von bis zu 6 automatischen
Programmen (Befehl ▲, ▼ und Zwischenposition*) für
jeden der 7 Tage der Wochentage. Mit Hilfe der Tasten ◄
und ► werden die abgespeicherten Programme angezeigt.
Die Motoren können über die Tasten ▲, ■ und ▼ nicht
gesteuert werden. Die Dämmerungsfunktion
auf Grundlage der eingegebenen Werte (7.8 bis 7.11),
über das ganze Jahr die unterschiedlichen Uhrzeiten,
so dass die Ausführung eines Programms sich nach der
Abenddämmerung richtet. (siehe § 7 INFO). Über die
Funktion Urlaubsfunktion
Programme von 0 bis +30 Minuten zufallsbedingt geändert,
um eine Anwesenheit in der Wohnung vorzutäuschen.
* Bei den externen Hz-Empfängern nicht verfügbar.
2
Installation
Dieses Produkt darf maximal in einer Höhe von 2 m installiert werden.
Figure B
Von Metallflächen fernhalten, die dessen ordentlichen Betrieb hemmen könnten. Funkgesteuerte Geräte,
die mit der derselben Frequenz arbeiten, können die Funktion unserer Produlete beeinträchtigen.
3
Änderung der Betriebsart
Um vom automatischen Betrieb auf den Handbetrieb zu übergehen (und umgekehrt), kurz auf Taste ● drücken.
Figure C
Für die in Kapitel §4, §5 et §6 aufgeführten Vorgänge, muss der Sender auf Handbetrieb eingestellt sein.
4
Programmierung des Senders auf ein bereits vorhandenes System (Handbetrieb)
4.1- 3 Sek. lang auf die Taste PROG des bereits vorhandenen Senders drücken.
4.2- Kanal des MULTI-TIMERS mit Hilfe der Auswahltasten (◄,►) anwählen
4.3- 1 Sek. lang auf die Taste PROG am MULTI-TIMER drücken. Der Vorgang ist abgeschlossen.
5
Benutzung des MULTI-TIMERS (Handbetrieb)
Figure D
5.1- Kanal mit Hilfe der Auswahltasten (◄,►) auswählen.
5.2- Danach auf die gewünschte Taste drücken (▲, ■, ▼).
6
Benennung der Kanäle (Handbetrieb)
Figure E
6.1- Mit Hilfe der Auswahltasten (◄,►), einen Kanal auswählen.
6.2- 3 Sek. lang auf die SET-Taste ● drücken, um den Einstellungsmodus zu aktivieren, am Display wird
SET angezeigt.
6.3- Mit Hilfe der Auswahltasten (◄,►), Stelle des einzugebenen Zeichens auswählen.
6.4- 1 Sek. lang auf SET-Taste ● drücken, um an dieser Stelle ein Zeichen auszugeben.
6.5- Buchstabe A blinkt, um das Zeichen zu ändern, auf Auswahltasten (◄,►) drücken.
6.6- Um das angezeigte Zeichen zu bestätigen, 1 Sek. lang auf die SET-Taste drücken ●. Die nachfolgende
Stelle blinkt. Vorgänge 6.3 bis 6.6 für alle Zeichen wiederholen, die den Namen des Kanals bilden.
6.7- Um abzuspeichern, und den Einstellungsmodus zu verlassen, 3 Sek. lang auf die SET-Taste ● drücken.
= OFF
4.
3
PROG 1s
= OFF
6.
6.
6
7
6.
6.
3
7
1 s
1 s
3 s
Abbildung A
Technische Daten
- Kompatibel mit den Empfängern und Motoren
- Schutzklasse: Klasse 3
- Spannungsversorgung: 2 Batterien 1,5V, Typ AAA (LR03).
- Frequenzband: 433,050 MHz - 434,790 MHz
F. 433,420 MHz. Sendeleistung: ERP < 10 mW.
- Funkreichweite (norm. Umweltbedingungen): 20 m
durch 2 Stahlbetonwände, 200 m im freien Feld.
:
Sicherheit und Haftung:
Haftung:
Der
Benutzer
muss
diese Anleitungen
aufbewahren. Jede Missachtung dieser Anweisungen und
= ON
:
jede nicht bestimmungsgemäße Verwendung des Produkts
ist untersagt und führt zum Ausschluss jeglicher Haftungs und
Gewährleistungsansprüche gegenüber SIMU. Dieses SIMU-
Produkt muss von einem Fachmann für Gebäudeautomation
installiert werden. Der Installateur muss sich außerdem
an die Normen und Vorschriften des Installationslandes
halten und die Kunden darüber informieren, was bei der
Benutzung und Wartung des Produkts zu beachten ist. Vor
der Installation muss die Kompatibilität dieses Produkts mit
den dazugehörigen Ausrüstungs und Zubehörteilen geprüft
werden. Bei Fragen zur Installation dieses Produkts und für
weiterführende Informationen wenden Sie sich bitte an Ihren
SIMU-Ansprechpartner oder besuchen Sie unsere Website
www.simu.com.
Sicherheitshinweise: Bei Verwendung mit einem Antrieb
beachten Sie auch die Anleitungen des Antriebs. Dieses
Produkt darf nicht im Freien installiert und verwendet werden.
Bewahren Sie das Produkt außerhalb der Reichweite von
Kindern auf. Verwenden Sie zur Reinigung des Produkts keine
Scheuer- oder Lösungsmittel. Setzen Sie das Produkt keinen
Stößen aus und lassen Sie es nicht fallen. Bringen Sie es nicht
in Kontakt mit brennbaren Stoffen, Wärmequellen, Feuchtigkeit
und Spritzwasser. Tauchen Sie es nicht in Flüssigkeiten.
): Die eingebaute Schaltuhr
Warnung: Dieses Produkt enthält Stabbatterien.
Batterien nicht verschlucken: Verschluckte Batterien können
innerhalb von 2 Stunden zu chemischen Verätzungen mit
Todesfolge führen. Wird eine Batterie in eine Körperöffnung
eingeführt oder bestehen diesbezüglich Zweifel, wenden Sie sich
berechnet,
umgehend an einen Arzt. Bewahren Sie (neue und gebrauchte)
Batterien außerhalb der Reichweite von Kindern auf. Verwenden
Sie das Produkt nicht mehr, wenn sich das Batteriefach nicht
schließen lässt und bewahren Sie es außerhalb der Reichweite
von Kindern auf. Es besteht Explosionsgefahr. Brennbare
Flüssigkeiten oder Gase können aus der Batterie austreten,
wird die Auslösezeit der
wenn sie auf hohe Temperaturen (heißer Ofen, Feuer) erhitzt,
gequetscht, durchschnitten oder einem extrem niedrigen
Luftdruck ausgesetzt wird. Nicht wiederaufladbare Batterien
dürfen nicht wiederaufgeladen werden.
Abbildung B
Abbildung C
Abbildung D
Abbildung E
1/2
Advertisement

Related Manuals for Simu TIMER MULTI


Summary of Contents for Simu TIMER MULTI
- Page 1 4.3- Press the PROG key on the TIMER MULTI transmitter for about 1 second. The operation is 4.2- Sélectionner le canal de l’émetteur TIMER MULTI à programmer grâce aux touches de défilement ◄ et ►. instructions is in compliance with the requirements of Radio Directive 4.3- 1 Sek.
- Page 2 = ON (7) INFO = ON 16:30 17:00 17:30 18:00 18:30 19:00 19:30 20:00 20:30 21:00 21:30 22:00 22:30 = ON = ON 120 s. MAX. 2 x LR03 AAA 1.5V Pour les opérations des chapitres §7, §8, §9 et §10, l'émetteur doit être en mode automatique. For the steps §7, §8, §9 and §10, the transmitter must be in automatic mode.
- Page 3 4.2- W nadajniku TIMER MULTI należy wybrać kanał do zaprogramowania za pomocą przycisków przewijania (◄,►). 4.1- Na dobu tří sekund stiskněte tlačítko PROG vysílače s individuálním ovládáním. 4.2- Selecteer het kanaal van de te programmeren zender TIMER MULTI met behulp van de scrolltoetsen (◄,►). europejskich. Pełny tekst deklaracji zgodności UE (WE) jest dostępny pod 4.3- Nacisnąć...
- Page 4 = ON (7) INFO = ON 16:30 17:00 17:30 18:00 18:30 19:00 19:30 20:00 20:30 21:00 21:30 22:00 22:30 = ON = ON 120 s. MAX. 2 x LR03 AAA 1.5V Voor de handelingen van de hoofdstukken §7, §8, §9 en §10 moet de zender zich in de automatische Aby wykonać...
-
Page 5: Instalación
RU - Настоящим компания SIMU заявляет, что радиооборудование, на которое распространяются настоящие инструкции, соответствует Para las operaciones de los capítulos §4, §5 y §6, el emisor Timer Multi debe estar en modo manual. Программирование радиопередатчика на существующую установку (ручной режим) Pис. C требованиям... - Page 6 = ON (7) INFO = ON 16:30 17:00 17:30 18:00 18:30 19:00 19:30 20:00 20:30 21:00 21:30 22:00 22:30 = ON = ON 120 s. MAX. 2 x LR03 AAA 1.5V Para las operaciones de los capítulos §7, §8, §9 y §10, el emisor debe estar en modo automático. Для...
Need help?
Do you have a question about the TIMER MULTI and is the answer not in the manual?
Questions and answers