Advertisement
Quick Links
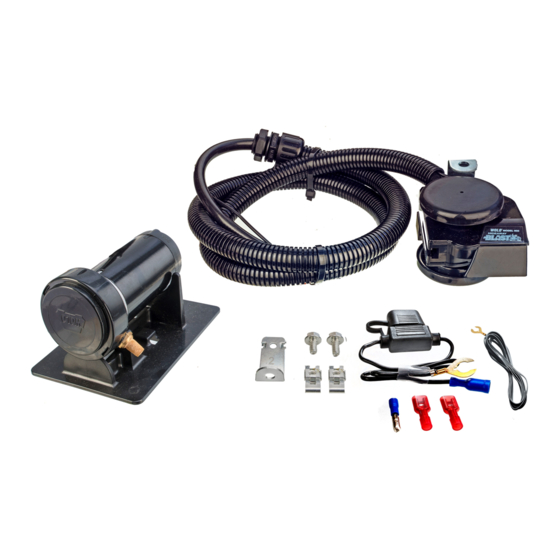
Your purchase of a Wolo HIDEAWAY BLAST is the perfect choice to compliment your motorcycle.
Wolo's horns are manufactured with the finest materials. Before being packaged, Wolo tests each
horn to ensure it meets our high standards, ensuring a perfect working horn. Quality workmanship and
components will provide years of dependable service. If you need help or have any questions using
your new Wolo horn, our technicians are available to answer your questions, Monday thru Friday, from
9 AM to 4 PM EST at 888-550-4676.
Before installation of the horn is attempted, it is important to read the installation manual completely,
and note any messages marked "IMPORTANT" or "WARNING''. The lives of people are dependent
upon a proper installation of the horn. The person installing the horn should have basic knowledge of
the motorcycle's electrical system and crimping wire terminals. A safe installation will prevent serious
injury or damage to the motorcycle.
HIDEAWAY BLAST comes complete and has a factory wired 30-amp waterproof relay. The heavy-
duty compressor that powers the HIDEAWAY BLAST will be installed in the left side saddle bag,
using Wolo's exclusive patented mounting bracket that secures the compressor in place using 3M
Dual Lock
tape. Installation requires drilling one 25/32" hole in the side of the saddle bag out of
TM
view (close to the location the compressor is mounted). The hole is required to route the air hose
and power wire to the compressor. A heavy-duty waterproof connector is provided, the connector will
secure the harness to the saddle bag.
REMOVAL OF HORN COVER AND FACTORY HORN
1.
The factory horn is secured inside the horn housing. The horn housing is removed from the
motorcycle by removing the nut, which secures the housing's bracket to the motorcycle. See Fig. 1.
2.
Once the nut is removed the horn housing will slide off the screw stud.
3.
The factory horn is removed from the horn housing by removing the nut that secures the horn to
the housing bracket. The factory horn will easily slide out of the housing. See Fig. 2 & 3.
4.
There are two (2) wires connected to the factory horn, both wires need to be disconnected
from the horn. The recommended method to remove the wires is to wiggle and firmly pull on
the insulated terminal of one wire until the terminal separates from the horn, repeat the same
procedure to remove the second wire. See Fig. 3.
INSTALLING THE HIDEAWAY HORN INTO THE FACTORY HORN HOUSING
IMPORTANT: The Hideaway Blast comes with two different mounting brackets, which are numbered
1 or 2. See Fig. 4.
To select the correct mounting bracket to be used, see Fig. 5 & 6. Select the factory horn housing that
matches the housing on your motorcycle.
CHANGING THE MOUNTING BRACKET
IMPORTANT: The Hideaway Blast comes with the number 1 bracket factory installed to the horn. If
mounting bracket number 1 is going to be used, skip to step 9.
IMPORTANT: Note the position of the bracket number 1 before removing it from the horn. The number 2
bracket will extend outward from the horn in the same direction as the number 1. See Fig. 7.
5.
To change the mounting bracket, remove the nut that secures the bracket to the horn, and the
number 1 bracket can be separated from the horn. See Fig. 7.
6.
Position the number 2 bracket onto the mounting screw that is extending from the horn's slotted
channel, make sure the brackets tabs are fully inserted into the slotted channel. See Fig 8.
HIDEAWAY BLAST
DROP IN REPLACEMENT HORN
INSTALLATION MANUAL
MODEL 900
TM
TM
Advertisement

Subscribe to Our Youtube Channel
Related Manuals for Wolo HIDEAWAY BLAST 900


Summary of Contents for Wolo HIDEAWAY BLAST 900
- Page 1 If you need help or have any questions using your new Wolo horn, our technicians are available to answer your questions, Monday thru Friday, from 9 AM to 4 PM EST at 888-550-4676.
- Page 2 Secure the number 2 bracket in place using the locking nut removed in step 5. Place the flat speed nut (provided) onto the end of the mounting bracket. IMPORTANT: The speed nut should be positioned on the bracket end so that the flat side is facing outward.
- Page 3 MOUNTING THE COMPRESSOR IN THE SADDLE BAG The Hideaway Blast comes with a patented compressor bracket, which secures the compressor in the saddle bag without drilling any holes. 21. Using the longest black plastic tie provided, insert the strap’s end into the mounting bracket’s retaining slot located on the base of the mounting bracket.
- Page 4 35D. Pull the black flexible tubing toward the horn housing while holding onto the black air hose and black wires. If there is still a kink or bend repeat procedure. 35E. Secure the horn housing back onto the motorcycle. 35F. Insert the black hose and black wire back through the access hole into the saddle bag. Tighten the nut that secures the connector to the saddle bag.
-
Page 5: Harley-Davidson
If there is such a proven defect, Wolo, at its option, will either repair or replace the item free of charge, if it is returned to Wolo within three months from the date of purchase together with proof of purchase as described below. -
Page 6: Mounting Brackets
HIDEAWAY BLAST MODEL 900 DROP IN REPLACEMENT HORN INSTALLATION MANUAL NUT ON NUT ON HOUSING HOUSING BRACKET BRACKET Fig. 1 Fig. 2 Fig. 3 MOUNTING BRACKETS USE MOUNTING BRACKET 1 USE MOUNTING BRACKET 2 Fig. 4 Fig. 5 Fig. 6 REMOVE NUT TO CHANGE... - Page 7 HIDEAWAY BLAST MODEL 900 DROP IN REPLACEMENT HORN INSTALLATION MANUAL SPEED REMOVE BOLTS Fig. 10 Fig. 11 Fig. 12 SPEED Fig. 13 Fig. 14 Fig. 15 HOUSING FACTORY HORN WIRES SHORT LONG BRACKET BOLT BOLT LONG BOLT HORN HOUSING SPEED NUTS BOTTOM HIDEAWAY...
- Page 8 HIDEAWAY BLAST MODEL 900 DROP IN REPLACEMENT HORN INSTALLATION MANUAL PUSH Air Filter Fig. 19 Fig. 20 Fig. 21 RUBBER GASKET 25/32” Access Hole OUTSIDE SADDLE Black FLEXIBLE 25/32˝ TUBING Hose ACCESS HOLE Black Wire INSIDE SADDLE Fig. 22 Fig. 23 Fig.
- Page 9 HARLEY are registered trademarks of H-D U.S.A., LLC. ® ® Wolo and its products are not affiliated with or otherwise approved by H-D U.S.A., LLC. Dual-Lock tape is a trademark of 3M. © 2020 Wolo Mfg. Corp. All Rights Reserved.
Need help?
Do you have a question about the HIDEAWAY BLAST 900 and is the answer not in the manual?
Questions and answers