Advertisement
Advertisement
Table of Contents

Summary of Contents for Euhomy WC-C
- Page 1 WATER DISPENSER USER MANUAL Model:WC-C Email:support@euhomy.com Facebook:euhomy.official Congratulations on your new Euhomy product. To ensure proper operation.please read this instruction Manual carefully before using this product . Keep this manual in a safe place for future reference .
- Page 3 We' d appreciate if you could share your experience with other shoppers on Amazon and euhomy.com. We' d love to make it right for you! If you just want to see the problem descrip- tion, you can directly see the tenth page, Or contact us directly.
-
Page 4: Table Of Contents
CONTENTS SAFETY PRECAUTIONS WARNING SETUP& USE INDICATOR LIGHTS INSTALLING AND REMOVING THE DRIP TRAY INSTALLING THE WATER BOTTLE DRAINING&CLEANING 10-11 CLEANING INSTRUCTION 12-13 TROUBLESHOOTING WARRANTY AND SERVICE... -
Page 5: Safety Precautions
SAFETY PRECAUTIONS SAFETY INFORMATION DANGER WARNING CAUTION Immediate hazards Hazards or unsafe prac- Hazards or unsafe prac- which WILL result in tices which COULD tices which COULD severe personal injury result in severe person- result in minor personal or death al injury or death injury IMPORTANT SAFETY INSTRUCTIONS... -
Page 6: Warning
WARNING SAFETY INFORMATION 1. The plug base should be three-hole grounded with electricity leakage protection. 2. The children are not allowed to play with water spout to avoid accidental burns. 3. This appliance is not intended for use by persons (including children) with reduced physi- cal, sensory or mental capabilities, or lack of experience and knowledge, unless they have been given supervision or instruction concerning the use of the appliance by a person responsible for their safety.Children should be supervised toensure that they do not play with... - Page 7 WARNING OPERATING CONDITION This machine is suitable for bottle of 3 or 5 gallons. Don't use unhealthy hard water. This machine should work under environment of temperature from 10°C- 38°C, relative humidity not higher than 90%. lf this machine worked under environment of temperature below 0°C or the thermostat did not work, the waterwill become ice in the cold water tank and block the pipe.
-
Page 8: Setup& Use
SET UP & USE Name Name Power indicator Cooling switch Heating indicator Heating switch Cooling indicator Power cord UV light Tank drain valve night light switch Water tray Door OPERATING INSTRUCTIONS Before using the water cooler for the first time, remove all packaging material, including the plastic bag. -
Page 9: Indicator Lights
INDICATOR LIGHTS Power Light The light will illuminate when plug in the water cooler. lt will keep lighting up until pull off the power cord. Heating lndicator This light wil illuminate when the water is heating. The light will remain on while the water is heating andwill turn to be green when it has reached the temperature of 185°F. -
Page 10: Installing And Removing The Drip Tray
INSATLLING AND REMOVING THE DRIP TRAY No external drain is needed, the overflow will collect here. 1. To install the drip tray, simply put it down into the area at the top of the door until it snapsinto place. 2.To remove the drip tray, place your fingers in the grid of thte drip tray. -
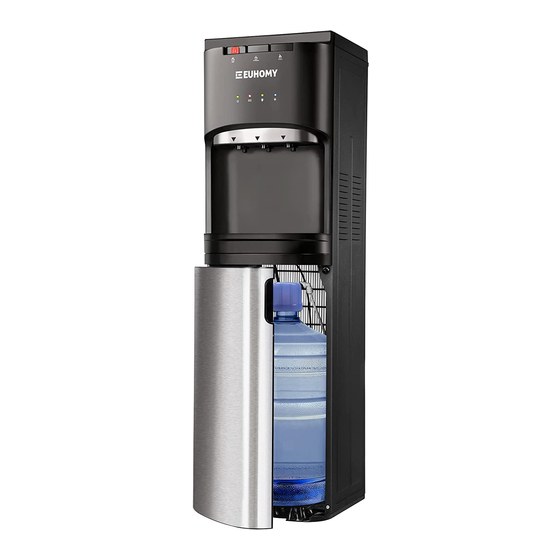
Page 11: Installing The Water Bottle
INSTALLING THE WATER BOTTLE 1.Make sure the lower door is open.Open the lower door by pull- ing on the right side of the door.Note: the lowerdoor is covered by a thin layer of plastic film used to protect the door during ship- ment.Please remove the plasticlayer prior to first use. - Page 12 INSTALLING THE WATER BOTTLE 9.Plug cord into a properly grounded wall outlet. At this time, the pump will begin to move water from the bottleto the hot and cold tanks. It will take up to 5 minutes to fill the tanks for the first time. During this period thepump will run continuously.
-
Page 13: Draining&Cleaning
DRAINING AND CLEANING To avoid accident, cut off the power supply before operation according to the following instruction.It is recommended that the unit be cleaned and sanitized manually about every six months to prolong the lifetime of the machine. To clean the outside of the unit 1.The machine had been disinfected before shipping from factory.Before using this machine, clean themachine by pushing the hot water button and cold water button, let about 1 liter water flow out. - Page 14 DRAINING AND CLEANING 3.Remove the water straw from the water bottle. 4.Place a container under the drain valve and drain valve plug which are located on the back panel. Remove thedrain cover and allow the water to drain out from the water cooler. Let the water flow into the container.
-
Page 15: Cleaning Instruction
CLEANING INSTRUCTION Periodically the water cooler tanks must be sanitized to prevent unpleasant tastes in the water and cleaned toremove mineral deposit that can impair flow. 1.Unscrew the top cover and take out the cold tank lid. 2.Put the citriacid scale remover into the machine's cold tank and make sure the water can flow out of the waterspout. - Page 16 CLEANING INSTRUCTION: 5.Using a container, drain the remaining cleaning solution from the internal water tanks from the drain valve byre- moving the drain cap and removing the drain plug. Discard the cleaning solution.Reinstall the drain plug and draincap on the water cooler.Flush the system using clean water using the same procedure outlined in steps 1 through 4above.When the rinse water stops flowing replace the drain plug and drain cap and tighten.The...
-
Page 17: Troubleshooting
TROUBLESHOOTING Please check the following before having the machine repaired. PROBLEM POSSIBLE CAUSES SOLUTIONS 1.Over consumption of hot or 1.Just wait a moment, and cold water in short time. thenhot cold water available again. 2.No power supply. No hot or cold water 2.Connect plug to socket, turn on heating or cooling switch. -
Page 18: Warranty And Service
If any problems occur, please contact the Euhomy Customer Care Centre via the contact information listed in this User Guide. We can only provide after sales service for products that are sold by Euhomy or Euhomy authorized retailers and distributors. If you have purchased your unit from a different place,... - Page 20 WATER DISPENSER USER MANUAL...
Need help?
Do you have a question about the WC-C and is the answer not in the manual?
Questions and answers
2 green lights flashing on unit
When 2 green lights are flashing on the Euhomy WC-C unit, it indicates that the water bottle is empty.
This answer is automatically generated
My water dispenser is blinking green the power and light UV. What does it mean?
the white tubing became detached inside the cooler. Where do I re attach it?