
Summary of Contents for Steelman 60339
- Page 1 HEAVY DUTY OPEN JAW CLAMP METER Please read this manual before switching the unit on. Important safety information inside. INSTRUCTIO N MANUAL 60339...
-
Page 2: Table Of Contents
BATTERY USE AND CARE 1. Introduction..............2. Safety................2-1. International Safety Symbols........2-2. Safety Notes.............. 2-3. Warnings..............2-4. Cautions..............3. Description..............3-1. Meter Description............3-2. Display icons Description..........4. Specifications..............5. General Specifications............ 6. Operation............... 7-10 6-1. AC Current Measurements.......... 6-2. -
Page 3: Introduction
INTRODUC TION This clamp meter is a hand-held digital Clamp Meter for automotive and construction use, where high current measurement is required. The Clamp Meter can measure the following: • AC/DC Voltage • AC Current • Resistance • Capacitance • Frequency •... -
Page 4: Cautions
SAFETY 2-4. Cautions • Improper use of this meter can cause damage, shock, injury or death. Read and understand this user manual before operating the meter. • Always remove the test leads before replacing the battery. • Inspect the condition of the test leads and the meter itself for any damage before operating the meter. -
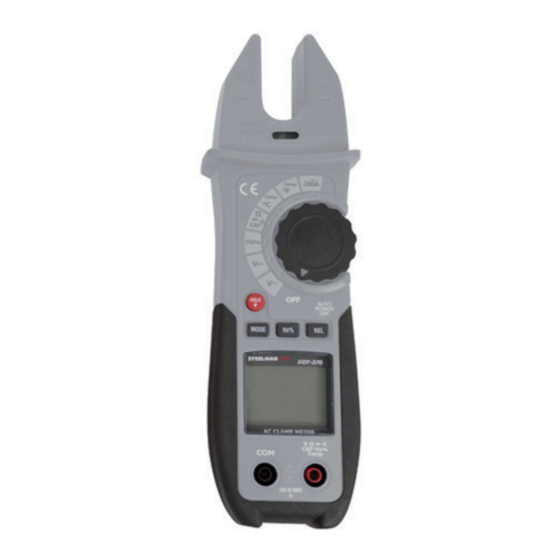
Page 5: Description
DESCRIPTION DESCRIPTION CURRENT FORK NCV INDICATOR LIGHT ROTARY FUNCTION SWITCH DATA/HOLD/BACKLIGHT BUTTON MODE BUTTON Hz/% BUTTON REL BUTTON LCD DISPLAY COM INPUT JACK V CAP TEMP Hz JACK BATTERY COVER 3-2. Display Icons Description HOLD Data Hold Minus sign Negative reading display 0 to 3999 Measurement display digits AUTO... -
Page 6: Specifications
SPECIFICATIONS Function Range Accuracy (% of reading + digits) Resolution ± (1.5% + 2d) ± (1.5% + 2d) 10mV 10mV DC Voltage 400V ± (1.5% + 2d) 100mV 600V ± (2% + 2d) Input Impedance: 10MΩ Over range protection: 600V DC or 600V AC RMS Function Range Accuracy (% of reading + digits) - Page 7 SPECIFICATIONS Function Range Accuracy (% of reading + digits) Resolution 40Hz ± (1.0% + 2d) 0.01Hz 400Hz ± (1.2% + 2d) 0.1Hz 4KHz ± (1.2% +2d) ± (1.2% + 2d) Frequency 40KHz ± (1.2% + 2d) 10Hz 10Hz 400KHz ± (1.2% + 2d) 100Hz 10MHz 10MHz...
-
Page 8: General Specifications
GENERAL SPECIFICATIONS Clamp jaw opening 1.2" (30 mm) approximately Display 3-3/4 digits (4000 counts) backlit LCD Continuity check Buzzer sounds at less than 50Ω Diode Test Test current of 0.5mA typical Open circuit voltage < 2VDC typical Low battery indication is displayed Over-range indication “OL”... -
Page 9: Operation
OPERATION Note: Read and understand all Warning and Caution statements in this operation manual prior to using this meter. Set the function select switch to the OFF position when the meter is not in use. 6-1. AC Current Measurements • Set the function switch to AC Current. •... -
Page 10: Capacitance Measurements
OPERATION • Touch the test probe tips across the circuit or component under test. • If the resistance is at less than 50Ω, a tone will sound. 6-6. Capacitance Measurements To avoid electric shock, discharge the capacitor under test before measuring. •... -
Page 11: Frequency Tests
OPERATION 6-8. Frequency Test • Insert the black test lead banana plug into the negative COM jack and the red test lead banana plug into the V Hz% Ω CAP TEMP positive jack. • Set the function switch to the Hz position. •... -
Page 12: Maintenance
OPERATION 2. To exit this mode, press and hold the REL button until “∆” is no longer in the display. DATA HOLD Button To freeze the LCD reading, press the HOLD button. While data hold is active, the icon appears on the LCD. Press the HOLD button again to return to normal operation. - Page 13 NOTES...
- Page 14 Patent rights available at www.jsproducts.com/patents 90 DAY LIMITED WARRANTY JS PRODUCTS | 6445 MONTESSOURI STREET | LAS VEGAS, NV 89113 800.255.7011 FAX: 775.898.8773 WWW.STEELMANPRO.COM...
Need help?
Do you have a question about the 60339 and is the answer not in the manual?
Questions and answers