Advertisement
Quick Links
RainRouter
User Guide v.1
Turn a downspout into a spigot when it rains!
Warnings Regarding Potential Hazards
PLEASE REFER TO HAZARD WARNINGS BOOKLET FOR MORE INFORMATION AND RETAIN THIS BROCHURE FOR FUTURE REFERENCE.
Installation Hazard
Infestation Hazard
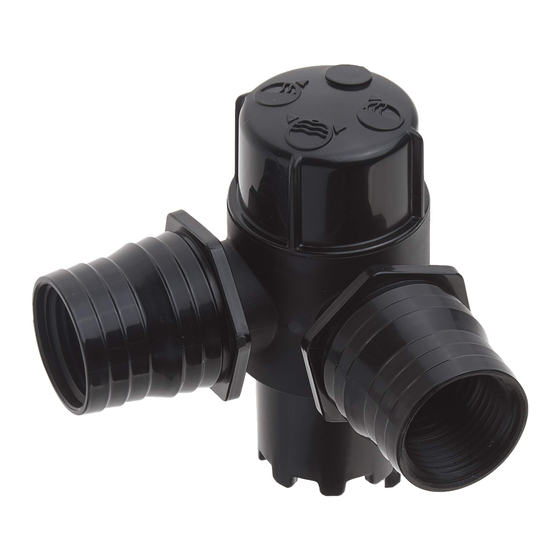
About the RainRouter Selector Valve
1
This selector valve must be used with an EarthMinded rain barrel or DIY rain barrel kit that includes a FlexiFit™ diverter.
The RainRouter selector valve can be used to send rainwater from a downspout to multiple collection spots. The RainRouter
selector valve lets you connect two (2) garden hoses, a garden hose and a rain barrel, or two (2) rain barrels to a single installed
diverter. A rain barrel can also be located to a more convenient location, such as the center of a garden, using a garden hose to
connect the rain barrel to the downspout.
Some areas prohibit the use of rain barrels. Please check local regulations before installing.
Rain barrel and garden hose
2
Operating settings
Water flows to both outlets
ACTIVE SETTING INDICATOR
Water flows to left outlet
TIP: CAP
UNUSED OUTLET
TO PREVENT
ACCIDENTAL
FLOODING
Selector Valve
™
Contamination Hazard
Wear Safety Gloves
Two (2) Rain barrels
Water flows to right outlet only
TIP: CAP
UNUSED OUTLET
TO PREVENT
ACCIDENTAL
FLOODING
No water flow to outlets, water automatically bypasses the downspout
3
Assembly diagram
1. Downspout
2. FlexiFit™ diverter
3. Valve housing
4. Active setting indicator
5. Selector dial
6. Garden hose connection
7. Multi-hose adaptor connects to:
eeeeea. 1-1/2"(38mm) and 1-1/4"(32mm) diameter bilge hose
eeeeeb. EarthMinded rain barrel fill hose
eeeeec. Male end of a garden hose
Contents
1. RainRouter selector valve
2. Multi-hose adaptors (2)
3. User guide (not pictured)
4. Hazard warnings booklet (not pictured)
1
2
4
Installing the RainRouter Selector Valve
This selector valve must be used with an EarthMinded rain barrel or DIY rain barrel kit that includes a FlexiFit™ diverter.
After the diverter is installed into the downspout, the RainRouter selector valve is ready to be inserted into the diverter.
1. Hold the selector valve with the Y outlet ends facing down and press into the diverter opening until there is no gap between the
valve and the diverter. If there is a gap, gently twist the valve from side to side while pushing inward until the valve seats against the
front edge of the diverter with no gap.
2. Position the selector valve based on the connection(s) you are trying to achieve.
1
5
Planning
A. Planning for new local installations:
Select a downspout on which to locate the RainRouter selector valve, keeping in mind the route to the areas that you intend
to send the water to and elevation changes or obstacles along the path of the hose. For garden hose or remote rain barrel
installations, it is recommended you lay out the hose before installing the diverter. For conventional rain barrel installations,
refer to the instructions included with your EarthMinded rain barrel.
B. Planning for new remote installations:
A rain barrel can be located away from a downspout to a different location such as the center of a garden by using a garden
hose to connect a rain barrel to the downspout. Follow the instructions in this guide for marking the height of the diverter
instead of the instructions in the EarthMinded rain barrel user guide.
DOWNSPOUTS
HOUSE
A
RAIN BARREL
GARDEN HOSE
(LOCAL)
28"/ 71cm
1
4
2
3
5
6
7
BLUE ARROW INDICATES ACTIVE SETTING
2
VALVE ORIENTATION
TIP: CAP
UNUSED OUTLET
TO PREVENT
ACCIDENTAL
FLOODING
a. Single connection rain barrel
c. Dual connection garden hose
TIP: CAP
UNUSED OUTLET
TO PREVENT
ACCIDENTAL
FLOODING
b. Single connection garden hose
d. Dual connection rain barrel/garden hose
GARDEN
B
RAIN BARREL
(REMOTE)
Advertisement

Summary of Contents for EarthMinded RainRouter
- Page 1 ACTIVE SETTING INDICATOR Select a downspout on which to locate the RainRouter selector valve, keeping in mind the route to the areas that you intend to send the water to and elevation changes or obstacles along the path of the hose. For garden hose or remote rain barrel installations, it is recommended you lay out the hose before installing the diverter.
- Page 2 • Make sure the diverter is installed with the collection cup (arrow) facing up. 2. Screw the cap on the male end of the hose and run it to the downspout. This is how the hose will connect to the RainRouter diverter •...
Need help?
Do you have a question about the RainRouter and is the answer not in the manual?
Questions and answers