
Summary of Contents for milquino Black & White
- Page 1 EN – USER MANUAL AVAILABLE AT www.milquino.com/kundenbetreuung/downloads/ jcr-electronic GmbH | 89407 Dillingen | info@milquino.com | www.milquino.com...
- Page 2 Notes...
-
Page 3: Table Of Contents
Function und Operation First Start Adjustment of the Powdertype Adjustment of the Waterhardness Adjustment of the Waterdispensing Adjustment of the Watertemperature Download Milquino-App/ Activation WLAN-Function 10/11 Production of Milk bottle Descaling Cleaning of the Powder Container Error Messages / Factory setting... -
Page 4: Safety Instructions / Technical Data
Connect the device only to a dedicated socket with a suitable plug and avoid pulling on the connection line. Never try to remove parts of the milquino® by force. The milquino® is designed that all parts which are intended for removal are easy and intuitive to remove. Do not open the device by your self! There is a risk to life and any claim to warranty expires! Clean the device externally with a slightly damp rag and absolutely avoid water entry into the lateral openings of the device. -
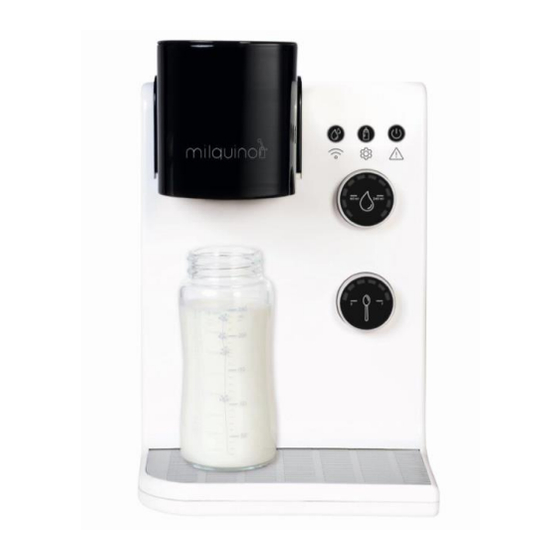
Page 5: Overview
OVERVIEW Cover Powder Container Bearing Gear big Cover Water Container Dosing system and Water Container Gear small Powder Container Water- and Powderoutlet Adjustment for Water- and Powder Dispensing Raiser for short bottle Stainless Steel Grid Drip tray... -
Page 6: Function Und Operation
FUNCTION AND OPERATION Short Press = switch on Long Press = switch off Short Press = Serve renewed Press = Cancel Serve Device switched on: Short Press = Cancel Serve reset Long Press = Factorysetting Device switched off: Long Press = Start Descaling Dispensing: Amount of Water Dispensing: Amount of Powder... -
Page 7: First Start
FIRST START 01. Connect the milquino® to the power supply. Die Main Button is illuminated red. 02. Clean the Water and Powder Container and their parts with lukewarm Water. NOTE: Water- und Powdercontainer and their parts are suitable for dishwasher use, but not over 60°C. Do not use Vapour Sterilizer for cleaning! 03. -
Page 8: Adjustment Of The Powdertype
= approx. X grams of powder. The milquino® fully automatic baby milk machine also follows this logic. You can adjust the dosage of the machine to the powder you are using. This setting is saved until you change it again (e.g. when changing the type of powder). -
Page 9: Adjustment Of The Waterhardness
The first LED is equal to level 1, the second LED is equal to level 2, etc. Default setting is level 4. 03. Release the button 2 . The milquino® saves the setting by switching it off and on again with the ON / OFF button... -
Page 10: Adjustment Of The Waterdispensing
03. Now turn rotary control A in the desired direction (to the right the amount of water is increased, to the left the amount is decreased). Basic Setting: 4 LED 04. Now release button 2. The milquino® saves the setting by switching it off and on again ON / OFF button. 1. Push and hold pressed 2. Push shortly... -
Page 11: Adjustment Of The Watertemperature
ADJUSTMENT OF THE WATERTEMPERATURE The milquino® serves the bottle at the perfect drinking temperature between 36 and 39 degrees. If you still want to adjust the temperature yourself, proceed as follows: 01. If necessary, turn on the device. Hold down button 2 until the device jumps to the 1st submenu (recognizable by the change in the number of LEDs on the rotary control). -
Page 12: Download Milquino-App/ Activation Wlan-Function
(recommended way in case of WPS will not connect) • Download the milquino App • Switch on the milquino and connect your mobile device to the WIFI “MILQUINO_XXX” (x represents the individual serial number of your machine) • Open the App and select “Manuell”... - Page 13 - Push the button 3 (WIFI) for approx. 6 seconds until the LED starts to blink. - Activate within 1 Minute the WPS Function at your router. View the instructions of your router. - Your milquino will connect automatically to your WIFI.
-
Page 14: Production Of Milk Bottle
PRODUCTION OF MILK BOTTLE 01. Fill drinking water into the water tank and check if there is enough baby formula in the formula container. If necessary, push the formula slightly downwards. 02. Switch the machine on by pushing the button 1 (if you have not already). -
Page 15: Descaling
01. Switch the machine OFF by pushing the button 1 .The blue LED remains flashing. 02. Fill approx. 0.5 Liter of Water into the Water Tank, add a milquino descaling tablet. 03. Put the Water Tank to the correct position at the back of the machine. -
Page 16: Cleaning Of The Powder Container
Ensure the hose of the water supply is assembled correct. 08. Push back the formula container carefully into the machine. The milquino is now ready to use. All other parts of the machine can easily be cleaned by a damp cloth. In any case, do not use sharp, abrasive cleaners or solvents. -
Page 17: Error Messages/ Factory Setting
ERROR MESSAGES/ FACTORY SETTING ON / OFF LED is flashing: • Water Tank is empty / Water Tank is missing / Water Tank is placed incorrect • Formula container is missing / Formula container is place incorrect No Water dispensing: •... -
Page 18: Warranty / Disposal
WARRANTY / DISPOSAL Limited Guarantee The cleaning and ongoing maintenance is in your hands. Over that, jcr-electronic GmbH Guarantees this product against defect in materials and workmanship for a period of two years from the date of purchase. During this period, jcr- electronic GmbH will either Repair or replace, at its discretion, any defective product at no charge to the owner. - Page 19 NOTES...
- Page 20 Black & White If you have any questions write an Mail to info@milquino.com | or call Phonenumber: +49 9071 2703...
Need help?
Do you have a question about the Black & White and is the answer not in the manual?
Questions and answers