Table of Contents
Advertisement
Available languages
Available languages
Quick Links
STYLE SELECTIONS and logo design are trademarks
or registered trademarks of LF, LLC. All rights reserved.
Serial Number
Questions, problems, missing parts? Before returning to your retailer, call our customer service
department at 1-877-888-8225, 8 a.m. - 8 p.m., EST, Monday - Sunday.
You may also contact us anytime at www.lowes.com
VR20299
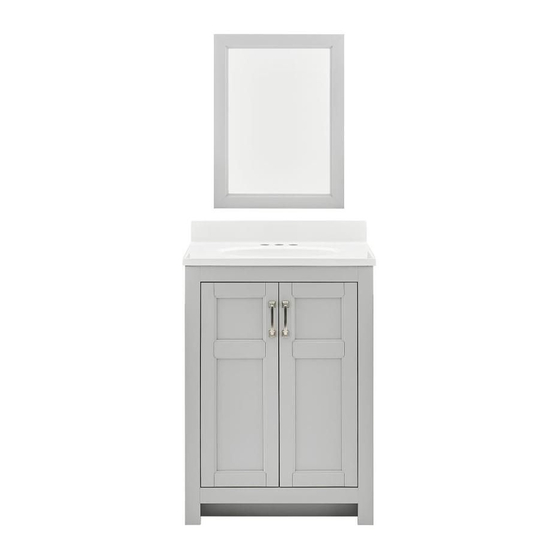
24.75-IN VANITY WITH
Purchase Date
1
TOP AND MIRROR
MODEL #1678VM-25-292
ATTACH YOUR RECEIPT HERE
ITEM #2538086
Español p. 9
Español p.
XX
Advertisement
Chapters
Table of Contents

Subscribe to Our Youtube Channel
Related Manuals for Style selections 1678VM-25-292


Summary of Contents for Style selections 1678VM-25-292
- Page 1 ITEM #2538086 24.75-IN VANITY WITH TOP AND MIRROR STYLE SELECTIONS and logo design are trademarks MODEL #1678VM-25-292 or registered trademarks of LF, LLC. All rights reserved. Español p. 9 Español p. ATTACH YOUR RECEIPT HERE Serial Number Purchase Date Questions, problems, missing parts? Before returning to your retailer, call our customer service department at 1-877-888-8225, 8 a.m.
-
Page 2: Table Of Contents
TABLE OF CONTENTS Package Contents...........................3 Hardware Contents..........................3 Safety Information..........................3 Preparation............................4 Assembly or Installation Instructions ....................4 Care and Maintenance ........................7 Warranty............................7 Replacement Parts List ........................8... -
Page 3: Package Contents
PACKAGE CONTENTS PART DESCRIPTION QUANTITY Vanity Left Door (preassembled to Vanity (A)) Right Door (preassembled to Vanity (A)) Mirror Mounting Hanger (preassembled to Mirror (E)) HARDWARE CONTENTS Touch-Up Pen Anchor Screw Qty. 1 Qty. 2 Qty. 2 SAFETY INFORMATION Please read and understand this entire manual before attempting to assemble, operate, or install this product. -
Page 4: Preparation
PREPARATION Before beginning assembly of product, make sure all parts are present. Compare parts with package contents list and hardware contents list. If any part is missing or damaged, do not attempt to assemble the product. Estimated Installation Time: 20-30 minutes (24 hours for silicone caulk to dry) Tools Required for Installation (not included): Phillips screwdriver, utility knife or scissors, silicone caulk, power drill with drill bit Helpful Tools (not included): Measuring tape, level... - Page 5 VANITY INSTALLATION INSTRUCTIONS Note: A t this stage it may be easier to install the faucet and drain kit (not included) to top (B) per the manufacturer’s instructions, before moving on to Step 2. 2. Apply stain free silicone caulk (not included) to the top edge of vanity (A).
- Page 6 MIRROR INSTALLATION INSTRUCTIONS 1. Measure the distance between the holes in the mounting hangers (F) on the back of the mirror (E). 2. Measure and mark location for mounting hardware on the wall using the measurement from Step 1. Make sure the marks are level and located at the desired height.
-
Page 7: Care And Maintenance
CARE AND MAINTENANCE • Dust the vanity regularly with a soft, non-lint producing cloth or household dusting product. • You can clean the vanity with a gentle, non-abrasive household cleaner. • Make sure to dry the wood immediately with a soft cloth or towel. •... -
Page 8: Replacement Parts List
REPLACEMENT PARTS LIST For replacement parts, call our customer service department at 1-877-888-8225, 8 a.m. - 8 p.m., EST, Monday - Sunday. PART DESCRIPTION PART # 2519-GEL COAT SINK Left Door 1678VM-25-292- DOOR SET Right Door Mirror 1678MR-18-292 Touch-Up Pen OF-0120R Anchor MWA-2.5x3.1-SET2... - Page 9 ARTÍCULO #2538086 TOCADOR CON CUBIERTA Y STYLE SELECTIONS y el diseño del logo son ESPEJO DE 62,86 CM marcas comerciales o marcas registradas de LF, LLC. Todos los derechos reservados. MODELO #1678VM-25-292 ADJUNTE SU RECIBO AQUÍ Número de serie Fecha de compra ¿Preguntas, problemas, piezas faltantes? Antes de volver a la tienda, llame a nuestro Departamento...
- Page 10 ÍNDICE Contenido del paquete........................11 Aditamentos........................11 Información de seguridad......................11 Preparación..........................12 Instrucciones de ensamblaje o instalación...................12 Cuidado y mantenimiento......................15 Garantía............................15 Lista de piezas de repuesto......................16...
-
Page 11: Contenido Del Paquete
CONTENIDO DEL PAQUETE PIEZA DESCRIPCIÓN CANTIDAD Tocador Cubierta Puerta izquierda (preensamblada al tocador (A)) Puerta derecha (preensamblada al tocador (A)) Espejo Gancho de montaje (preensamblado al espejo (E)) ADITAMENTOS Aplicador de retoque Ancla de expansión Tornillo Cant. 1 Cant. 2 Cant. -
Page 12: Preparación
PREPARACIÓN Antes de comenzar a ensamblar el producto, asegúrese de tener todas las piezas. Compare las piezas con la lista del contenido del paquete y la lista de aditamentos. No intente ensamblar el producto si falta alguna pieza o si estas están dañadas. Tiempo de instalación estimado: de 20 a 30 minutos (24 horas para que seque la masilla de calafateo de silicona). - Page 13 INSTRUCCIONES DE INSTALACIÓN DEL TOCADOR Nota: en esta etapa puede resultar más sencillo instalar el kit de grifo y desagüe (no se incluye) en la cubierta (B) de acuerdo con las instrucciones del fabricante antes de continuar con el paso 2. 2.
- Page 14 INSTRUCCIONES DE INSTALACIÓN DEL ESPEJO 1. Mida la distancia entre los orificios de los ganchos de montaje (F) en la parte posterior del espejo (E). 2. Mida y marque la ubicación para los aditamentos de montaje en la pared con la medida del Paso 1. Asegúrese de que las marcas estén niveladas y ubicadas a la altura deseada.
-
Page 15: Cuidado Y Mantenimiento
CUIDADO Y MANTENIMIENTO • Limpie el tocador regularmente con un paño suave que no deje pelusas o con un producto de limpieza doméstico. • Puede limpiar el tocador con un limpiador doméstico suave no abrasivo. • Asegúrese de secar la madera inmediatamente con un paño o una toalla suave. •... -
Page 16: Lista De Piezas De Repuesto
Para obtener piezas de repuesto, llame a nuestro Departamento de Servicio al Cliente al 1-877-888-8225, de lunes a domingo de 8 a.m. a 8 p.m., hora estándar del Este. PIEZA DESCRIPCIÓN PIEZA # Cubierta 2519-GEL COAT SINK Puerta izquierda 1678VM-25-292- DOOR SET Puerta derecha Espejo 1678MR-18-292 Aplicador de retoque OF-0120R Ancla de expansión...
Need help?
Do you have a question about the 1678VM-25-292 and is the answer not in the manual?
Questions and answers