Table of Contents
Advertisement
Quick Links
Advertisement
Table of Contents

Related Manuals for RCP CONTOUR NEXT ONE

Summary of Contents for RCP CONTOUR NEXT ONE
- Page 1 CONTOUR® NEXT ONE Glucose Meter CONTOUR® NEXT ONE Glucose Meter...
-
Page 2: Table Of Contents
PRODUCT OVERVIEW ............. 9 The Blood Glucose Meter ........... 9 Up/Down Scroll Buttons ..........9 Your Contour next ONE meter Screen ....10 Initial Setup from the Meter ........11 View Pre-Set Target ..........12 Set the Date .............. 13 GETTING READY TO TEST .......... - Page 3 USER GUIDE BATTERIES ............... 24 Replace the Batteries..........25 ERROR DETECTION DISPLAYS ........27 CONTROL SOLUTION ............ 29 Quality Control ............29 Control Solution Testing ..........30 LOGBOOK ..............33 Review the Logbook ..........33 SETTINGS ................ 34 Access Settings ............34 Change the Time ............
-
Page 4: Introduction
CONTOUR® NEXT ONE Glucose Meter INTRODUCTION This Blood Glucose Meter is provided by Remote Care Partners (RCP) for use exclusively with the health monitoring program from your provider. CAUTION: Your Contour next ONE meter works ONLY with Contour next test strips and Contour... -
Page 5: Notes On Safety
Use of this device is only for the intended use described in this manual. Only use testing strips CONTOUR® NEXT supplied by RCP. Do not allow the device to contact surfaces that are too hot to touch. Do not use the device where aerosol sprays are in use. -
Page 6: Quickstart
CONTOUR® NEXT ONE Glucose Meter QUICKSTART Prepare: Wash your hands with soap and water. Dry thoroughly. Gather supplies: Lancing device, lancet, tissue (for blotting blood from your finger after the puncture). Prepare the lancing device: Unscrew the cap, push the lancet firmly into the device, remove the rounded end of the lancet by turning (save this piece), screw the cap back on, and adjust the puncture depth (usually 3). -
Page 7: Intended Use
ONE blood glucose monitoring system is intended to be used by a single person and should not be shared. The Contour next ONE blood glucose monitoring system is intended for self-testing outside the body (in vitro diagnostic use) by people with diabetes at home as an aid in monitoring the effectiveness of a diabetes control program. -
Page 8: Contents Of Your Kit
CONTOUR® NEXT ONE Glucose Meter CONTENTS OF YOUR KIT ▪ A Meter ▪ Storage Bag ▪ Lancing Device ▪ Sterile lancet (Optional) NOTES: ▪ The Lancing Device can be used several times; however, the lancet must be changed after each use. ▪... -
Page 9: Product Overview
USER GUIDE PRODUCT OVERVIEW The Blood Glucose Meter Up/Down Scroll Buttons Using the Meter Buttons Press and hold the OK button until the meter turns On. Press and hold the OK button until the meter turns Off. buttons on the meter allow you to scroll through the options. -
Page 10: Your Contour Next One Meter Screen
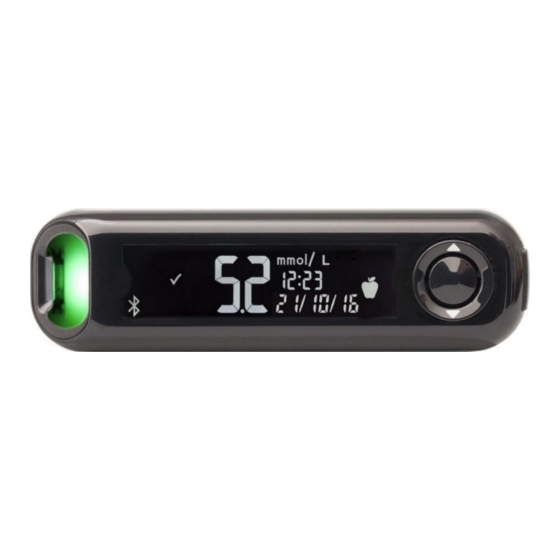
CONTOUR® NEXT ONE Glucose Meter Your C ONE meter Screen ontour Test Result in Target Time Meal Marker Test Strip Port Date PAGE 10 REMOTE CARE PARTNERS V1.0... -
Page 11: Initial Setup From The Meter
If there are missing characters or if the strip portlight is a color other than white, contact RCP Customer Support at 855-477-7000. This may affect the way you see your results. -
Page 12: View Pre-Set Target
CONTOUR® NEXT ONE Glucose Meter View Pre-Set Target The meter displays a pre-set Overall Target Range. To move to the next screen, press the OK button. Continue to Set the Time. Set the Time The hour is blinking To change the hour, press the button on the outer ring. -
Page 13: Set The Date
USER GUIDE Set the Date The year is blinking 1. To change the year, press the or button, then press the OK button. 2. To change the month, press the button, then press the OK button. 3. To change the day, press the button, then press the OK button. -
Page 14: Getting Ready To Test
CONTOUR® NEXT ONE Glucose Meter GETTING READY TO TEST Ensure that you have the materials you need before you begin testing: • Contour next ONE meter. • Contour next test strips. • Lancing device and lancets from your kit, if provided. - Page 15 USER GUIDE Replace the endcap. Rotate the endcap dial to adjust the puncture depth. The amount of pressure applied to the puncture site also affects puncture depth. V1.0 REMOTE CARE PARTNERS PAGE 15...
-
Page 16: Insert A Test Strip Into The Meter
CONTOUR® NEXT ONE Glucose Meter Insert a test strip into the meter 1. With clean, dry hands, remove a single test strip from its vial. Do not bend, cut, or modify the test strips in any way. Tightly close the bottle lid immediately after you have removed the test strip. -
Page 17: Get The Blood Drop: Fingertip Testing
USER GUIDE Get the Blood Drop: Fingertip Testing Press the lancing device firmly against the puncture site and press the release button. Stroke your hand and figure toward the puncture to form a drop of blood. Do not squeeze around the puncture site. -
Page 18: Apply More Blood
CONTOUR® NEXT ONE Glucose Meter Apply More Blood 1. If the meter beeps twice and the screen displays a blinking blood drop, the test strip does not have enough blood. 2. Apply more blood to the test strip within 60 seconds. 3. -
Page 19: Understanding The Results
USER GUIDE UNDERSTANDING THE RESULTS LO or HI Results If the meter beeps twice and displays the LO screen, your blood sugar reading is under 20 mg/dL. Follow medical advice immediately. Contact your health care professional. If the meter beeps once and displays the HI screen, your blood sugar reading is over 600 mg/dL: 1. -
Page 20: Care And Storage
If your device malfunctions for any reason or you notice any changes in the external meter case or display, call RCP Customer Care Customer Service at 1-855-477-7000.for assistance PAGE 20 REMOTE CARE PARTNERS... -
Page 21: Cleaning And Disinfection
USER GUIDE CLEANING AND DISINFECTION Clean and disinfect your Contour next ONE meter once a week. Use only Clorox Germicidal Wipes containing 0.55% sodium hypochlorite (bleach). The wipes are proven safe to use with the Contour next ONE meter. Clorox Germicidal Wipes are available for purchase online at http://www.officedepot.com... -
Page 22: Cleaning Your Meter
CONTOUR® NEXT ONE Glucose Meter Cleaning Your Meter Supplies needed for cleaning: Clorox Germicidal Wipes containing 0.55% • sodium hypochlorite (bleach). Paper towels. • CAUTION: Do not allow cleaning solution to run into the meter through open areas, such as around the buttons or the meter’s test strip or data ports. -
Page 23: Disinfecting Your Meter
USER GUIDE Disinfecting Your Meter Supplies needed for disinfecting: Clorox Germicidal Wipes containing 0.55% • sodium hypochlorite (bleach). Paper towels. • Timing device. • 1. Before disinfecting, clean the meter as described in Cleaning Your Meter. 2. Using a new germicidal wipe, carefully wipe all outer surfaces of your meter until wet. -
Page 24: Batteries
CONTOUR® NEXT ONE Glucose Meter BATTERIES When the batteries are low, the Low Batteries symbol displays on every screen. Replace the batteries immediately. When you see this symbol, you can only test about 10 more times over the next 3 days before the batteries are dead. -
Page 25: Replace The Batteries
USER GUIDE Replace the Batteries. 1. Before replacing your batteries, turn off your meter. 2. Turn the meter over and slide the back cover in the direction of the arrow. The battery holder comes out. 3. Remove both of the old batteries and replace them with two 3-volt CR2032 or DL2032 coin cell batteries. - Page 26 CONTOUR® NEXT ONE Glucose Meter 8. Slide the battery holder back into place. 9. Discard batteries according to your local environmental regulations. WARNING: Keep batteries away form children. Many types of batteries are-poisonous. If swallowed, immediately contact your poison control center. PAGE 26 REMOTE CARE PARTNERS V1.0...
-
Page 27: Error Detection Displays
When an error occurs, the meter beeps 2 times and displays an error code. Press the OK button to turn off the meter. If you experience continued errors, contact RCP Customer Care at 1-855-477-7000. V1.0 REMOTE CARE PARTNERS... - Page 28 CONTOUR® NEXT ONE Glucose Meter Speak to a Customer Service representative before returning your meter for any reason. Contact RCP Customer Care at 1-855-477-7000. PAGE 28 REMOTE CARE PARTNERS V1.0...
-
Page 29: Control Solution
USER GUIDE CONTROL SOLUTION Quality Control Shake the control solution bottle • well, about 15 times before every use. Unmixed control solution may • cause inaccurate results. You should perform a control test when: Using your meter for the first time. •... -
Page 30: Control Solution Testing
CONTOUR® NEXT ONE Glucose Meter Control Solution Testing 1. Remove a Contour next test strip from the bottle. 2. Tightly close the bottle lid immediately after you remove the test strip. 3. Hold the test strip with the grey square end facing up. - Page 31 USER GUIDE 7. Squeeze a small drop of solution onto a clean, nonabsorbent surface. CAUTION: Do not apply control solution to your fingertip or to the test strip directly from the bottle. Immediately touch the tip of the test strip to the drop of control solution.
- Page 32 If your control test result is out of range, do not use your Contour next ONE meter for blood sugar testing until you resolve the issue. Contact RCP Customer Care at 1-855-477-7000.
-
Page 33: Logbook
USER GUIDE LOGBOOK The Logbook contains blood sugar test results. The Logbook holds up to 800 results. When the Logbook reaches the maximum, the oldest test result will be removed as a new test is completed and saved to the Logbook. Review the Logbook NOTE: To return to the Home screen while viewing the Logbook, press the OK button. -
Page 34: Settings
CONTOUR® NEXT ONE Glucose Meter SETTINGS In Settings you can: Please note: the correct date/time is already set on your meter. • Change the time format. • Change the time. • Change the date format. • Change the date. You must accept or change each setting with the OK button before moving to the next one. -
Page 35: Change The Time
USER GUIDE Change the Time The time format is blinking. 1. To change the time format, if needed, press button, then press the OK button. To change the hour, press the button, then press the OK button. To change the minutes, press the button, then press the OK button. - Page 36 CONTOUR® NEXT ONE Glucose Meter 4. Continue to press the OK button until you set the Date Form Screen. The date format (m/d or d.m) is blinking. 5. To select Month/Day/Year (m/d) or Day.Month.Year (d.m), press the or . button, then press the OK button.
-
Page 37: Technical Information: User Accuracy
Table 1: System accuracy results for glucose concentration < 75 mg/dL Table 2: System intermediate precision results for Contour next ONE meter using Contour next test strips Table 3: System accuracy results for glucose concentrations between 32.2 mg/dL and 458 mg/dL V1.0... -
Page 38: Technical Information: Precision
10 times on each of 10 instruments for a total of 300 readings. The following precision results were obtained. Table 1: System repeatability results for Contour Next ONE meter using Contour Next test strips PAGE 38 REMOTE CARE PARTNERS... - Page 39 USER GUIDE Intermediate measurement precision (which includes variability across multiple days) was evaluated using control solutions at 3 glucose levels. With each control solution, each of 3 lots of Contour Next test strips was tested once on each of 10 instruments on 10 separate days for a total of 300 readings.
-
Page 40: Symptoms Of High Or Low Blood Glucose
CONTOUR® NEXT ONE Glucose Meter SYMPTOMS OF HIGH OR LOW BLOOD GLUCOSE You can better understand your test results by being aware of high or low blood glucose symptoms. According to the American Diabetes Association (www.diabetes.org), some of the most common symptoms are: Low blood glucose (Hypoglycemia): shakiness passing out... -
Page 41: Specifications
USER GUIDE SPECIFICATIONS Test Sample: Capillary whole blood only Test Result: Referenced to plasma/serum glucose Sample Volume: 0.6 μL Measuring Range: 20 mg/dL–600 mg/dL of glucose in blood Countdown Time: 5 seconds Memory: Stores most recent 800 test results Battery Type: Two 3-volt CR2032 or DL2032 coin cell batteries, 225 mAh capacity Battery Life: Approximately 1000 tests (1 yr. -
Page 42: Symbols Used
CONTOUR® NEXT ONE Glucose Meter other nearby electronic equipment, nor are emissions from nearby electronic equipment likely to interfere with the Contour Next ONE meter. SYMBOLS USED The following symbols are used throughout the product labeling for the C ONE blood... -
Page 43: References
USER GUIDE Comparison Options: The Contour next ONE system is designed for use with capillary whole blood. Comparison with a laboratory method must be done simultaneously with aliquots of the same sample. NOTE: Glucose concentrations drop rapidly due to glycolysis (approximately 5%–7% per hour). -
Page 44: Warranty
CONTOUR® NEXT ONE Glucose Meter characteristics and perfusion index. Mayo Clinic Proceedings. 2008;83(4):400-405. American Diabetes Association. Standards of medical care in diabetes—2016. Diabetes Care. 2016;39(supplement 1):S15. Burtis CA, Ashwood ER, editors. Tietz Fundamentals of Clinical Chemistry. 5th edition. Philadelphia, PA: WB SaundersCo; 2001;444. WARRANTY Manufacturer's Warranty: Ascensia Diabetes Care warrants to the original purchaser that this... - Page 45 Contour next test strips, and therefore does not warrant the performance of the Contour next ONE meter when used with any test strips other than Contour next test strips or when the Contour next test strip is altered or modified in any manner.
- Page 46 CONTOUR® NEXT ONE Glucose Meter OF REPLACEMENT, DESCRIBED ABOVE, IS THE ONLY OBLIGATION OF ASCENSIA DIABETES CARE UNDER THIS WARRANTY. 9. IN NO EVENT SHALL ASCENSIA DIABETES CARE BE LIABLE 10. FOR INDIRECT, SPECIAL OR CONSEQUENTIAL DAMAGES, EVEN IF ASCENSIA DIABETES CARE HAS BEEN ADVISED OF THE POSSIBILITY OF SUCH DAMAGES.
-
Page 47: Contact Information And Notices
USER GUIDE CONTACT INFORMATION AND NOTICES Remote Care Partners 855-477-7000 www.remotecarepartners.com FCC Compliance Statement This equipment has been tested and found to comply with the limits for a Class B digital device, pursuant to Part 15 of the FCC Rules. These limits are designed to provide reasonable protection against harmful interference in a residential installation. - Page 48 CONTOUR® NEXT ONE Glucose Meter • Connect the equipment into an outlet different from that to which the receiver is connected. • Consult the dealer or an experienced radio/TV technician for help. PAGE 48 REMOTE CARE PARTNERS V1.0...
Need help?
Do you have a question about the CONTOUR NEXT ONE and is the answer not in the manual?
Questions and answers