Advertisement
Available languages
Available languages
Quick Links
Advertisement

Summary of Contents for babyjogger City tour 2
- Page 1 ASSEMBLY INSTRUCTIONS babyjogger.com INSTRUCCIONES PARA EL ENSAMBLAJE ©2019 NWL0000880831C 6/19 IMPORTANT: Read carefully and keep for future reference. Your child’ s safety may be affected if you do not follow these instructions.
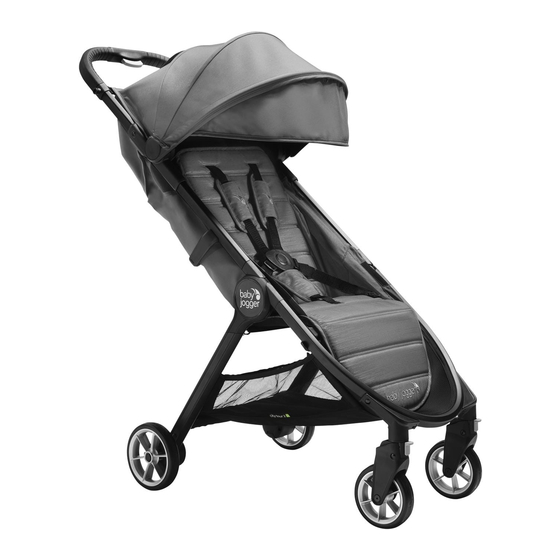
- Page 2 Handlebar Swivel/Lock Canopy Front Wheel Canopy Extension Handlebar Fold Release Button Harness Pads and Buckle Pad Handlebar Fold Button Harness Buckle Parking Brake Rear Wheel Rear Wheel Release Button Storage Basket Front Wheel Release Button Leg Support Auto-lock Footwell...
- Page 3 CLICK CLICK...
- Page 4 CLICK...
- Page 8 CLICK...
- Page 9 WARNING IMPORTANT - Keep these instructions for • Stroller is not meant to be used for future reference. transporting children up or down stairs or Read these instructions carefully before escalators. Damage resulting to stroller use. Your child’ s safety may be affected if will not be covered under warranty.
-
Page 10: Front Wheel
FRAME REAR WHEELS 1 Unpack the stroller frame from the 8 Installation box and set the wheels aside. • Align the rear wheel axle with the Unlock the stroller by pulling the wheel mount on the stroller frame auto-lock lever. and insert it into the wheel mount 2 Pull the lower front frame of the until it locks into place. -
Page 11: Basket Removal
30 From underneath the stroller, WARNING: Always use the crotch unfasten the snaps of the basket strap in combination with the near the rear of the stroller. shoulder straps and waist belt. 31 At the rear of the stroller, push up on 16 Slide the harness pads up to access the hanging clips to remove them plastic guide on strap. -
Page 12: Care And Maintenance
CARE AND MAINTENANCE To preserve the longevity of your stroller, STORING it is important to perform simple, regular • Sunshine can fade seat fabric and dry maintenance. From time to time, make sure out tires, so storing your stroller indoors that the joints and folding areas are still in will prolong its good looks. - Page 13 If your stroller was purchased outside of the United States, please contact the distributor in the country nearest you. Their contact information can be found on our website at http://www.babyjogger.com. Claims for warranty outside of the country in which the product was purchased may incur shipping charges.
- Page 14 Manillar Traba antigiratoria Capota Rueda delantera Extensión de la capota Botón de liberación de pliegue del manillar Almohadillas del arnés y de la hebilla 13 Botón de pliegue del manillar Hebilla del arnés Freno de estacionamiento Rueda trasera Botón de liberación de las ruedas traseras Canasta de almacenamiento Botón de liberación de las ruedas delanteras Apoyapiés...
- Page 15 ADVERTENCIA IMPORTANTE – Guarde estas Daños resultantes al cochecito no estarán instrucciones para referencia futura. cubiertos bajo la garantía. Lea estas instrucciones detenidamente • Este cochecito no reemplaza una cama antes del uso. La seguridad de su niño o cuna. En caso de que su niño necesite podría verse afectada si no cumple estas dormir, debe ponerlo en una cama, cuna o instrucciones.
- Page 16 ARMAZÓN en el montante de la rueda hasta 1 Desempaque el armazón del que se trabe en su lugar. Escuchará cochecito de la caja y deje a un sonido. un lado las ruedas. Destrabe el • Tire suavemente de la rueda cochecito tirando la palanca de traba trasera para asegurarse de que esté...
- Page 17 ADVERTENCIA: Evite serias 26 Levante el soporte para las lesiones causadas por caídas o pantorrillas y desabroche la tira de resbalones. Ajuste y sujete siempre sujeción que hay debajo del soporte correctamente el arnés de seguridad. para las piernas. ADVERTENCIA: Use siempre 27 Retire la tela del asiento de la barra la correa de la entrepierna en del soporte para las pantorrillas.
- Page 18 40 Desenganche las seis tiras de sujeción situadas en el respaldo del asiento. 41 Retire la tela del asiento de los canales del armazón situada en la parte superior del asiento. ADVERTENCIA: Asegúrese de que todos los sujetadores estén correctamente cerrados al volver a sujetar la tela del asiento.
-
Page 19: Cuidado Y Mantenimiento
CUIDADO Y MANTENIMIENTO Para preservar la longevidad de su Cuidado de las ruedas cochecito, es importante realizar tareas • Se pueden limpiar las ruedas usando periódicas simples de mantenimiento. un trapo húmedo. Se deberá secarlas De vez en cuando, asegúrese de que las completamente con una toalla o trapo uniones y lugares con pliegues todavía suave. - Page 20 Si su cochecito fue comprado fuera de los Estados Unidos, por favor comuníquese con el distribuidor en el país más cercano. Se puede encontrar la información de contacto en nuestro sitio web en http://www.babyjogger.com. Las reclamaciones por garantía fuera del país en el que se compró el producto podrían incurrir cargos por envío.
- Page 24 Baby Jogger, LLC 6655 Peachtree-Dunwoody Rd. NE • Atlanta, GA 30328 www.babyjogger.com...
Need help?
Do you have a question about the City tour 2 and is the answer not in the manual?
Questions and answers